Thursday, June 28, 2012

Update to the SAP on Oracle -> Windows/SQL Server OS/DB Migration FAQ

The most time consuming part of a OS/DB migration is almost always extracting the data off the legacy UNIX system, usually because these systems are several years old and are far slower than modern Intel or AMD commodity hardware.  For example the SAPS rating on a modern HP DL 580 G7 is over 57,000 according to SAP's official benchmark site
One of the most effective ways of speeding up the export of data from UNIX/Oracle to Win/SQL is to run the SAP export processes (called R3LOAD) on a separate Windows Intel server.  This offers two advantages (1) the CPU load of running the R3LOAD processes is removed from the UNIX server and more CPU and memory is available for Oracle (2) R3LOAD can run on modern Intel/AMD servers much faster than older UNIX systems.
Please check section #10 of the document for more information and please feel free to post questions about OS/DB Migration to SQL Server in this blog.
Thanks
Post Script - Here are some Step by Step procedures for an export from Oracle using a Windows R3LOAD server
1.      Download the SAP System Copy Guide
2.      Clean the SAP data dictionary and make sure DB02 -> Missing Tables/Indexes is clean
3.      Clean QCM tables SE14 -> Delete temporary tables or Invalid tables
4.      Stop SAP on the source system
5.      Connect a Windows/Intel server as per my FAQ – see section 10 – you will need to copy the TNSNAMES.ORA from the Unix/Oracle server and place this on the Wintel server in the path = TNS_ADMIN 
6.      Make sure r3load –testconnect works (replace c:\export with the directory where you have about 300-400GB free)
7.      Copy Migmon.sar, Migtime.sar and strsplitter.sar off the Netweaver master Installation DVD and un-sar them in c:\export
8.      Run r3ldctl –l logfilename –p c:\export              
9.      Run this command and keep output in a Text file called tablefile.txt
set lines 100 pages 200
col Table format a40
col Owner format a10
col MB format 999,999,999
select owner "Owner", segment_name "Table", bytes/1024/1024 "MB" from dba_segments where bytes > 100*1024*1024 and segment_type like 'TAB%' order by owner asc, bytes asc;
10.   Run this command
str_splitter.bat -strDirs c:\export\abap\data -outputDir c:\export\abap\data - tableFile tablefile.txt

11.   Run this command on the top 10 or 20 tables
r3ta -f c:\export\abap\data\
.str -l
whr.log -o c:\export\abap\data\
.WHR -table
%
12.   Run this command
C:\export>where_splitter.bat -whereDir c:\export\abap\data\ -strDir c:\export\abap\data -outputDir c:\export\abap\data -whereLimit 1
13.   Configure the export monitor.properties file.  Here you must specify the template file, export directory and number of R3LOAD processes.  If you have any problem, email me the file
14.   System is now ready for export.  Open a command prompt on the Wintel server and type export_monitor.bat
15.   System will now export
 **************************************************************************************************
Here is the process for doing the import

1.      Check the Export Logs and ensure there are no errors - open a Command Prompt and type Findstr /C:ERROR: \*.log
2.      Configure a separate R3LOAD server.  The best R3LOAD server is a 2 processor commodity server with a high clock speed.  So far the Intel Nehalem EP 5680 has proved to be the most effective, though AMD produces good results as well.  Follow step #10 in the OS/DB Migration FAQ
3.      Install Windows 2008 R2 Enterprise Edition x64 – an evaluation copy can be downloaded from http://www.microsoft.com/windowsserver2008/en/us/trial-software.aspx
4.      Create Domain users SAPService and adm (local users can be used as well – set the password the same on the SQL DB server and the R3LOAD server, however it is recommended to user Domain users for SAP systems)
5.      Install SQL Server 2008 R2 and apply the latest CU or Service Pack – check http://blogs.msdn.com/b/sqlreleaseservices/default.aspx.  An evaluation copy of SQL 2008 R2 can be downloaded from http://www.microsoft.com/sqlserver/2008/en/us/trial-software.aspx.  It is recommended to use a separate server for SQL and a separate server for R3LOAD  
6.      Create the SAP Database on the SQL Database Server using this script. 
-- Sample script to create SAP Database
-- Most Medium Size SAP systems need 8 or 16 datafiles, 16 is generally quite common
-- Note: only 2 datafiles per LUN/disk and separate disk for Transaction Log
CREATE DATABASE [SID] ON  PRIMARY
( NAME = N'SIDDATA1', FILENAME = N'F:\SIDDATA1\SIDDATA1.mdf' , SIZE = 100GB , FILEGROWTH = 1GB ),
( NAME = N'SIDDATA2', FILENAME = N'F:\SIDDATA2\SIDDATA2.ndf' , SIZE = 100GB , FILEGROWTH = 1GB ),
( NAME = N'SIDDATA3', FILENAME = N'G:\SIDDATA3\SIDDATA3.ndf' , SIZE = 100GB , FILEGROWTH = 1GB ),
( NAME = N'SIDDATA4', FILENAME = N'G:\SIDDATA4\SIDDATA4.ndf' , SIZE = 100GB , FILEGROWTH = 1GB ),
( NAME = N'SIDDATA5', FILENAME = N'H:\SIDDATA5\SIDDATA5.ndf' , SIZE = 100GB , FILEGROWTH = 1GB ),
( NAME = N'SIDDATA6', FILENAME = N'H:\SIDDATA6\SIDDATA6.ndf' , SIZE = 100GB , FILEGROWTH = 1GB ),
( NAME = N'SIDDATA7', FILENAME = N'I:\SIDDATA7\SIDDATA7.ndf' , SIZE = 100GB , FILEGROWTH = 1GB ),
( NAME = N'SIDDATA8', FILENAME = N'I:\SIDDATA8\SIDDATA8.ndf' , SIZE = 100GB , FILEGROWTH = 1GB )
LOG ON
( NAME = N'SIDLOG1', FILENAME = N'L:\SIDLOG1\SIDLOG1.ldf' , SIZE = 80GB , FILEGROWTH = 5GB)
ALTER DATABASE [SID] SET AUTO_CREATE_STATISTICS ON
GO
ALTER DATABASE [SID] SET AUTO_SHRINK OFF
GO
ALTER DATABASE [SID] SET AUTO_UPDATE_STATISTICS ON
GO
ALTER DATABASE [SID] SET AUTO_UPDATE_STATISTICS_ASYNC ON
GO
ALTER DATABASE [SID] SET RECOVERY SIMPLE
GO
ALTER DATABASE [SID] SET PAGE_VERIFY CHECKSUM 
GO

7.      Download the zip file attached to OSS Note 551915 – this contains a script that creates the require database users and mapping between Windows user account and database logins
8.      Copy the latest MIGMON.SAR, R3LOAD.EXE and DBSL onto the R3LOAD server.  MIGMON.SAR can be downloaded or copied of the Netweaver Installation Master DVD
9.      Run R3LOAD –testconnect and ensure connection is successful
10.   If required create a file called importorderby.txt.  this file can be used to prioritize certain tables/packages so they start first otherwise Migmon will prioritize by size
11.   Run sapcar –xvf migmon.sar
12.   Edit the file specified in ddlFile=c:\export\ABAP\DB\DDLMSS.TPL  and set system to import PAGE compressed as per section #19 in the OS/DB Migration FAQ     
13.   Configure the import_monitor_cmd.properties file (change “c:\export” as needed)

# Import Monitor options
#
# List of import directories, separator on Windows ; on UNIX :
importDirs= c:\export\abap\data\

# Installation directory
installDir=c:\import

# Package order: name | size | file with package names
orderBy=c:\import\importorderby.txt

# DDL control file, default is DDL.TPL
ddlFile=c:\export\ABAP\DB\DDLMSS.TPL

# Optional path of R3load executable
r3loadExe=c:\import\R3load.exe

# Generation of task files: yes | no
tskFiles=yes

# DB code page for the target database
dbCodepage=4103

# Migration key
migrationKey=

# Additional R3load arguments for LOAD phase
loadArgs=-stop_on_error -merge_bck -loadprocedure fast

# Number of parallel import jobs
jobNum=160

# Trace level
trace=all

14.   Set SQL Server Trace Flags 1117, 610 and 3917.  Ensure SQL Server Logging mode is set to SIMPLE
15.   If required limit SQL Server Index build memory as per section 22. m. in the OS/DB Migration FAQ
16.   Set environment variable BCP_LOB=1 and BCP_BATCH_SIZE=50000
17.   Run Import_monitor.bat
18.   Migmon will import the system
19.   Check logs – open a Command Prompt and type Findstr /C:ERROR: \*.log
20.   Run Migration Time Analyzer as per section #6 of  OS/DB Migration FAQ (adjust importorderby.txt if needed)
21.   Run SAPInst -> Additional Lifecycle Tasks -> System Copy -> Target System.  At the appropriate menu screen select “Homogenous System Copy Backup/Restore or Attach”.  The reason for not selecting “R3Load based system copy” is that we have manually performed these steps already. 
22.   Remove SQL Server Trace Flags 610 and 3917
23.   Remove environment variable BCP_LOB=1 and BCP_BATCH_SIZE=50000
24.   Set SQL Recovery mode to FULL
25.   Run Full Backup with Backup compression
26.   Follow post processing steps as per SAP system copy guide
27.   Compare database size and backup sizes with Oracle.  The SQL database should be ~25% of the original size on Oracle and much faster and easier to backup and administer
28.   Compare performance on SQL 2008 R2 on powerful new low cost Intel/AMD commodity servers.  2 processor Intel servers with 96-128GB RAM should cost absolutely no more than $12,000 to $15,000 USD (including HBA, RAM, CPU & 3 years support) and can easily outperform UNIX/Oracle servers that cost hundreds of thousands of dollars, if not millions.
 Please feel free to post questions in this blog post and if you wish to share the compression ratios and performance results other customers may find this useful.
Note: It is possible to do the entire process via the SAPInst GUI, however this has some restrictions and also forces customers to run steps such as R3 Size Check, something that takes a long time and is not required for SQL Server. 
Good luck!

Tuesday, April 10, 2012

Downloading .sca files (SAP_JTECHS.sca, SAP_BUILDT.sca, SAP-JEE.sca)


The .sca files can be downloaded from service.sap.com/swdc.
For downloading SAP_JTECHS.sca:

service.sap.com/swdc --> Support Packages and Patches --> " SAP NetWeaver" --> SAP NETWEAVER" --> SAP NETWEAVER 2004S" --> Entry by Component" -->Application Server Java --> SAP JAVA TECH SERVICES 7.00 --> #OS independent

For downloading SAP_BUILDT.sca:

service.sap.com/swdc --> Support Packages and Patches --> " SAP NetWeaver" --> SAP NETWEAVER" --> SAP NETWEAVER 2004S" --> Entry by Component" -->Application Server Java --> DI BUILD TOOL 7.00 --> #OS independent

For downloading SAP-JEE.sca:

service.sap.com/swdc --> Support Packages and Patches --> " SAP NetWeaver" --> SAP NETWEAVER" --> SAP NETWEAVER 2004S" --> Entry by Component" -->Application Server Java --> SAP J2EE ENGINE 7.00 --> #OS independent

Monday, April 9, 2012

SAP idle session time out / Logging off inactive users


Logging off the inactive users is not set up by default. Setting up the feature of logging off the users improves the security as unattended terminals do not stay active indefinitely.
To activate automatic logging off, do the following:
  • Go to Profile Maintenance by choosing Tools --> CCMS --> Configuration  --> Profile Maintenance or the transaction RZ11.
  • Maintain the parameter rdisp/gui_auto_logout. Enter the required number of seconds of inactivity before the user is logged off automatically.
To deactivate automatic logoff, delete the parameter from the profile(s) or set the value '0'.

Friday, April 6, 2012

Downloading pre-configured Smart Forms


Procedure to download the pre-configured Smart Forms is explained in the SAP Note 595812
Detailed information regarding the Pre-configured Smart Forms is available at:

http://service.sap.com/preconfiguredforms OR

http://service.sap.com/smb/development/preconfiguredforms.

To download pre-configured Smart Forms package:
  • Go to http://service.sap.com/installations, select tab "download".
  • On the right hand side screen, locate navigation tree node
    SAP Software Distribution Center->Download->Installations and Upgrades->Entry by Application Group.
  • In the main window (right hand side), follow the path SAP Best Practices->Best Practices for mySAP All-in-One-> PRECONFIGURED SMART FORMS. Different versions of pre-configured Smart Forms are available here for download.

Thursday, April 5, 2012

How to get List of transactions executed by a User in a specific period of time


To get the list of transactions executed by a user in a specific period of time:
  • Go to ST03. Select choose for analysis. Choose only one application server at a time in case you have multiple application servers. Choose time period of your choice.
  • In the next screen from menu choose GO TO-->PROFILES->-USER PROFILES. Here you will get the list on users who have worked on that application server.
  • Double click on the required user and you will get all the transactions he/she has executed.
  • In case you select TOTAL in step 1 and then follow the steps 2 and 3 you will only get the list of application server on which the user has worked and not the transaction details.

Wednesday, April 4, 2012

Do we need to really log-out and log-in again to make authorization changes effective?


Whenever any changes were made to the user authorizations, normally it is required to log-out and log-in again to make these changes effective.

Here is an alternative:

Execute the report RSUSR405 in SE38. This would refresh all user-related buffers and changes to the authorizations are made effective immediately..

Tuesday, April 3, 2012

Differences between the transactions SE09 and SE10


SE09 is the transaction code for workbench organizer. Workbench organizer is the set of utilities for development change management. All Development changes are tracked via Workbench organizer.

SE10 is for Customizing organizer. Customizing organizer is the set of tools for customizing change management. All customizing changes are tracked via customizing organizer.
SE01 is the main screen of the Change and transport Organizer. From here the administrator can achieve all tasks related to transport requests - such as create, change, view logs, display client/delivery transports, etc. SE09 and SE10 can also be accessed from here. However, not all developers might be granted access to this transaction.

Monday, April 2, 2012

How to check Speed & Quality of User Network Connection from SAP

If someone want to check speed and quality or IP address of the network connection, this can be checked by SAP system.

Following Procedure can be followed.

User Transaction OS01


2. Click on the presentation Server and then click on the change view ‘tab’


3. Here you can pick the network IP address & click on “10*Ping” tab:


Here we can find the details. For better network speed switch to desired presentation server.

Friday, March 30, 2012

Report RSBTCDEL2 to delete old jobs


The job SAP_REORG_JOBS is a standard job which runs a report RSBTCDEL2 to delete old, canceled, inconsistent, non-deleted jobs from the system. But the SAP systems older than release 4.7 used RSBTCDEL report to delete the old jobs. But in those systems, after upgrade it may not run and create a dumpTSV_TNEW_PAGE_ALLOC_FAILED as the old jobs get accumulated and cause memory problem.
Solution: So in those systems we need to schedule a job with report RSBTCDEL2 and variant which specifies the time range after which the jobs need to get deleted from the system. To create a new variant for the report RSBTCDEL2 we need to know the time range after which the jobs need to get deleted from the client.

1. Create a new variant in Transaction SE38 specifying the number of day’s range after which the jobs need to get deleted from the system.


2. Change the job from released to scheduled and delete the old RSBTCDEL report. Schedule it with the new job RSBTCDEL2


click on save
The job will now work fine since the program and Variant have been replaced.

Thursday, March 29, 2012

SAP Security related activities in Upgrade

The SAP system profile parameter auth/no_check_in_some_cases has the value
“Y”. If the profile parameter is set to .N, the value must be changed. (This ensures better security).

If roles were already used in the source release, they must be updated. Transactions that were selected in the menu of existing roles can be protected using additional authorization objects in the target release. This means that tables USOBT_C and USOBX_C have to be updated as well as the existing roles.

The SU25 tcode is used for to fill the customer tables of the profile generator the first time the profile generator is used, or update the customer tables after an upgrade.

1. SU25
Step 2A

Compares the new USOBT and USOBX tables with USOBT_C and USOBX_C.
This compares the Profile Generator data from the previous release with the data for
the current release. New default values are written in the customer tables for the
Profile Generator

Step 2B
Add any new transactions/updates to tables USOBX_C and USOBT_C.

If you have made changes to the check indicators or field values in transaction
SU24, you can compare these with the new SAP defaults. You can see the values
delivered by SAP and the values that you changed next to each other, and can make
an adjustment, if desired.

Hint:
Steps 2A and 2B make changes to the customer tables of the Profile Generator.
If you want to transport these changes, choose step 3 in transaction .SU25. Before implementing any changes in system, take corresponding business approval for all role changes. The step 2C and 2D step will clearly identify the roles affected and new tcodes introduced in new systems.


Step 2C

This step guides you through all the roles that are affected by newly added authorization checks and that have to be changed to correspond. The corresponding authorization profiles need to be edited and regenerated. You can jump directly to role maintenance.

SU25, 2C step also contains the new SAP roles introduced.

If you go to one by one role, there are some authorization objects that are got affected during upgrade. We can categorize these authorization objects as below:-

1. Standard New – These are new authorization objects that are introduced in new system for corresponding tcode.

2. Manually new - It shows the authorization objects which were manually added in old system. Some of the values got updated for this also.
3. Standard Updated - Updated means, in old system if you have kept the standard values as it is, SAP has updated these standard values (u can check this one in SU24 check indicators).
4. Maintained New- Some of the organizational values introduced as field in authorization object.

After maintaining all new authorization objects, you can save it and generate the profile. If you get back to SU25 2C step shows all the roles with green signal. Means all roles saved and generated.

SU25, 2C step also contains the new SAP roles introduced.
After generating all profiles in SU25 2C step, you can jump to 2D step.

Step 2D
If you execute this step, it will show the list of roles and old tcode and corresponding new tcode.
If business wants to use new tcode, then u can replace old tcodes by new one by clicking on automatically adjust menu. Otherwise go to manually adjust menu and generate the profile.
The new tcodes are introduced in 2D step, this doesn't means the old tcodes are no longer exists in new system. We have to check manually for each and every tcode.Some tcode does not exists in new systems. FOr e.g. RZ02 is replaced by RZ20 in ECC6. RZ02 no longer exists in ECC6.

STEP 3
This step transports the changes made in steps 1, 2a, and 2b. Tailoring the Authorization Checks .This area is used to make changes to the authorization checks.

STEP 4
Changes to the check indicators are made in step 4. You can also go to step 4 by calling transaction-SU24.

You can then change an authorization check within a transaction.

1. When a profile to grant the user authorization to execute transaction is generated, the authorizations are only added the Profile Generator when the check indicator is set to Check/Maintain.
2. If the check indicator is set to do not check, the system does not check the authorization object of the relevant transaction.

Review Items:-
Security Related Parameters
You can compare and check security related parameters from old release to current release.
Review users (via SU01) to check for any new or changed fields on the user masters (Check especially background user-ID for authorizations, to avoid cancellation of batch jobs).

Wednesday, March 28, 2012

Time Zone conflict between 000 client and other clients in SAP

While executing the transaction code ST03N in SAP some time problem comes that there is a conflicts in Time Zone between 000 and other clients in the same system.

Solution:-

1) Execute the transaction code stzac in both of the respective clients.


2) Check whether System Time Zone and User's Default Time Zone are same in both the clients.


3) If not the maintain both the Time Zone i.e., System Time Zone and User's defaults Time Zone Same in both the clients.

While Saving it will create a Transport Request.

Again check with the Transaction Code ST03N you will find conflict has been resolved

Tuesday, March 27, 2012

How to disable Import All option from STMS in SAP


How to Remove Import All Option from STMS in SAP

Any changes made in the development server needs to be transported to the Quality server for checking and then finally in Production server.

So Importing the Transport Requests is the critical. Sometimes by mistake if one click on the button Import All in the production environment all the Transport Request which is in released status or already Imported to Production can be directly Imported to the production environment (Which may not be required in the Production). This will create great impact in the production Server.

To avoid such situation, IMPORT ALL Icon should be disabled in STMS.

Procedure to Disable IMPROT_ALL Icon in STMS:-

1) Go to STMS Tcode


2) Go to Menu Option Overview


3) Select System

4) Choose SAP SYSTEM


5) Go to Transport Tool Tab


6) Create Parameter "NO_IMPORT_ALL" with value 1 (True)

7) Save it.

Once it is done the Import_ALL icon will be Disabled from STMS.


Monday, March 26, 2012

How to Clear SCOT Error from Production Server

How to Clear SCOT error form Production Server

1) Execute SCOT transaction

2) Go to Utilities

3) Overview of Send orders

4) Go to SOST transaction and Select all error messages . You can use Tab send status for this and by using the respective tick marks.


5) Select Error Data and Repeat Data


6) Go to SM37, select the respective Jobs , Copy the Jobs and Release with an authorized user or your ID.

7) Check with SCOT transaction all error data has cleared.

Friday, March 23, 2012

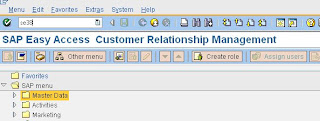
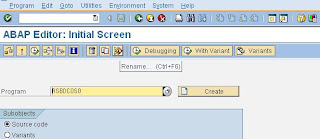
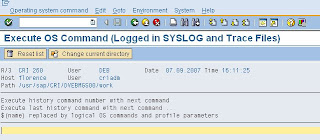
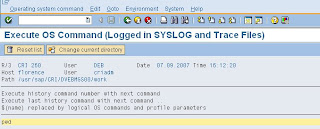
How to Execute OS Level command from SAPGUI


Step by Step Procedure to Execution of OS Level command from SAPGUI

1) Execute Transaction Code SA38/ SE38.


2) Write the report name RSBDCOS0


3) Execute the Report


4) Type any OS Level Command and do work from GUI


Thursday, March 22, 2012

How to Disable Multiple Logins on SAP


To disable multiple user logins within the same client implement this parameter in the instance profile:
login/disable_multi_gui_login = 1
If you do not use this parameter in your system, users have the ability to ignore the warning window at the time they try to login to the same client. Activating this parameter in your system will make you look good if you get audited.
In case you’re wondering how to allow multiple logins for certain key users you can implement parameter login/multi_login_users. You can list the user IDs that should be ignored if the parameter above is active in your system.

Wednesday, March 21, 2012

SAP Basis Info Toolkit


In these documents you will get tips and tricks of Basis Operations on Windows,UNIX and Linux.Besides you will get answer to those questions;
Backups
what do I need to backup?
how often do I need to backup?
what are my backup options?
Client Tasks
add a client?
add a logical system ID to be assigned to a client?
change a client?
copy one client to another in the same R/3 system?
copy one client to another in different R/3 systems?
copy only user master data from one client to another?
delete a client?
lock a client so configuration changes cannot be made?
verify that a client copy ran successfully?
view all past client copies for a client?
Communications Tasks
add a RFC connection?
delete a RFC connection?
modify a RFC connection?
verify one R/3 system is talking to another?
Database Tasks
perform Database Stats, Check Database, and Backup Jobs – MS SQL Server?
perform Database Stats, Check Database, and Backup Jobs – Oracle?
Job Tasks
change the start time/date for a scheduled job?
clean out old job logs?
delete a scheduled job?
delete a running job?
schedule a new job to run?
verify that a job has run successfully?
Printer Tasks
add a printer?
create a new Frontend aka Local aka Desktop Printer?
reprint a document that has already printed?
reroute a printer output request?
reset the cache for a printer?
view a list of all printer output requests?
view a list of the output requests for one printer only?
Security Tasks
attach a role to a user?
attach a user to a role?
copy an existing role to a new role?
create a user role?
delete a user role?
grant a transaction to a user?
modify a user role?
move roles from one client to another?
revoke an authorization from a user?
revoke a transaction from a user?
Support Package and Binary Patch Tasks
apply a SPAM/SAINT update?
apply kernel patches?
apply other SAP binary patches?
apply support packages?
check for New SPAM Updates, Support Packages and Kernel Patches?
download a kernel patch from SAP Marketplace?
download a SPAM/SAINT Update?
download a support package from SAP Marketplace?
download other SAP binary patches?
find your Current SPAM Update and Support Package Level
know when SAP releases new fixes for our SAP software?
ready a kernel patch for application?
find SAP’s most current patches?
find your Current Kernel Patch Level?
find your Current SPAM Update and Support Package Level?
know when SAP releases new fixes for our SAP software?
ready a kernel patch for application?
ready a SPAM/SAINT update or Support Package for application?
ready other SAP binary patches for application?
System Tasks
add a system parameter?
apply a SAP (OSS) note?
check that the system parameters are valid?
delete a system parameter?
generate a developer’s key for a programmer?
generate an object key to change a SAP-owned object?
how do I make server files viewable from SAP?
keep all users out of a transaction?
modify a system parameter?
open a service connection for SAP to come into my system?
reclaim system space from obsolete temporary objects?
recompile all ABAP programs in a R/3 system?
send a message to all connected users?
send a message to one connected user?
start R/3?
start saprouter (OSS Link)?
start the OS collector?
stop a SAP work process?
stop R/3?
stop saprouter?
stop the OS collector?
stop the R/3 subsystem?
verify that our link to SAP is up?
verify that R/3 is up?
verify the status of saprouter?
view a short dump received by a user?
view all processes currently running?
view all system locks?
view all table locks?
view all update locks?
Transport Tasks
add a change request to a transport queue?
add a new SAP Instance to an Existing TMS Domain?
automate the Transport Process?
configure TMS – Transport Management System – for the First Time?
configure TMS to Use SAP’s Quality Assurance Functionality?
re-Transport One or Several Change Requests at Once?
transport a change from one R/3 system to another?
transport several change requests at once?
verify that the transport system is up and running?
view a history of what changes have been transported?
use Target Groups to Transport to Mulitple Clients to Different Instances?
User Tasks
add a user?
add an ITS user?
change a user’s password?
change several users at once?
copy an existing user to a new user?
delete a user?
delete an ITS user?
drop a connected user?
get a list of all users in a client?
lock a user?
lock all users at once?
modify a user?
modify an ITS user?
produce various user reports?
start an audit trace for a specific user?
view a list of all users currently connected?
Web and Internet Tasks
start and stop the SAP IGS Server?
Working with the SAP Marketplace
apply a SAP License Key the new way?
apply a SAP License Key the old way?
check the status of a request License Key?
find your Hardware Key?
generate a Developer’s Key for a Programmer?
generate an Object Key for a Programmer?
open a Problem via SAP Marketplace?
open a Service Connection for SAP Support to allow SAP access?
request a new License Key?
request a SAP Marketplace User ID aka “S” Number aka OSS User ID?