Most of the times you might have question in your mind that why you give sap_all and sap_new everytime we create admin user (Altough some people used to give sap_all to every one ).So here i am sharing my knowledge about differnce between these 2 :
SAP_NEW:-
SAP_NEW is a SAP standard Profile which is usually assigned to system users temporarily during an upgrade to ensure that the activities and operations of SAP users is not hindered, during the Upgrade. It contains all the necessary objects and transactions for the users to continue their work during the upgrade. It should be withdrawn once all upgrade activities is completed, and replaced with the now modified Roles as it has extensive authorizations than required.
SAP_ALL:-
SAP_ALL is a SAP standard profile, which is used on need basis, to resolve particular issues which may arise during the usage of SAP. It is used by Administrators/Developers only and is applied on a need to use basis, then withdrawn. It contains all SAP system objects and Transactions. SAP_ALL is very critical and only SAP* contains SAP_ALL attached to it in the production system. No other dialog users have SAP_ALL attached to them.
SAP_NEW is used in the Production environment during a version upgrade whereas SAP_ALL shouldn't be or not allowed be used in Production except where necessary, in a controlled manner with all proper approvals from the customer.
Thursday, June 30, 2011
How to resize redolog groups on Oracle
Here is the procedure to resize the redo log group in SAP/Oracle
To check all Redolog files Run command:
Now add a group, To add a log group
After these commands, Force System for log switch
Alter system switch logfile;
Drop Existing Log groups files (Make sure no group has status active or current)
Remove these files from OS level
Now again add same Group
We can drop Log group 5,6,7,8
In case any of these groups are Active or current stage use “Alter system switch logfile"
To check all Redolog files Run command:
Select * from v$log;
Now add a group, To add a log group
Alter database add logfile group 5 ('/oracle/SID/origlogA/log_g15m1.dbf','/oracle/SID/mirrlogA/log_g15m2.dbf') size 200M;
alter database add logfile group 6 ('/oracle/SID/origlogB/log_g16m1.dbf','/oracle/SID/mirrlogB/log_g16m2.dbf') size 200M;
alter database add logfile group 7 ('/oracle/SID/origlogA/log_g17m1.dbf','/oracle/SID/mirrlogA/log_g17m2.dbf') size 200M;
alter database add logfile group 8 ('/oracle/SID/origlogB/log_g18m1.dbf','/oracle/SID/mirrlogB/log_g18m2.dbf') size 200M;
After these commands, Force System for log switch
Alter system switch logfile;
Drop Existing Log groups files (Make sure no group has status active or current)
Alter database drop logfile group 1;
Alter database drop logfile group 2;
Alter database drop logfile group 3;
Alter database drop logfile group 4;
Remove these files from OS level
Now again add same Group
alter database add logfile group 1 ('/oracle/SID/origlogA/log_g11m1.dbf','/oracle/SID/mirrlogA/log_g11m2.dbf') size 200M;
alter database add logfile group 2 ('/oracle/SID/origlogB/log_g12m1.dbf','/oracle/SID/mirrlogB/log_g12m2.dbf') size 200M;
alter database add logfile group 3 ('/oracle/SID/origlogA/log_g13m1.dbf','/oracle/SID/mirrlogA/log_g13m2.dbf') size 200M;
alter database add logfile group 4 ('/oracle/SID/origlogB/log_g14m1.dbf','/oracle/SID/mirrlogB/log_g14m2.dbf') size 200M;
We can drop Log group 5,6,7,8
In case any of these groups are Active or current stage use “Alter system switch logfile"
Alter database drop logfile group 5;
Alter database drop logfile group 6;
Alter database drop logfile group 7;
Alter database drop logfile group 8;
Oracle Upgrade From 9i To 10g (Unix Platform)
Hi All,
Here is the procedure to upgrade the oracle 9i to 10g (9.2.0.6 to 10.2.0.4) ...
Some Notes You might need in between:
1) Note 841728 - 10.2: Solutions for installation and upgrade problems
2) Note 819830 - Oracle Database 10g: Additional Information on upgrade:UNIX
3) Note 886783 - Installing Oracle 9207 Client Software on UNIX
4) Note 600141 - Oracle9i: Automatic UNDO Management
5) Note 819829 - Oracle Instant Client Installation and Configuration on Unix
6) Note 830577 - Oracle Database 10g: ORA-21700 when upgrading to 10.1/10.2
7) Note 871735 - Current patch set for Oracle 10.2.0
Prerequisites for unix system :
1. Checking the Correct UNIX Users, Groups, and Authorizations:
Enter the following commands with user orasid:
touch /oracle/write_test
rm /oracle/write_test
umask 022
2) Checking the Directory Structure
Create the staging directory /oracle/stage/102_64.
Extract OR110264.SAR from CD 51031670 to /oracle/stage/102_64
Now perform the following:
cd /oracle/stage/102_64/database OR
cd /oracle/stage/102_64/database/Disk1
mv SAP SAP_ORIG
3) Download RDBMS_SAP_64.zip from note #819830 and copy it over to the
/oracle/stage /102_64/database directory
4) Extract the zip file:
cd /oracle/stage/102_64/database OR
cd /oracle/stage/102_64/database/Disk1
Unzip RDBMS_SAP_64.zip (You should now see the directory SAP extracted which
contains the updated version of SAP-specific files)
5) Check the Oracle inventory directory /var/opt/oracle/oraInst.loc
The default location for the Oracle inventory is $ORACLE_BASE/oraInventory
6) Create the empty Oracle home directory before starting the OUI.
/oracle//102_64
7) Running the Pre-Upgrade Script
Execute the following commands:
sqlplus /nolog
SQL> connect / as sysdba
SQL> spool /tmp/pre_upgrade.log
SQL> @/oracle/stage/102_64/database/Disk1/SAP/utlu102i.sql
SQL> spool off
SQL> exit
(You can check the results of the pre-upgrade script by looking at the log file /tmp/pre_upgrade.log.)
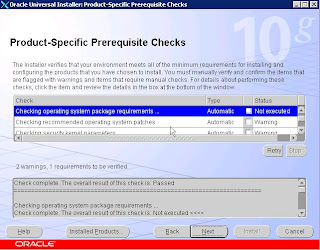
8) Checking the Prerequisites for the Oracle Universal Installer
Log in as the Oracle user ora.
Execute the following commands:
cd /oracle/stage/102_64/database/Disk1
./runInstaller –executeSysPrereqs
(If the OUI complains that the operating system version is not certified or
supported, you can ignore this.If OUI reports missing OS patches, you need to
apply these before you can continue. )
9) Download the latest version of the Oracle Client software ‒ OCL1020464.SAR
Before you start installing / extracting the Oracle client software please
shutdown the SAP application running on that host.Updating the Oracle client
software online (when the SAP system is still running) is not supported and may
result in system errors/inconsistencies.
Now do the following:
mv /oracle/client/10x_64 /oracle/client/10x_64_ORIG
mkdir /oracle/client/10x_64
IMPORTANT!! Go up to this directory, cd /oracle/client/10x_64
SAPCAR -xvf /tmp/OCL1020464.SAR
(Refer Note # 886783)
10) Execute the SQL script sapconn_role.sql as follows:
cp /oracle/stage/102_64/database/Disk1/SAP/sapconn_role.sql $ORACLE_HOME/dbs
cd $ORACLE_HOME/dbs
sqlplus /nolog @sapconn_role
11) 9. Migrating to Automatic Undo Management
Read SAP Note 600141,
12) 10. Stopping Statspack Reports (If running)
Log on as the user under which the statspack jobs run (usually PERFSTAT):
SQL> connect PERFSTAT/
SQL> select job, what from user_jobs;
This displays a list of the jobs that are currently entered under the user PERFSTAT.
Delete all jobs with the print job number:
SQL> connect PERFSTAT/
SQL> execute dbms_job.remove();
13)Checking the SYSTEM and SYSAUX Tablespace for Free space
Make sure that the SYSTEM and SYSAUX tablespaces have at least between 500 MB and 750 MB freespace.
(If your source database is Oracle 9.2, there is no SYSAUX tablespace. In this case you can ignore references to the SYSAUX tablespace in this section. )
Check Space by:
brspace –f dbshow –c tsinfo –s SYSTEM
brspace –f dbshow –c tsinfo –s SYSAUX
If the size is less then 750 MB of freespace extend the tablespace.
14) Checking for Invalid Database Objects
a). Execute the following commands:
SQL> spool invalid_objects
SQL> select unique object_name, object_type, owner from dba_objects where status ='INVALID';
SQL> @?/rdbms/admin/utlrp.sql
SQL> select unique object_name, object_type, owner from dba_objects where status ='INVALID';
SQL> spool off
A) list of invalid objects before the upgrade is now generated.Invalid Objects Before upgrade
B) Check the list of invalid objects after the upgrade.If any objects in the list from before the upgrade are also in the list of invalid objects after the upgrade, you can be sure that this is not due to the upgrade process.
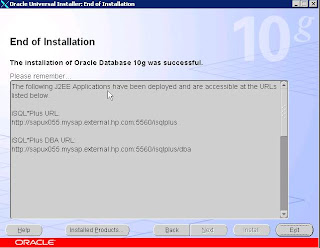
Oracle Software Installation( started )
1) Set the environment variables below by editing the files .dbenv_.sh and .dbenv_.csh in the home directory of ora.
(Do not make the changes to the environment permanent as long as the old database is still running)
a). Make sure the following environment variables are not set:
n TWO_TASK
n ORA_NLS
n ORA_NLS32
n ORA_NLS33
b). Set the following environment variables:
DISPLAY:0.0 (It is the host on which the OUI will be displayed.)
ORACLE_BASE /oracle
ORACLE_SID
ORACLE_HOME /oracle//102_64
NLS_LANG Set this to the output of the script CHECKS.SQL (/oracle/stage/102_64/database/Disk1/SAP . The database must be open before you execute the script CHECKS.SQL. )
ORA_NLS10 $ORACLE_HOME/nls/data
SAPDATA_HOME /oracle/
SHLIB_PATH $ORACLE_HOME/lib:$SHLIB_PATH
c). Include $ORACLE_HOME/bin in your PATH or path variable, replacing the existing variable with the new one:
set path = ($ORACLE_HOME/bin $path)
Check if the temporary directory (usually /tmp) has at least 400 MB of free space.
2) BackUp the Oracle Inventory
3)Running the Oracle Universal Installer
Start the OUI with the user ora as follows:
cd /oracle/stage/102_64/database/Disk1/SAP
./RUNINSTALLER
4) On The first screen press Next
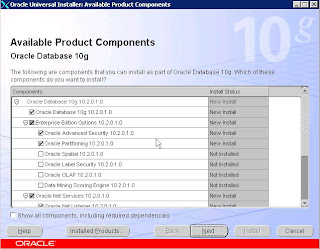
5)
6) After this press Next next and you will see this screen
7) Installing the Current Patch Set
Only have to install the latest (that is, the current) patch set.
SAP Note 871735.
51036965_4 Patch CD.
Now enter the following command to unzip and extract the installation files:
$ unzip *.zip
Stop all listeners and other processes running in the Oracle home directory, where you need to install the patch set.
cd patchset_directory/Disk1
./runInstaller
8) Specify the detail and continue with installation
Prerequisites for DB Upgrade
1. Copying and Adapting the SQL*Net Files
I. Log on as user ora.
II. If ora have environment variable TNS_ADMIN set, do the following:
a) Choose a new location for the new SQL*Net parameter files and set TNS_ADMIN to point to the new location.
b) Copy the SQL*Net parameter files from the old locationto
c) Edit the new SQL*Net files by adapting all file paths for the new directory. Be sure to adapt the value of ORACLE_HOME in the listener.ora file.
III. If ora has not set the TNS_ADMIN environment variable, Oracle first searches in /etc, in
$ORACLE_HOME/network/admin for the SQL*Net parameter files. Choose which of the following applies to your installation:
n The SQL*Net parameter files are located in directory /etc:
a) Make a backup copy of the files.
b) Edit the new SQL*Net files by adapting all file paths for the new directory. Be sure to adapt the value of ORACLE_HOME in the listener.ora file.
n The SQL*Net parameter files are located in/network/admin:
a) Copy the SQL*Net parameter files fromto .
b) Edit the new SQL*Net files by adapting all file paths for the new directory. Be sure to adapt the value of ORACLE_HOME in the listener.ora file.
IV. Since your database is still running in the old environment, do not start the listener with the new
listener.ora file at this point.
2) Shutting Down the SAP System and Oracle Listener Process
stopsap r3
lsnrctl stop
Database Upgrade( Started)
1) Checking the oratab Entry
oratab file( /etc )
a). Make sure that the oratab file contains the following entry:
::N
Where old_ORACLE_HOME stands for the path to the old oracle software installation.
b). If this entry does not exist, insert it using a text editor.
2) Starting the Database Upgrade Assistant
Start the Oracle Database Upgrade Assistant (DBUA).
Before Starting Check:
Confirm that the following environment variables point to Oracle 10.2 directories:
ORACLE_HOME points to /oracle//102_64
PATH
ORA_NLS10
LD_LIBRARY_PATH or SHLIB_PATH or LIBPATH
Before you start the DBUA make sure that the DISPLAY environment variable is correctly set.
Now start the DBUA:
cd $ORACLE_HOME/bin
./dbua
3) After this you should be able to see this
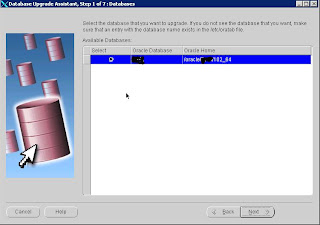
4) Choose the database SID in the database screen. And click on “Next”
5) Check the Database Assistant Information window detail after analysis. If the information
is regarding the following points, you can ignore and proceed further by clicking “yes”
(Default is “No”)
1. Stale optimizer statistics
2. Changes to Oracle connect role
3. Information on invalid objects
6) In the SYSAUX creation screen apply the following changes
1. Datafile name and location
a. Change the data file path and file name as
/oracle/SID/sapdata1/sysaux_1/sysaux.data1
b. Increase the initial size to 1000Mb
c. Select the Autoextend on check box
d. Increment 100Mb
e. Modify the selection of Maximum size value to 2000Mb from Unlimited
7) In the Recompilation of invalid objects screen
1. Choose check for the recompilation of invalid objects
2. Select the check box for disable the Archive log during the upgrade.
3. Click on “Next” to proceed
8) Select the “I already backed up my database” and choose next
9) In the “Management Options” screen disable the Configure the database with
enterprise manager option
10) In the “Management Options” screen disable the Configure the database with
enterprise manager option
11) Click Finish on the summary Screen
12) a. Conversion Started By 09:00 PM
b. Conversion End By 11:07 Pm
c. Total Conversion Time 2Hr (Approx)
Post-Upgrade Steps
1). Finalizing the Environment of the oraUser
Make sure that the changes you made to the Oracle user environment are permanently stored in the profiles (.cshrc, .dbenv_.csh, and so on).
2) Checking the Upgraded Database
a) Log onto the database as the ora user.
b) Enter the following command to start SQLPLUS:
sqlplus / as sysdba
c) Enter the following SQL commands:
A) Enter the following command to determine the release of the installed software:
SQL> select version from V$INSTANCE;
B) Enter the following command to determine the release and status of the installed database components:
SQL> select comp_id, version, status from dba_registry;
Make sure that the command returns the status VALID.
C) Check that the version returned in the previous two commands is identical.
After the upgrade check that the following document is created:
$ORACLE_HOME/assistants/dbua/doc/help/DefaultBehaviorChangesin10g.html
3) Extract the latest BR*Tools to the kernel directory /sapmnt/SID/exe
(i) Cd /sapmnt/SYS/exe
(ii) Sapcar –xvf DBATL700O10_18-20001045.SAR
4) Copy the initSID.sap from /oracle/SID/920_64/dbs directory
(i) Cd $ORACLE_HOME/dbs
(ii) Cp /oracle/SID/920_64/dbs/initSID.sap .
5) Update the permissions for the OS$ users for BR*Tools usage
i) cp /sapmnt/SID/exe/sapdba_role.sql /oracle/SID/102_64/dbs
ii) cd /oracle/SID/102_64/dbs
iii) ./sqlplus /nolog @sapdba_role SID
6) Change database compatibility by executing the following SQL command as the ora user
a) Login as oraSID
b) Sqlplus /nolog
c) Connect / as sysdba
i) SQL> alter system set compatible='10.2.0' scope = spfile;
d) Restart the Oracle database.
i) Shutdown immediate
ii) startup
7) Deactivate the Oracle recycle bin by executing the following SQL command as the ora user:
a) SQL> purge dba_recyclebin;
b) SQL> alter system set recyclebin = 'off' scope = spfile;
8) Gather Oracle optimizer statistics as follows:
a) Execute the following commands as the ora user:
b) SQL> spool $ORACLE_HOME/cfgtoollogs/dbstats.log
c) SQL> execute dbms_scheduler.disable('GATHER_STATS_JOB');
d) SQL> execute dbms_stats.gather_system_stats;
e) SQL> execute dbms_stats.gather_dictionary_stats (ESTIMATE_PERCENT => NULL,
METHOD_OPT => 'FOR ALL COLUMNS SIZE AUTO',GRANULARITY => 'ALL',
CASCADE => TRUE, OPTIONS => 'GATHER', NO_INVALIDATE => FALSE);
f) SQL> execute dbms_stats.gather_fixed_objects_stats;
g) Check the log file dbstats.log created at $ORACLE_HOME/cfgtoollogs for any errors during the gathering of statistics
9) Identify the objects that are invalid after the upgrade as follows:
a) Execute the following commands as the ora user:
b) SQL> @?/rdbms/admin/utlrp.sql;
c) SQL> spool $ORACLE_HOME/cfgtoollogs/invalid_post.log
d) SQL> select count(*) from dba_objects where status = 'INVALID';
e) SQL> select substr(owner,1,12) owner, substr(object_name,1,30) object, substr(object_type,1,30) type, status from dba_objects where status <>'VALID' order by owner;
f) SQL> spool off;
g) Check the log file to compare the invalid objects before the start of the upgrade to the upgraded system
10) Disable the following oracle parameters
a) Alter system reset commit_write scope = spfile sid=’*’;
b) Alter system reset cursor_space_for_time scope = spfile sid=’*’;
c) Alter system reset db_file_multiblock_read_count scope = spfile sid=’*’;
d) Alter system reset hash_join_enabled scope = spfile sid=’*’;
e) Alter system reset log_archive_start scope = spfile sid=’*’;
f) Alter system reset optimizer_index_cost_adj scope = spfile sid=’*’;
g) Alter system reset optimizer_mode scope = spfile sid=’*’;
h) Alter system reset statistics_level scope = spfile sid=’*’;
i) Alter system reset timed_statistics scope = spfile sid=’*’;
j) Alter system reset trace_enabled scope = spfile sid=’*’;
11) Restart the database to activate the changes
a) Sqlplus /nolog
b) Connect / as sysdba
c) Shutdown immediate;
d) Startup
12) Gather Statistics for SAP Schema
a) sqlplus /nolog
b) SQL> connect / as sysdba
c) SQL> @/oracle/stage/102_64/database/SAP/updDBSTATC10.sql
13) Update the DBCHECKORA control table after the upgrade as follows:
a) cd /oracle/stage/102_64/database/SAP
b) sqlplus sap/ @dbcheckora10upgr
14) Checking the oratab entry
a) cd /var/opt/oracle
b) Make sure that there is an entry like the following in your oratab file:
i) SID:/oracle/C11/102_64:N
15) Start the Listener process
a) Login oraSID
b) Check the status of the listener process
(i) lsnrctl staus
c) if the process is already not running, start the process
i) To start the listener lsnrctl start
16) Don’t rename the old oracle home directory, just rename the /oracle/SID/920_64 directory.
a) mv /oracle/SID/920_64/bin /oracle/SID/920_64/bin.old
17) Change the following R3 instance parameter to the new oracle home /oracle/SID/102_64.
a) DIR_ORAHOME
b) DIR_CLIENT_ORAHOME
c) DIR_SERVER_ORAHOME
18) Install the Oracle 9.2.0.7 Client software as per the note 886783
a) Login as oraSID
b) cd /oracle/client
c) mkdir 92x_64
d) cd 92x_64
e) SAPCAR –xvf /oracle/stage/920_64/client/OCL92064.SAR
That's all If you have any Problem Start Troubleshooting
Dont forget to apply SAP recommeneded opatches after this..
Here is the procedure to upgrade the oracle 9i to 10g (9.2.0.6 to 10.2.0.4) ...
Some Notes You might need in between:
1) Note 841728 - 10.2: Solutions for installation and upgrade problems
2) Note 819830 - Oracle Database 10g: Additional Information on upgrade:UNIX
3) Note 886783 - Installing Oracle 9207 Client Software on UNIX
4) Note 600141 - Oracle9i: Automatic UNDO Management
5) Note 819829 - Oracle Instant Client Installation and Configuration on Unix
6) Note 830577 - Oracle Database 10g: ORA-21700 when upgrading to 10.1/10.2
7) Note 871735 - Current patch set for Oracle 10.2.0
Prerequisites for unix system :
1. Checking the Correct UNIX Users, Groups, and Authorizations:
Enter the following commands with user orasid:
touch /oracle/write_test
rm /oracle/write_test
umask 022
2) Checking the Directory Structure
Create the staging directory /oracle/stage/102_64.
Extract OR110264.SAR from CD 51031670 to /oracle/stage/102_64
Now perform the following:
cd /oracle/stage/102_64/database OR
cd /oracle/stage/102_64/database/Disk1
mv SAP SAP_ORIG
3) Download RDBMS_SAP_64.zip from note #819830 and copy it over to the
/oracle/stage /102_64/database directory
4) Extract the zip file:
cd /oracle/stage/102_64/database OR
cd /oracle/stage/102_64/database/Disk1
Unzip RDBMS_SAP_64.zip (You should now see the directory SAP extracted which
contains the updated version of SAP-specific files)
5) Check the Oracle inventory directory /var/opt/oracle/oraInst.loc
The default location for the Oracle inventory is $ORACLE_BASE/oraInventory
6) Create the empty Oracle home directory before starting the OUI.
/oracle/
7) Running the Pre-Upgrade Script
Execute the following commands:
sqlplus /nolog
SQL> connect / as sysdba
SQL> spool /tmp/pre_upgrade.log
SQL> @/oracle/stage/102_64/database/Disk1/SAP/utlu102i.sql
SQL> spool off
SQL> exit
(You can check the results of the pre-upgrade script by looking at the log file /tmp/pre_upgrade.log.)
8) Checking the Prerequisites for the Oracle Universal Installer
Log in as the Oracle user ora
Execute the following commands:
cd /oracle/stage/102_64/database/Disk1
./runInstaller –executeSysPrereqs
(If the OUI complains that the operating system version is not certified or
supported, you can ignore this.If OUI reports missing OS patches, you need to
apply these before you can continue. )
9) Download the latest version of the Oracle Client software ‒ OCL1020464.SAR
Before you start installing / extracting the Oracle client software please
shutdown the SAP application running on that host.Updating the Oracle client
software online (when the SAP system is still running) is not supported and may
result in system errors/inconsistencies.
Now do the following:
mv /oracle/client/10x_64 /oracle/client/10x_64_ORIG
mkdir /oracle/client/10x_64
IMPORTANT!! Go up to this directory, cd /oracle/client/10x_64
SAPCAR -xvf /tmp/OCL1020464.SAR
(Refer Note # 886783)
10) Execute the SQL script sapconn_role.sql as follows:
cp /oracle/stage/102_64/database/Disk1/SAP/sapconn_role.sql $ORACLE_HOME/dbs
cd $ORACLE_HOME/dbs
sqlplus /nolog @sapconn_role
11) 9. Migrating to Automatic Undo Management
Read SAP Note 600141,
12) 10. Stopping Statspack Reports (If running)
Log on as the user under which the statspack jobs run (usually PERFSTAT):
SQL> connect PERFSTAT/
SQL> select job, what from user_jobs;
This displays a list of the jobs that are currently entered under the user PERFSTAT.
Delete all jobs with the print job number
SQL> connect PERFSTAT/
SQL> execute dbms_job.remove(
13)Checking the SYSTEM and SYSAUX Tablespace for Free space
Make sure that the SYSTEM and SYSAUX tablespaces have at least between 500 MB and 750 MB freespace.
(If your source database is Oracle 9.2, there is no SYSAUX tablespace. In this case you can ignore references to the SYSAUX tablespace in this section. )
Check Space by:
brspace –f dbshow –c tsinfo –s SYSTEM
brspace –f dbshow –c tsinfo –s SYSAUX
If the size is less then 750 MB of freespace extend the tablespace.
14) Checking for Invalid Database Objects
a). Execute the following commands:
SQL> spool invalid_objects
SQL> select unique object_name, object_type, owner from dba_objects where status ='INVALID';
SQL> @?/rdbms/admin/utlrp.sql
SQL> select unique object_name, object_type, owner from dba_objects where status ='INVALID';
SQL> spool off
A) list of invalid objects before the upgrade is now generated.Invalid Objects Before upgrade
B) Check the list of invalid objects after the upgrade.If any objects in the list from before the upgrade are also in the list of invalid objects after the upgrade, you can be sure that this is not due to the upgrade process.
Oracle Software Installation( started )
1) Set the environment variables below by editing the files .dbenv_
(Do not make the changes to the environment permanent as long as the old database is still running)
a). Make sure the following environment variables are not set:
n TWO_TASK
n ORA_NLS
n ORA_NLS32
n ORA_NLS33
b). Set the following environment variables:
DISPLAY
ORACLE_BASE /oracle
ORACLE_SID
ORACLE_HOME /oracle/
NLS_LANG Set this to the output of the script CHECKS.SQL (/oracle/stage/102_64/database/Disk1/SAP . The database must be open before you execute the script CHECKS.SQL. )
ORA_NLS10 $ORACLE_HOME/nls/data
SAPDATA_HOME /oracle/
SHLIB_PATH $ORACLE_HOME/lib:$SHLIB_PATH
c). Include $ORACLE_HOME/bin in your PATH or path variable, replacing the existing variable with the new one:
set path = ($ORACLE_HOME/bin $path)
Check if the temporary directory (usually /tmp) has at least 400 MB of free space.
2) BackUp the Oracle Inventory
3)Running the Oracle Universal Installer
Start the OUI with the user ora
cd /oracle/stage/102_64/database/Disk1/SAP
./RUNINSTALLER
4) On The first screen press Next

5)

6) After this press Next next and you will see this screen

7) Installing the Current Patch Set
Only have to install the latest (that is, the current) patch set.
SAP Note 871735.
51036965_4 Patch CD.
Now enter the following command to unzip and extract the installation files:
$ unzip *.zip
Stop all listeners and other processes running in the Oracle home directory, where you need to install the patch set.
cd patchset_directory/Disk1
./runInstaller
8) Specify the detail and continue with installation
Prerequisites for DB Upgrade
1. Copying and Adapting the SQL*Net Files
I. Log on as user ora
II. If ora
a) Choose a new location for the new SQL*Net parameter files and set TNS_ADMIN to point to the new location
b) Copy the SQL*Net parameter files from the old location
c) Edit the new SQL*Net files by adapting all file paths for the new directory. Be sure to adapt the value of ORACLE_HOME in the listener.ora file.
III. If ora
$ORACLE_HOME/network/admin for the SQL*Net parameter files. Choose which of the following applies to your installation:
n The SQL*Net parameter files are located in directory /etc:
a) Make a backup copy of the files.
b) Edit the new SQL*Net files by adapting all file paths for the new directory. Be sure to adapt the value of ORACLE_HOME in the listener.ora file.
n The SQL*Net parameter files are located in
a) Copy the SQL*Net parameter files from
b) Edit the new SQL*Net files by adapting all file paths for the new directory. Be sure to adapt the value of ORACLE_HOME in the listener.ora file.
IV. Since your database is still running in the old environment, do not start the listener with the new
listener.ora file at this point.
2) Shutting Down the SAP System and Oracle Listener Process
stopsap r3
lsnrctl stop
Database Upgrade( Started)
1) Checking the oratab Entry
oratab file( /etc )
a). Make sure that the oratab file contains the following entry:
Where old_ORACLE_HOME stands for the path to the old oracle software installation.
b). If this entry does not exist, insert it using a text editor.
2) Starting the Database Upgrade Assistant
Start the Oracle Database Upgrade Assistant (DBUA).
Before Starting Check:
Confirm that the following environment variables point to Oracle 10.2 directories:
ORACLE_HOME points to /oracle/
PATH
ORA_NLS10
LD_LIBRARY_PATH or SHLIB_PATH or LIBPATH
Before you start the DBUA make sure that the DISPLAY environment variable is correctly set.
Now start the DBUA:
cd $ORACLE_HOME/bin
./dbua
3) After this you should be able to see this

4) Choose the database SID in the database screen. And click on “Next”
5) Check the Database Assistant Information window detail after analysis. If the information
is regarding the following points, you can ignore and proceed further by clicking “yes”
(Default is “No”)
1. Stale optimizer statistics
2. Changes to Oracle connect role
3. Information on invalid objects
6) In the SYSAUX creation screen apply the following changes
1. Datafile name and location
a. Change the data file path and file name as
/oracle/SID/sapdata1/sysaux_1/sysaux.data1
b. Increase the initial size to 1000Mb
c. Select the Autoextend on check box
d. Increment 100Mb
e. Modify the selection of Maximum size value to 2000Mb from Unlimited
7) In the Recompilation of invalid objects screen
1. Choose check for the recompilation of invalid objects
2. Select the check box for disable the Archive log during the upgrade.
3. Click on “Next” to proceed
8) Select the “I already backed up my database” and choose next
9) In the “Management Options” screen disable the Configure the database with
enterprise manager option
10) In the “Management Options” screen disable the Configure the database with
enterprise manager option
11) Click Finish on the summary Screen
12) a. Conversion Started By 09:00 PM
b. Conversion End By 11:07 Pm
c. Total Conversion Time 2Hr (Approx)
Post-Upgrade Steps
1). Finalizing the Environment of the ora
Make sure that the changes you made to the Oracle user environment are permanently stored in the profiles (.cshrc, .dbenv_
2) Checking the Upgraded Database
a) Log onto the database as the ora
b) Enter the following command to start SQLPLUS:
sqlplus / as sysdba
c) Enter the following SQL commands:
A) Enter the following command to determine the release of the installed software:
SQL> select version from V$INSTANCE;
B) Enter the following command to determine the release and status of the installed database components:
SQL> select comp_id, version, status from dba_registry;
Make sure that the command returns the status VALID.
C) Check that the version returned in the previous two commands is identical.
After the upgrade check that the following document is created:
$ORACLE_HOME/assistants/dbua/doc/help/DefaultBehaviorChangesin10g.html
3) Extract the latest BR*Tools to the kernel directory /sapmnt/SID/exe
(i) Cd /sapmnt/SYS/exe
(ii) Sapcar –xvf DBATL700O10_18-20001045.SAR
4) Copy the initSID.sap from /oracle/SID/920_64/dbs directory
(i) Cd $ORACLE_HOME/dbs
(ii) Cp /oracle/SID/920_64/dbs/initSID.sap .
5) Update the permissions for the OS$ users for BR*Tools usage
i) cp /sapmnt/SID/exe/sapdba_role.sql /oracle/SID/102_64/dbs
ii) cd /oracle/SID/102_64/dbs
iii) ./sqlplus /nolog @sapdba_role SID
6) Change database compatibility by executing the following SQL command as the ora
a) Login as oraSID
b) Sqlplus /nolog
c) Connect / as sysdba
i) SQL> alter system set compatible='10.2.0' scope = spfile;
d) Restart the Oracle database.
i) Shutdown immediate
ii) startup
7) Deactivate the Oracle recycle bin by executing the following SQL command as the ora
a) SQL> purge dba_recyclebin;
b) SQL> alter system set recyclebin = 'off' scope = spfile;
8) Gather Oracle optimizer statistics as follows:
a) Execute the following commands as the ora
b) SQL> spool $ORACLE_HOME/cfgtoollogs/dbstats.log
c) SQL> execute dbms_scheduler.disable('GATHER_STATS_JOB');
d) SQL> execute dbms_stats.gather_system_stats;
e) SQL> execute dbms_stats.gather_dictionary_stats (ESTIMATE_PERCENT => NULL,
METHOD_OPT => 'FOR ALL COLUMNS SIZE AUTO',GRANULARITY => 'ALL',
CASCADE => TRUE, OPTIONS => 'GATHER', NO_INVALIDATE => FALSE);
f) SQL> execute dbms_stats.gather_fixed_objects_stats;
g) Check the log file dbstats.log created at $ORACLE_HOME/cfgtoollogs for any errors during the gathering of statistics
9) Identify the objects that are invalid after the upgrade as follows:
a) Execute the following commands as the ora
b) SQL> @?/rdbms/admin/utlrp.sql;
c) SQL> spool $ORACLE_HOME/cfgtoollogs/invalid_post.log
d) SQL> select count(*) from dba_objects where status = 'INVALID';
e) SQL> select substr(owner,1,12) owner, substr(object_name,1,30) object, substr(object_type,1,30) type, status from dba_objects where status <>'VALID' order by owner;
f) SQL> spool off;
g) Check the log file to compare the invalid objects before the start of the upgrade to the upgraded system
10) Disable the following oracle parameters
a) Alter system reset commit_write scope = spfile sid=’*’;
b) Alter system reset cursor_space_for_time scope = spfile sid=’*’;
c) Alter system reset db_file_multiblock_read_count scope = spfile sid=’*’;
d) Alter system reset hash_join_enabled scope = spfile sid=’*’;
e) Alter system reset log_archive_start scope = spfile sid=’*’;
f) Alter system reset optimizer_index_cost_adj scope = spfile sid=’*’;
g) Alter system reset optimizer_mode scope = spfile sid=’*’;
h) Alter system reset statistics_level scope = spfile sid=’*’;
i) Alter system reset timed_statistics scope = spfile sid=’*’;
j) Alter system reset trace_enabled scope = spfile sid=’*’;
11) Restart the database to activate the changes
a) Sqlplus /nolog
b) Connect / as sysdba
c) Shutdown immediate;
d) Startup
12) Gather Statistics for SAP Schema
a) sqlplus /nolog
b) SQL> connect / as sysdba
c) SQL> @/oracle/stage/102_64/database/SAP/updDBSTATC10.sql
13) Update the DBCHECKORA control table after the upgrade as follows:
a) cd /oracle/stage/102_64/database/SAP
b) sqlplus sap
14) Checking the oratab entry
a) cd /var/opt/oracle
b) Make sure that there is an entry like the following in your oratab file:
i) SID:/oracle/C11/102_64:N
15) Start the Listener process
a) Login oraSID
b) Check the status of the listener process
(i) lsnrctl staus
c) if the process is already not running, start the process
i) To start the listener lsnrctl start
16) Don’t rename the old oracle home directory, just rename the /oracle/SID/920_64 directory.
a) mv /oracle/SID/920_64/bin /oracle/SID/920_64/bin.old
17) Change the following R3 instance parameter to the new oracle home /oracle/SID/102_64.
a) DIR_ORAHOME
b) DIR_CLIENT_ORAHOME
c) DIR_SERVER_ORAHOME
18) Install the Oracle 9.2.0.7 Client software as per the note 886783
a) Login as oraSID
b) cd /oracle/client
c) mkdir 92x_64
d) cd 92x_64
e) SAPCAR –xvf /oracle/stage/920_64/client/OCL92064.SAR
That's all If you have any Problem Start Troubleshooting
Dont forget to apply SAP recommeneded opatches after this..
Tuesday, June 28, 2011
Basis Critical Object: S_USER_AUT
Basis Critical object : S_USER_AUT
Definition
Authorization object, which is checked during authorization maintenance.
The check is made in the following authorization maintenance
transactions (Tools -> Administration -> User maintenance).
o SU03 - maintenance of authorizations
o SU02 - allocate authorization to a profile
Defined fields
This object is defined with the following three fields:
o Authorization object: The authorization objects, for which the
authorization administrator may maintain, delete, etc.,
authorizations, must be entered here.
o Authorization name: With this field, the authorization administrator
can be given a limited name space for the assignment of
authorization names.
It makes sense to do this when there are several adminstrators, so
that the authorizations are not maintained reciprocally or possible
internal naming conventions are adhered to.
o Activity: This field can be used to limit what the administrator may
do with the authorization.
Possible values:
- 01 = create
- 02 = change
- 03 = display
- 06 = delete
- 07 = activate
- 08 = display change documents
- 22 = assign authorization profiles
- 24 = archive
Example
Field Values
Authorization object S*
Authorization name *
Activity 01 - 06
With this authorization, the authorization administrator can create,
change, delete, and display authorizations of any name for all objects
beginning with S (Basis authorization objects). The administrator can
not, however, activate the authorizations or display the change
documents.
Compression level for Indexes in SAP-Oracle DB
Index compression feature in Oracle 10g and supported by SAP can free up more than 25% for DB space. SAP provides compression level for some of the indexes but for others, you need to run script provided by SAP. This script can take long time to complete. I am listing the compression level for almost all big tables. This I got after running the script in our environment and this can fit in any environment.
Note : parallel degree should be adjusted based on np. of CPUs available on the server.
***********************
alter index “BSIM~0″ rebuild online compress 4 parallel 4 pctfree 1;
alter index “BSIM~0″ noparallel;
alter index “EDIDC~0″ rebuild online compress 1 parallel 4 pctfree 1;
alter index “EDIDC~0″ noparallel;
alter index “EDIDC~1″ rebuild online compress 2 parallel 4 pctfree 1;
alter index “EDIDC~1″ noparallel;
alter index “EDIDC~2″ rebuild online compress 3 parallel 4 pctfree 1;
alter index “EDIDC~2″ noparallel;
alter index “EDIDC~3″ rebuild online compress 2 parallel 4 pctfree 1;
alter index “EDIDC~3″ noparallel;
alter index “EDIDC~4″ rebuild online compress 3 parallel 4 pctfree 1;
alter index “EDIDC~4″ noparallel;
alter index “EKBE~0″ rebuild online compress 4 parallel 4 pctfree 1;
alter index “EKBE~0″ noparallel;
alter index “EKBE~A” rebuild online compress 3 parallel 4 pctfree 1;
alter index “EKBE~A” noparallel;
alter index “EKBE~B” rebuild online compress 2 parallel 4 pctfree 1;
alter index “EKBE~B” noparallel;
alter index “EKBE~ZA” rebuild online compress 3 parallel 4 pctfree 1;
alter index “EKBE~ZA” noparallel;
alter index “EKBE~ZE” rebuild online compress 3 parallel 4 pctfree 1;
alter index “EKBE~ZE” noparallel;
alter index “EKET~0″ rebuild online compress 2 parallel 4 pctfree 1;
alter index “EKET~0″ noparallel;
alter index “EKET~E” rebuild online compress 3 parallel 4 pctfree 1;
alter index “EKET~E” noparallel;
alter index “EKPO~0″ rebuild online compress 2 parallel 15 nologging pctfree 1;
alter index “EKPO~0″ noparallel;
alter index “EKPO~1″ rebuild online compress 7 parallel 15 nologging pctfree 1;
alter index “EKPO~1″ noparallel;
alter index “EKPO~A” rebuild online compress 3 parallel 15 nologging pctfree 1;
alter index “EKPO~A” noparallel;
alter index “EKPO~B” rebuild online compress 3 parallel 15 nologging pctfree 1;
alter index “EKPO~B” noparallel;
alter index “EKPO~FPL” rebuild online compress 2 parallel 15 nologging pctfree 1;
alter index “EKPO~FPL” noparallel;
alter index “EKPO~SRV” rebuild online compress 2 parallel 15 nologging pctfree 1;
alter index “EKPO~SRV” noparallel;
alter index “FAGLFLEXA~0″ rebuild online compress 5 parallel 15 nologging pctfree 1;
alter index “FAGLFLEXA~0″ noparallel;
alter index “FAGLFLEXA~2″ rebuild online compress 6 parallel 15 nologging pctfree 1;
alter index “FAGLFLEXA~2″ noparallel;
alter index “FAGLFLEXA~3″ rebuild online compress 4 parallel 15 nologging pctfree 1;
alter index “FAGLFLEXA~3″ noparallel;
alter index “FAGLFLEXA~4″ rebuild online compress 4 parallel 15 nologging pctfree 1;
alter index “FAGLFLEXA~4″ noparallel;
alter index “FAGLFLEXA~6″ rebuild online compress 4 parallel 15 nologging pctfree 1;
alter index “FAGLFLEXA~6″ noparallel;
alter index “FAGLFLEXA~ZN1″ rebuild online compress 5 parallel 15 nologging pctfree 1;
alter index “FAGLFLEXA~ZN1″ noparallel;
alter index “VBFA~0″ rebuild online compress 3 parallel 4 pctfree 1;
alter index “VBFA~0″ noparallel;
alter index “VBFA~ZDL” rebuild online compress 1 parallel 4 pctfree 1;
alter index “VBFA~ZDL” noparallel;
alter index “MARCH~0″ rebuild online compress 2 parallel 4 pctfree 1;
alter index “MARCH~0″ noparallel;
alter index “MARDH~0″ rebuild online compress 2 parallel 4 pctfree 1;
alter index “MARDH~0″ noparallel;
alter index “MARD~0″ rebuild online compress 2 parallel 15 nologging pctfree 1;
alter index “MARD~0″ noparallel;
alter index “MARD~ZA” rebuild online compress 2 parallel 15 nologging pctfree 1;
alter index “MARD~ZA” noparallel;
alter index “EKPO~0″ rebuild online compress 2 parallel 15 nologging pctfree 1;
alter index “EKPO~0″ noparallel;
alter index “EKPO~1″ rebuild online compress 7 parallel 15 nologging pctfree 1;
alter index “EKPO~1″ noparallel;
alter index “EKPO~A” rebuild online compress 3 parallel 15 nologging pctfree 1;
alter index “EKPO~A” noparallel;
alter index “EKPO~B” rebuild online compress 3 parallel 15 nologging pctfree 1;
alter index “EKPO~B” noparallel;
alter index “EKPO~FPL” rebuild online compress 2 parallel 15 nologging pctfree 1;
alter index “EKPO~FPL” noparallel;
alter index “EKPO~SRV” rebuild online compress 2 parallel 15 nologging pctfree 1;
alter index “EKPO~SRV” noparallel;
alter index “MBEWH~0″ rebuild online compress 4 parallel 15 nologging pctfree 1;
alter index “MBEWH~0″ noparallel;
alter index “MBEW~0″ rebuild online compress 2 parallel 4 pctfree 1;
alter index “MBEW~0″ noparallel;
alter index “MBEW~ML1″ rebuild online compress 1 parallel 4 pctfree 1;
alter index “MBEW~ML1″ noparallel;
alter index “MBEW~ZBW” rebuild online compress 2 parallel 4 pctfree 1;
alter index “MBEW~ZBW” noparallel;
alter index “S012~0″ rebuild online compress 10 parallel 4 pctfree 1;
alter index “S012~0″ noparallel;
alter index “S012~VAB” rebuild online compress 2 parallel 4 pctfree 1;
alter index “S012~VAB” noparallel;
alter index “S013~0″ rebuild online compress 10 parallel 4 pctfree 1;
alter index “S013~0″ noparallel;
alter index “S031~0″ rebuild online compress 8 parallel 4 pctfree 1;
alter index “S031~0″ noparallel;
alter index “S033~0″ rebuild online compress 8 parallel 4 pctfree 1;
alter index “S033~0″ noparallel;
alter index “S033~A” rebuild online compress 1 parallel 4 pctfree 1;
alter index “S033~A” noparallel;
alter index “S033~B” rebuild online compress 3 parallel 4 pctfree 1;
alter index “S033~B” noparallel;
alter index “S120~0″ rebuild online compress 6 parallel 15 nologging pctfree 1;
alter index “S120~0″ noparallel;
alter index “S120~VAB” rebuild online compress 2 parallel 15 nologging pctfree 1;
alter index “S120~VAB” noparallel;
alter index “VBFA~0″ rebuild online compress 3 parallel 15 nologging pctfree 1;
alter index “VBFA~0″ noparallel;
alter index “VBFA~ZDL” rebuild online compress 1 parallel 15 nologging pctfree 1;
alter index “VBFA~ZDL” noparallel;
alter index “VBRP~0″ rebuild online compress 2 parallel 4 pctfree 1;
alter index “VBRP~0″ noparallel;
alter index “VBRP~ZVG” rebuild online compress 2 parallel 4 pctfree 1;
alter index “VBRP~ZVG” noparallel;
alter index “VRPMA~0″ rebuild online compress 6 parallel 4 pctfree 1;
alter index “VRPMA~0″ noparallel;
alter index “EKET~0″ rebuild online compress 2 parallel 15 nologging pctfree 1;
alter index “EKET~0″ noparallel;
alter index “EKET~E” rebuild online compress 3 parallel 15 nologging pctfree 1;
alter index “EKET~E” noparallel;
alter index “EKBE~0″ rebuild online compress 4 parallel 15 nologging pctfree 1;
alter index “EKBE~0″ noparallel;
alter index “EKBE~A” rebuild online compress 3 parallel 15 nologging pctfree 1;
alter index “EKBE~A” noparallel;
alter index “EKBE~B” rebuild online compress 2 parallel 15 nologging pctfree 1;
alter index “EKBE~B” noparallel;
alter index “EKBE~ZA” rebuild online compress 3 parallel 15 nologging pctfree 1;
alter index “EKBE~ZA” noparallel;
alter index “EKBE~ZE” rebuild online compress 3 parallel 15 nologging pctfree 1;
alter index “EKBE~ZE” noparallel;
alter index “MARDH~0″ rebuild online compress 2 parallel 15 nologging pctfree 1;
alter index “MARDH~0″ noparallel;
alter index “MARCH~0″ rebuild online compress 2 parallel 15 nologging pctfree 1;
alter index “MARCH~0″ noparallel;
alter index “S120~0″ rebuild online compress 6 parallel 15 nologging pctfree 1;
alter index “S120~0″ noparallel;
alter index “S120~VAB” rebuild online compress 2 parallel 15 nologging pctfree 1;
alter index “S120~VAB” noparallel;
alter index “MARDH~0″ rebuild online compress 2 parallel 4 pctfree 1;
alter index “MARDH~0″ noparallel;
alter index “VBFA~0″ rebuild online compress 3 parallel 15 nologging pctfree 1;
alter index “VBFA~0″ noparallel;
alter index “VBFA~ZDL” rebuild online compress 1 parallel 15 nologging pctfree 1;
alter index “VBFA~ZDL” noparallel;
alter index “MBEWH~0″ rebuild online compress 4 parallel 15 nologging pctfree 1;
alter index “MBEWH~0″ noparallel;
Saturday, June 18, 2011
Type of user on SAP system
1. Dialogue:-
For this kind of users:-
GUI login is possible.
Initial password and expiration of passowrd are checked.
Multi GUI logins are checked.
Usage:- These are used for GUI logins.
2. System
For this kind of users:-
GUI login is not possible.
Initial password and expiration of passowrd are not checked.
Usage:- These are used for internal use in system like background jobs.
3. Communication
For this kind of users:-
GUI login is not possible.
Users are allowed to change password through some software in middle tier.
Usage:- These are used for login to system through external systems like web application
4. Service
For this kind of users:-
GUI login is possible.
Initial password and expiration of passowrd are not checked.
Multiple logins are allowed.
Users are not allowed to change the password. Only admin can change the password
Usage:- These are used for anonymous users. This type of users should be given minimum authorization.
5. Reference
For this kind of users:-
GUI login is not ible.
Initial password and expiration of passowrd are not checked.
Usage:- These are special kind of users which are used to give authorization to other users.
Friday, June 17, 2011
SAP Basis Daily Check
SAP Logon Connection Test
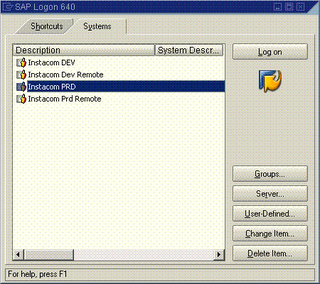
1. Double click on all above instance to check if you are able to login.
2. If login sucessful, this means server is alive and has no connectivity issue. A new screen will pop up. See below

1. Double click on all above instance to check if you are able to login.
2. If login sucessful, this means server is alive and has no connectivity issue. A new screen will pop up. See below
3. You shall see the above screen. Now you are ready to start your daily check list.
DB12/DB13 Create and Check backup status
1. On the command field, key in DB12 and below screen will be displayed. It shows the summary of the backup status.
1. On the command field, key in DB12 and below screen will be displayed. It shows the summary of the backup status.

2. On command field, enter /nDB13. This T-code is used to perform backup. You can also check the backup status.
3. In DB13, select a desired cell which you plan to perform your backup. Double click on the cell
4. Choose Full database backup to device
5. Backup mode: Offline
6. Device directory: ‘ d:\backup\ (this is just a folder which your backup could be stored)
7. Below is a sample picture.
4. Choose Full database backup to device
5. Backup mode: Offline
6. Device directory: ‘ d:\backup\ (this is just a folder which your backup could be stored)
7. Below is a sample picture.
DB02 Check Database size
1. Use DB02 to check DB size
2. Database current size (GB) is Total DB size – Free space
2. Database current size (GB) is Total DB size – Free space
SM50 Check if instance is running on all servers1. All work process is either running or waiting and none are stopped except CPIC (interprocess communication)
2. Make sure not all dialog work process are used up, otherwise other user cannot make any transaction.
2. Make sure not all dialog work process are used up, otherwise other user cannot make any transaction.
RZ20 Check filling degree of spool used numbers
1. Click on SAP CCMS Monitor Templates
2. Click on SPOOL System
3. System Wide > Spool > SpoolNumbers > UsedNumebrs
4. If value greater then 80% in spool numbers – will lead to system wait until spool reorganisation is done
2. Click on SPOOL System
3. System Wide > Spool > SpoolNumbers > UsedNumebrs
4. If value greater then 80% in spool numbers – will lead to system wait until spool reorganisation is done

SM13 Check if update is active
1. Enter SM13 and make sure UPDATE SYSTEM STATUS : Update is active.
2. Make sure client = *, User =* and status = All, Press F8 to execute
3. Click on any entry with error
4. You may have to dig deeper (SM21, ST22, DB02, etc) and work with functional expert to resolve the issue
2. Make sure client = *, User =* and status = All, Press F8 to execute
3. Click on any entry with error
4. You may have to dig deeper (SM21, ST22, DB02, etc) and work with functional expert to resolve the issue

SM12 Check lock entries with long duration
1. Type SM12 in command field
2. Client = *
3. User name = *
4. Click list.
2. Client = *
3. User name = *
4. Click list.
Its important to notice all values under the time column show the current time. Jobs with earlier date should be immediately investigated. These locks are problematic because it prevents access or changes to the locked records.
ST22 Check and analyze SAP ABAP short Dumps
An ABAP dump (AKA short dump) is generated when a report or transaction terminates as the result of a serious error. The system records the error in the system log. SM21 and write a snapshot (dump) of the program terminiation to a special table (SNAP). This transaction can also be called from the system log (SM21). ABAP dump is used to analyze and determine why the error occured and take corrective action
An ABAP dump (AKA short dump) is generated when a report or transaction terminates as the result of a serious error. The system records the error in the system log. SM21 and write a snapshot (dump) of the program terminiation to a special table (SNAP). This transaction can also be called from the system log (SM21). ABAP dump is used to analyze and determine why the error occured and take corrective action
(no print screen – currenly my SAP has no Runtime errors)
Once Runtime errors is displayed
1. Double click on the entries
2. A detail analysis on the error will be displayed
3. Dump contains the follow information
- Why program has been terminted
- What caused the program termination
- Where in the program code the termination occured
- What you can do to correct the error
- The values of the relevant system fields when the program terminated
- The calls or events that was active when the program terminated
- Any other programs that are affected
SM21 Check and analyze SAP system log for any critical log entries (hourly)
1. Type SM21 into command field
2. Enter the relevant details and execute
3. Look for unusual entries.
4. Double click on the entries for more information
Lastly, a few more userful transaction
1. SM37 – Check and analyze failed background jobs
2. SP01 – Check SPOOL for errors
3. ST06 – CPU & Memory Utilization
4. ST03 – Check for database performance and response time
5. ST11 – Check for core file entries
2. SP01 – Check SPOOL for errors
3. ST06 – CPU & Memory Utilization
4. ST03 – Check for database performance and response time
5. ST11 – Check for core file entries
Thursday, June 16, 2011
Export/Import Table using BRTOOLS
Case : I want to reorganize table and rebuild index offline for table SOFFCONT1. Table SOFFCONT1 contains SAP Business Workplace/SAPoffice objects which often grow rapidly in Netweaver based component.
Procedure : Here’s the procedure to export/import tables and rebuild index using BRTOOLS,
- Export table SOFFCONT1
- Drop index
- Import table SOFFCONT1
- Run Update Statistics Optimizer
Details steps :
1. Export table SOFFCONT1
>brspace -f tbexport -t soffcont1
BR0280I BRSPACE time stamp: 2009-06-06 21.10.00
BR1009I Name of database instance: R3X
BR1010I BRSPACE action ID: seasymoz
BR1011I BRSPACE function ID: tbe
BR1012I BRSPACE function: tbexport
BR0280I BRSPACE time stamp: 2009-06-06 21.10.07
BR0657I Input menu 359 - please enter/check input values
Main options for export of tables: SAPR3X.SOFFCONT1
1 * Export utility (utility) ............... [EXP]
2 * Tablespaces for export (tablespaces) ... []
3 * Owner for export (owner) ............... []
4 - Export table rows (rows) ............... [yes]
5 - Export table indexes (indexes) ......... [yes]
6 - Export table constraints (constraints) . [yes]
7 - Export table grants (grants) ........... [yes]
8 - Export table triggers (triggers) ....... [yes]
Standard keys: c - cont, b - back, s - stop, r - refr, h - help
BR0662I Enter your choice:
BR0280I BRSPACE time stamp: 2009-06-06 21.12.18
BR0663I Your choice: 'c'
BR0259I Program execution will be continued...
BR0280I BRSPACE time stamp: 2009-06-06 21.12.18
BR0657I Input menu 360 - please enter/check input values
Additional options for export of tables: SAPR3X.SOFFCONT1
1 - Use direct path (direct) ................ [yes]
2 - Export buffer size in KB (buffer) ....... [10240]
3 - Compress table extents/data (compress) .. [no]
4 - Consistent export (consistent) .......... [no]
5 # Parallel degree (parallel) .............. [1]
6 - Max. size of dump file in MB (filesize) . [20000]
7 - Force table export (force) .............. [no]
8 - EXP/EXPDP command (command) ............. [E:\oracle\R3X\102\BIN\exp parfile=I:\Oracle\R3X\sapreorg\seasymoz\parfile.exp]
Standard keys: c - cont, b - back, s - stop, r - refr, h - help
BR0662I Enter your choice:
BR0280I BRSPACE time stamp: 2009-06-06 21.13.15
BR0663I Your choice: 'c'
BR0259I Program execution will be continued...
BR0280I BRSPACE time stamp: 2009-06-06 21.13.16
BR0370I Directory I:\Oracle\R3X\sapreorg\seasymoz created
BR0280I BRSPACE time stamp: 2009-06-06 21.13.16
BR0370I Directory I:\Oracle\R3X\sapreorg\seasymoz.edd created
BR1164I Export of tables will be started with command line: E:\oracle\R3X\102\BIN\exp parfile=I:\Oracle\R3X\sapreorg\seasymoz\parfile.exp
BR0280I BRSPACE time stamp: 2009-06-06 21.13.16
BR0670I Enter 'c[ont]' to continue, 'b[ack]' to go back, 's[top]' to abort:
BR0280I BRSPACE time stamp: 2009-06-06 21.13.47
BR0257I Your reply: 'c'
BR0259I Program execution will be continued...
BR0278I Command output of 'E:\oracle\R3X\102\BIN\exp parfile=I:\Oracle\R3X\sapreorg\seasymoz\parfile.exp':
Export: Release 10.2.0.2.0 - Production on Sat Jun 6 21:13:47 2009
Copyright (c) 1982, 2005, Oracle. All rights reserved.
Username:
Connected to: Oracle Database 10g Enterprise Edition Release 10.2.0.2.0 - 64bit Production
With the Partitioning, OLAP and Data Mining options
Export done in WE8DEC character set and UTF8 NCHAR character set
About to export specified tables via Direct Path ...
Current user changed to SAPR3X
. . exporting table SOFFCONT1
continuing export into file I:\Oracle\R3X\sapreorg\seasymoz.edd\expdat1.dmp
962456 rows exported
Export terminated successfully without warnings.
BR0280I BRSPACE time stamp: 2009-06-06 22.44.59
BR1160I 1 table exported by EXP utility
BR0280I BRSPACE time stamp: 2009-06-06 22.45.02
BR0670I Enter 'c[ont]' to continue, 'b[ack]' to go back, 's[top]' to abort:
BR0280I BRSPACE time stamp: 2009-06-06 22.55.09
BR0257I Your reply: 'c'
BR0259I Program execution will be continued...
BR0280I BRSPACE time stamp: 2009-06-06 22.55.10
BR1022I Number of tables processed: 1
BR1003I BRSPACE function 'tbexport' completed
BR1008I End of BRSPACE processing: seasymoz.tbe 2009-06-06 22.55.10
BR0280I BRSPACE time stamp: 2009-06-06 22.55.12
BR1005I BRSPACE completed successfully
2. Drop index
>sqlplus “/as sysdba”
SQL>drop index “SAPR3X”.”SOFFCONT1~0″;
Index dropped
3. Import table SOFFCONT1
>brspace -f tbimport -t soffcont1
BR0280I BRSPACE time stamp: 2009-06-06 23.00.00
BR1009I Name of database instance: R3X
BR1010I BRSPACE action ID: seasywiu
BR1011I BRSPACE function ID: tbi
BR1012I BRSPACE function: tbimport
BR0280I BRSPACE time stamp: 2009-06-06 23.00.00
BR0656I Choice menu 361 - please make a selection
Import tables main menu
1 = Import tables
2 - Show BRSPACE export runs
3 * Exit program
4 - Reset program status
Standard keys: c - cont, b - back, s - stop, r - refr, h - help
BR0662I Enter your choice:
BR0280I BRSPACE time stamp: 2009-06-06 23.00.14
BR0663I Your choice: 'c'
BR0259I Program execution will be continued...
BR0699I Reading log file I:\Oracle\R3X\sapreorg\spaceR3X.log ...
BR0280I BRSPACE time stamp: 2009-06-06 23.00.15
BR0658I List menu 362 - please select one entry
List of BRSPACE exports for import
Pos. Run Date Tables Dumps Size[KB] Util.
1 = seasymoz.tbe 2009-06-06 21.09.57 1 2 25519234 EXP
Standard keys: c - cont, b - back, s - stop, r - refr, h - help
BR0662I Enter your selection:
BR0280I BRSPACE time stamp: 2009-06-06 23.01.22
BR0663I Your selection: 'c'
BR0259I Program execution will be continued...
BR0280I BRSPACE time stamp: 2009-06-06 23.01.22
BR0657I Input menu 363 - please enter/check input values
Main options for import from dump file I:\Oracle\R3X\sapreorg\seasymoz.edd\expd at.dmp,... (2 dumps)
1 * Import utility (utility) ............... [IMP]
2 - Import type (type) ..................... [full]
3 # Owner for import (owner) ............... []
4 # Tables for import (tables) ............. [SOFFCONT1]
5 - Import table rows (rows) ............... [yes]
6 - Import table indexes (indexes) ......... [yes]
7 - Import table constraints (constraints) . [yes]
8 - Import table grants (grants) ........... [yes]
9 # Import table triggers (triggers) ....... [yes]
Standard keys: c - cont, b - back, s - stop, r - refr, h - help
BR0662I Enter your choice:
BR0280I BRSPACE time stamp: 2009-06-06 23.02.42
BR0663I Your choice: 'c'
BR0259I Program execution will be continued...
BR0280I BRSPACE time stamp: 2009-06-06 23.02.42
BR0657I Input menu 364 - please enter/check input values
Additional options for import from dump file I:\Oracle\R3X\sapreorg\seasymoz.ed d\expdat.dmp,... (2 dumps)
1 - Import buffer size in KB (buffer) ....... [10240]
2 - Commit after each array insert (commit) . [yes]
3 - Ignore creation errors (ignore) ......... [yes]
4 # Table exists action (action) ............ [skip]
5 # Parallel degree (parallel) .............. [1]
6 # Max. size of dump file in MB (filesize) . [20000]
7 - Force table import (force) .............. [no]
8 - IMP/IMPDP command (command) ............. [E:\oracle\R3X\102\BIN\imp parfile=I:\Oracle\R3X\sapreorg\seasywiu\parfile.imp]
Standard keys: c - cont, b - back, s - stop, r - refr, h - help
BR0662I Enter your choice:
BR0280I BRSPACE time stamp: 2009-06-06 23.03.06
BR0663I Your choice: 'c'
BR0259I Program execution will be continued...
BR0280I BRSPACE time stamp: 2009-06-06 23.03.07
BR0370I Directory I:\Oracle\R3X\sapreorg\seasywiu created
BR1172I Import of tables will be started with command line: E:\oracle\R3X\102\BIN\imp parfile=I:\Oracle\R3X\sapreorg\seasywiu\parfile.imp
BR0280I BRSPACE time stamp: 2009-06-06 23.03.07
BR0670I Enter 'c[ont]' to continue, 'b[ack]' to go back, 's[top]' to abort:
BR0280I BRSPACE time stamp: 2009-06-06 23.03.34
BR0257I Your reply: 'c'
BR0259I Program execution will be continued...
BR0278I Command output of 'E:\oracle\R3X\102\BIN\imp parfile=I:\Oracle\R3X\sapreorg\seasywiu\parfile.imp':
Import: Release 10.2.0.2.0 - Production on Sat Jun 6 23:03:35 2009
Copyright (c) 1982, 2005, Oracle. All rights reserved.
Username:
Connected to: Oracle Database 10g Enterprise Edition Release 10.2.0.2.0 - 64bit Production
With the Partitioning, OLAP and Data Mining options
Export file created by EXPORT:V10.02.01 via direct path
import done in WE8DEC character set and UTF8 NCHAR character set
. importing SYS's objects into SYS
. importing SAPR3X's objects into SAPR3X
. . importing table "SOFFCONT1" 962456 rows imported
Import terminated successfully without warnings.
BR0280I BRSPACE time stamp: 2009-06-07 00.43.12
BR1166I 1 table imported by IMP utility
BR0280I BRSPACE time stamp: 2009-06-07 00.43.14
BR0256I Enter 'c[ont]' to continue, 's[top]' to cancel BRSPACE:
BR0280I BRSPACE time stamp: 2009-06-07 00.46.19
BR0257I Your reply: 'c'
BR0259I Program execution will be continued...
BR0280I BRSPACE time stamp: 2009-06-07 00.46.19
BR0656I Choice menu 361 - please make a selection
Import tables main menu
1 * Import tables
2 - Show BRSPACE export runs
3 = Exit program
4 - Reset program status
Standard keys: c - cont, b - back, s - stop, r - refr, h - help
BR0662I Enter your choice:
BR0280I BRSPACE time stamp: 2009-06-07 00.46.25
BR0663I Your choice: 'c'
BR0259I Program execution will be continued...
BR0280I BRSPACE time stamp: 2009-06-07 00.46.25
BR0680I Do you really want to exit BRSPACE? Enter y[es]/n[o]:
BR0280I BRSPACE time stamp: 2009-06-07 00.46.33
BR0257I Your reply: 'y'
BR0280I BRSPACE time stamp: 2009-06-07 00.46.33
BR1022I Number of tables processed: 1
BR1003I BRSPACE function 'tbimport' completed
BR1008I End of BRSPACE processing: seasywiu.tbi 2009-06-07 00.46.33
BR0280I BRSPACE time stamp: 2009-06-07 00.46.34
BR1005I BRSPACE completed successfully
4. Run Update Statistic Optimizer in SAP
Execute or Schedule this via DB13 then it will create a new index for table SOFFCONT1.
Note: Tables SOFFCONT1 need to be reorganized offline as they contain LONG RAW fields and must not be converted to LOBS with the online reorganization.
Forgot the Password of sap* in 000 client
If you are able to login as DDIC or other Admin User Name , login and change the password of sap* . If you dont know any other admin passwords, the way left is delete the row of sap* from the Table usr02 .
Query is :
delete from usr02 where BNAME='sap*' AND MANDT='000';
In MS SQL, using Enterprise manager , delete the Entire row of BNAME=sap* and MANDIT=000 .
Note that the Profile parameter : login/no_automatic_login_sapstart should be set as 0 .
Otherwise go to rz10 > Extended maintanance > Select Instance parameter > Set the parameter login/no_automatic_login_sap* =0 , copy and save.
Restart the instance . You ll be able to login as sap* .
Wednesday, June 15, 2011
Client Copy (SAP)
Remote Client Copy from X to Y
1. Create New Logical System Name
TR BD54
e.g. CLNTXXX (new client number)
2. Create a new client
TR SCC4
Fill in the fields with the relevant information for the new client e.g. client number XXX
3. Offline – backup
To be on the safe side check if backup has been performed before start of client copy.
4. Turn off archiving for Oracle
To avoid archive full errors during the client copy operation
5. Login to the new client XXX with user sap* and password= pass
TR SCCL
Fill in all information needed e.g. Client Copy profile “SAP_ALL”
Check SAP Marked Place for more options
Check “Expert Settings”, e.g. locking of users, parallel processing etc. etc.
6. Check the Status for Client Copy
TR SCC3
After the Client Copy
7. Turn on Archiving for Oracle
8. Perform backup
9. Lock the client for changes
TR SCC4 (only necessary if production)
10. Edit parameter Default Client (optional)
Correct the parameter for the Default client setting towards the new client
AIX Command for SAP Basis
Simple commands
chgrp grp filelist : Change the group that the file(s) belong to.
chmod 777 filelist : Change the rights of the file(s). 777: owner-world-user. 7: read-write-delete (=111)
chown user filelist : Change the owner of the file(s)
cp file1 file2 : Copy file1 to file2
cp /dev/null file : Clear all contents of file
errpt : Hardware error-report (IBM-unix)
ls –ltr : Show filelist, –parameters: l: show fileattributes , t: sort by time, r: reverse sortorder
more
mv file1 file2 : Move command
ps –ef : Show all running processes, -e, -f
vi : The famous vi-editor
2 A little more complex commands
kill: Kill a process as if it is cancelled. Child processes are killed as well.
kill –1: Kill a process as if the user is logging out. Child processes are killed as well.
kill –9: Kill a process as brutal as possible. Child-processes are not touched.
kill –USR2: Increases TRACE by 1
kill –USR1: ecreases TRACE by 1. When TRACE = 0 all open trace files are closed and can be cleared using ‘cp /dev/null filename’.
lslv : Show the logical volumes
lsvg : Show the volumegroups
sappfpar check pf= : Checks the profileparameter. Do they exist and do they have correct values.
set VAR VAL : set environment variable VAR to value VAL
printenv : prints the environementvariables
ps –ef grep xxx : Monitor processes with name containing xxx
ps –u: Monitor processes run by user
chgrp grp filelist : Change the group that the file(s) belong to.
chmod 777 filelist : Change the rights of the file(s). 777: owner-world-user. 7: read-write-delete (=111)
chown user filelist : Change the owner of the file(s)
cp file1 file2 : Copy file1 to file2
cp /dev/null file : Clear all contents of file
errpt : Hardware error-report (IBM-unix)
ls –ltr : Show filelist, –parameters: l: show fileattributes , t: sort by time, r: reverse sortorder
more
mv file1 file2 : Move command
ps –ef : Show all running processes, -e, -f
vi : The famous vi-editor
2 A little more complex commands
kill
kill –1
kill –9
kill –USR2
kill –USR1
lslv : Show the logical volumes
lsvg : Show the volumegroups
sappfpar check pf=
set VAR VAL : set environment variable VAR to value VAL
printenv : prints the environementvariables
ps –ef grep xxx : Monitor processes with name containing xxx
ps –u
SAP Basis Tools : Niping
Niping is a testing program developed by SAP to enhance TCP/IP and UDP layer function. Network Interface (NI) is used by SAPRouter and all SAP programs to provide independency of various communication. The enhanced TCP/IP and UDP Protocol is called SAP Protocol which provide one field length more and error information. This program simply send request to the server, then read the reply from server. Niping mostly uses to test connection to SAP server with or without SAP Router. Niping also provides enhancement communication through the firewall or proxy server.
Niping syntax
Example niping command (with or without SAProuter),
host1 : saprouter -r //start saprouter in host1
host2 : niping -s //this will emulate a test server
host3 : niping -c -H host2 //this will test connection to host2 without SAProuter
host3 : niping -c -H /H/host1/H/host2 //this will test connection to host2 with SAProuter
host1 : saprouter -r //start saprouter in host1
host2 : niping -s //this will emulate a test server
host3 : niping -c -H host2 //this will test connection to host2 without SAProuter
host3 : niping -c -H /H/host1/H/host2 //this will test connection to host2 with SAProuter
niping -t //this is for self test which will display a result *** SELFTEST O.K. *** if connection OK
Saturday, June 11, 2011
SAPGUI for Java on Linux : Configuration using SAPRouter
Some of my blog visitor asking about how is the connection string if I am using SAProuter to connect from SAPGUI for Java (http://basishowto.blogspot.com/2008/09/installation-and-configuration-of.html).
Actually, it's simple and the same one.
For connection string, you can add this :
conn = /H/[IP_Address_of_your_SAPRouter]/S/3299/H/[IP_Address_of_your_SAP_Server]/S/32[Your_SAP_Server_System_Number]
Remember that IP Address of your SAPRouter is your Public IP which is widely known from the internet and 3299 is the default port of SAPRouter.
Hopefully, that this would help you.
Friday, June 10, 2011
Installing SAP R/3 Application server on Linux
In this article, I will give you step by step for installation of application server system SAP R / 3 using the Linux OS. Why use Linux? Instead better use Windows? There are some things that a consideration to me why using Linux include:
Excellence ext3 and reiserfs is the ability to manage the logical volume size online.So we can easily increase the size of logical volumes without having to unmount the logical volume.We start, yes ...
1. OS InstallationWhen the OS installation, prepare a sufficient partition for the installation of SAP. The table on the following attachment (Disk) The following will give an explanation setting partitions using LVM.
2. Installing the Central InstanceSince we will use an existing Database Instance on AIX 64 bit machine, then we have to install the Central Instance. Installing the Central Instance package in Linux is to get the executable files from the SAP kernel for Linux.
Set environment needed to run sapinst among others:LD_LIBRARY_PATH = / sapmnt / [SID] / exeSAPINST_JRE_HOME = / opt / [location of java runtime environment]DISPLAY = [IP_Address of Windows Client]: 0.0umask = 22
To test, run the xclock command on the console. If an analog clock image, it means that environment is set correctly. If not appear, review the value of each environment variable you.

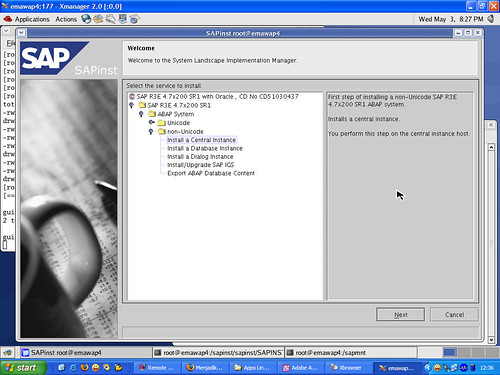


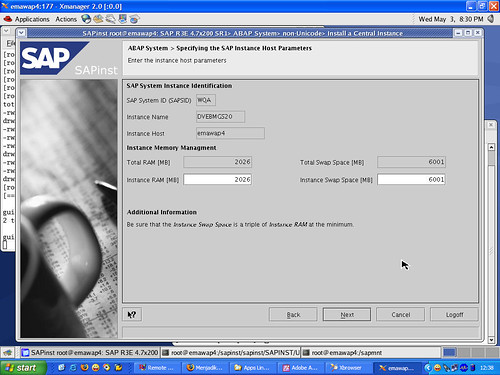
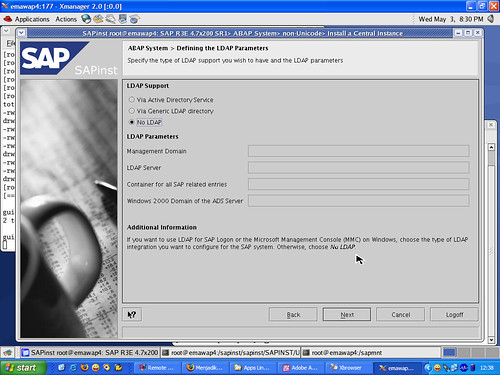

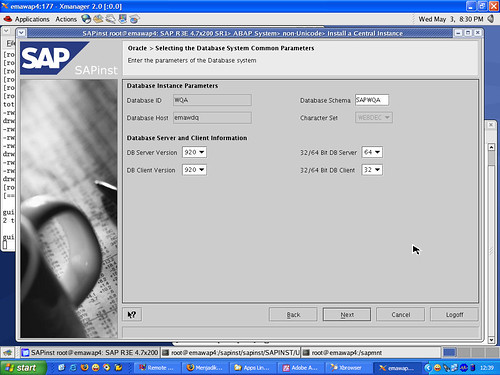
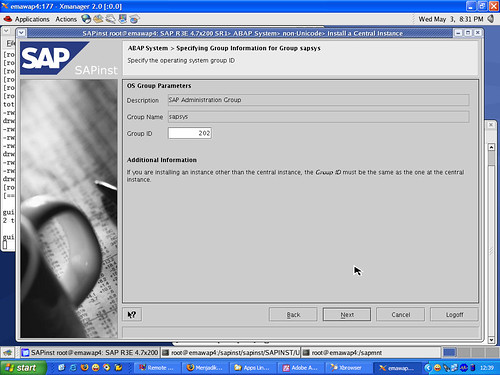


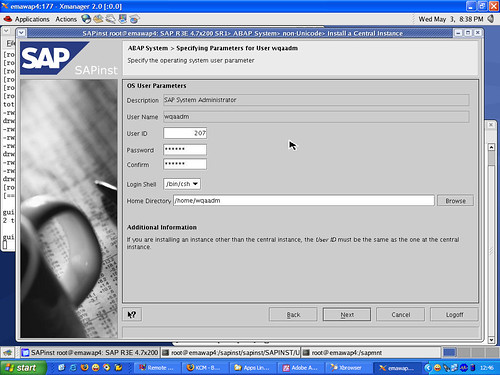

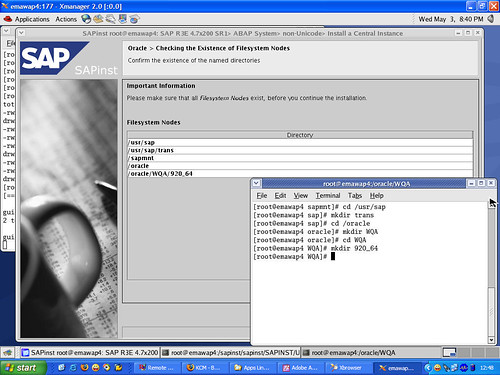

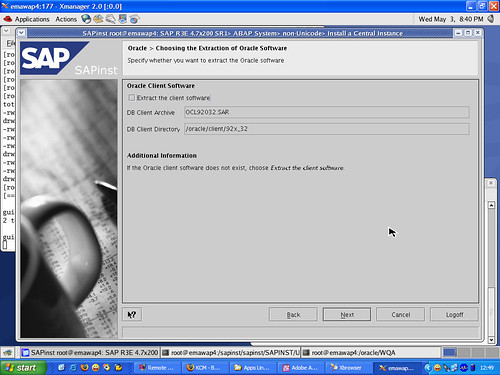
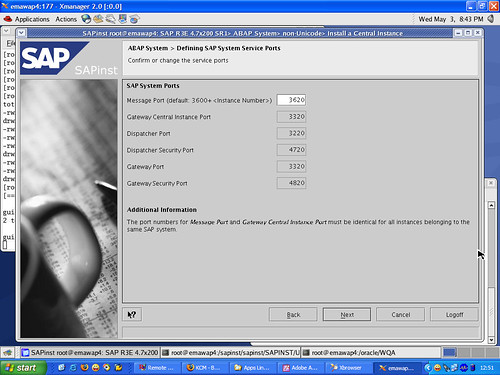

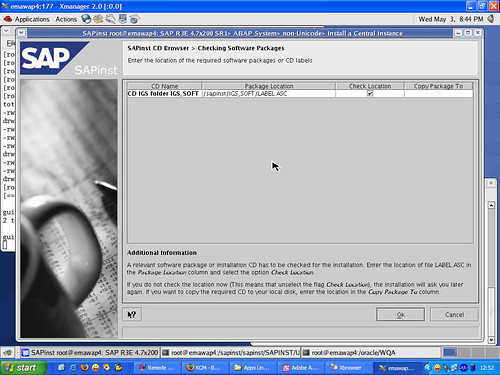
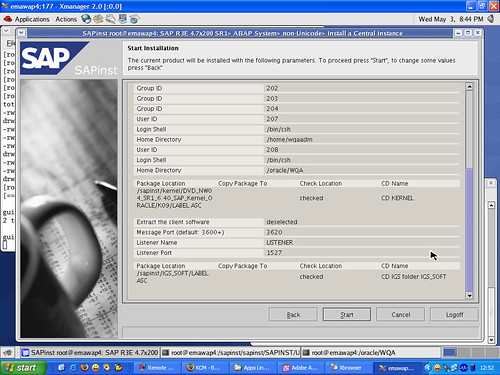


3. Installing Dialog Instance
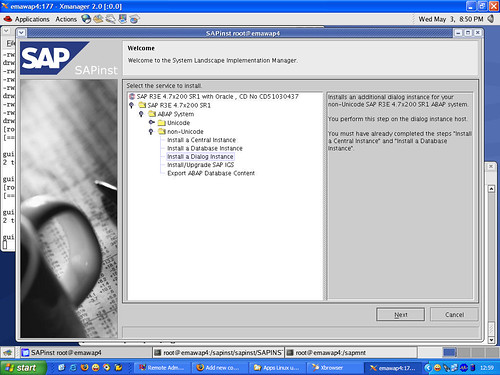

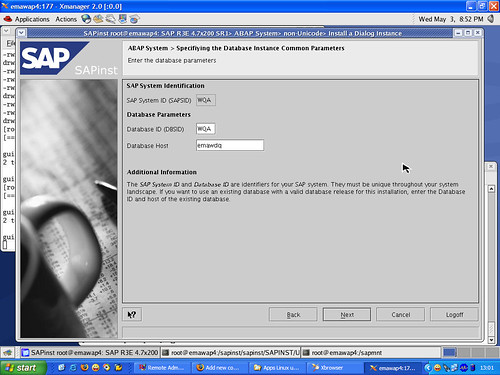


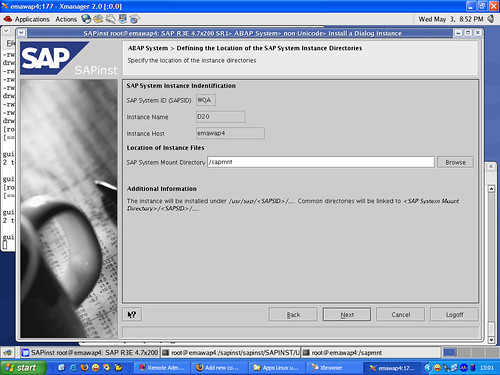
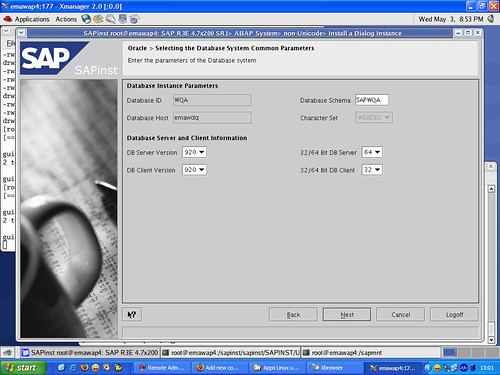

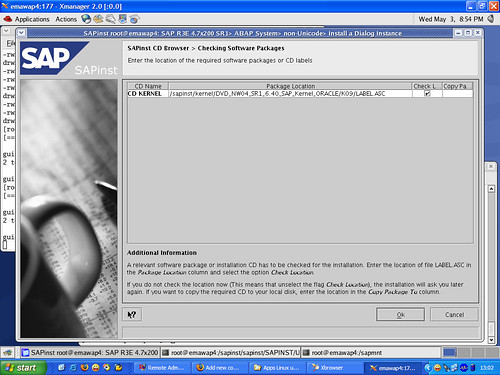


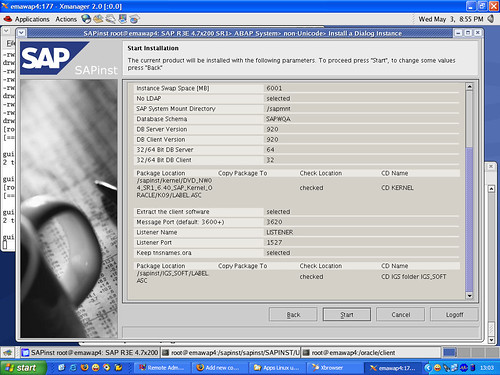

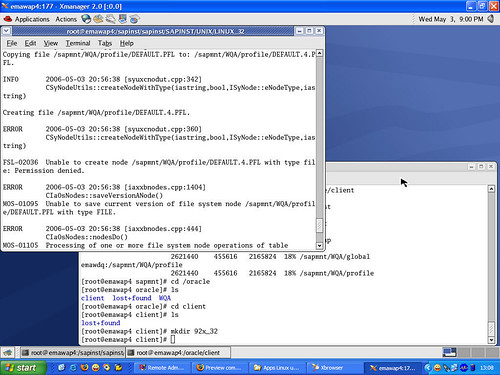

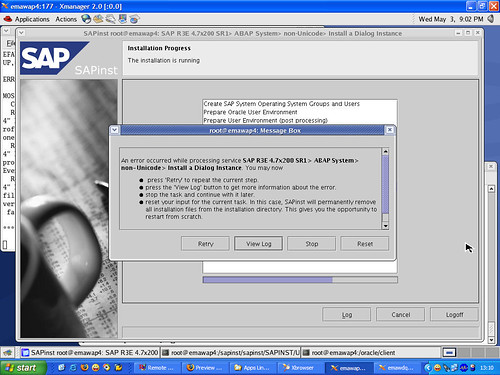
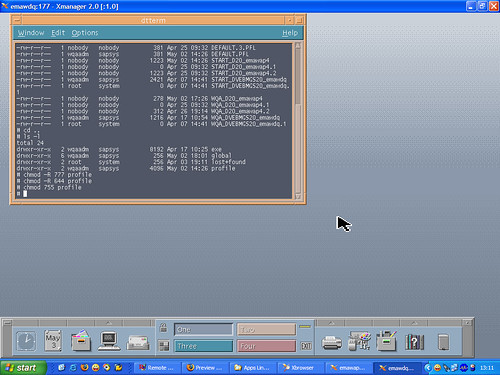

4. Next run the dialog instance. Previous sure central instance and database server is running on the AIX machine.
Now we already have a Linux application servers are cheap, reliable and stable.There is more to be dituning, later we went on again.
- Database Instance that will be used is Oracle with a platform AIX (IBM's proprietary UNIX). Between AIX and Linux, UNIX machines are equally so compatibility will be more awake than using Windows.
- Linux is free and open source. By nature, I was much easier to perform tuning and search for references on the Internet.
- Communication between Linux and AIX will use NFS, while Windows and AIX will use SAMBA.
- Linux machine is more stable, reliable, and most importantly the virus-immune.
- Linux is also less expensive in terms of maintenance, hardware requirements, compared to using Windows (must have a license) and AIX (in terms of licensing and hardware).
Excellence ext3 and reiserfs is the ability to manage the logical volume size online.So we can easily increase the size of logical volumes without having to unmount the logical volume.We start, yes ...
1. OS InstallationWhen the OS installation, prepare a sufficient partition for the installation of SAP. The table on the following attachment (Disk) The following will give an explanation setting partitions using LVM.
2. Installing the Central InstanceSince we will use an existing Database Instance on AIX 64 bit machine, then we have to install the Central Instance. Installing the Central Instance package in Linux is to get the executable files from the SAP kernel for Linux.
Set environment needed to run sapinst among others:LD_LIBRARY_PATH = / sapmnt / [SID] / exeSAPINST_JRE_HOME = / opt / [location of java runtime environment]DISPLAY = [IP_Address of Windows Client]: 0.0umask = 22
To test, run the xclock command on the console. If an analog clock image, it means that environment is set correctly. If not appear, review the value of each environment variable you.
Go to the directory sapinst. Sapinst Run command on the console.
Choose Install Central Instance.
Fill in the information to the SAP System ID (SAPSID) and Instance Number.Customize with existing information on the Database Instance on AIX.
Fill in the information database ID (DBSID) and Database Host.
Let the information by default. This we do because this server will only be used asapplication servers.
Choose No if you do not use LDAP LDAP facilities on your network.
Make sure that this directory is exist.
Make sure the correct information Database Schema. And do not forget the type ofdatabase server is running on AIX is 64 bits.
Information about the group sapsys. Noteworthy is the Group ID must match the Group ID on the AIX machine (as a database server).
Information about the group dba. Noteworthy is the Group ID must match the Group IDon the AIX machine (as a database server).
Information about the group shift gears. Noteworthy is the Group ID must match the Group ID on the AIX machine (as a database server).
Information about the user [sid] adm. Must be considered is the User ID andpassword must be the same as your User ID and password on AIX machine.
Information about the user ora [sid]. Must be considered is the User ID and passwordmust be the same as your User ID and password on AIX machines.
Note the directory listing above. These directories must exist. If not exist, create itnow!. The directory must exist is / usr / sap, / usr / sap / trans, / sapmnt, / oracle, /oracle / [SID] / 920_64.
You must indicate the location of the SAP Kernel for Linux is available. You should be ready.
Information extraction of Oracle Client. Remove the check mark. We will not installOracle Client now.
Information on ports used by SAP applications. The following ports should not beused by other applications, which is 36 [system number], 33 [system number], 32[system number], 47 [system number], and 48 [system number]. Please edit the file /etc / services.
Information listener name and port used by the listener. Make sure the port is not usedby other applications.
Show location IGS_SOFT.
Summary information on the Central Instance installation. Check back and you stillcan click the back button if there is not yet appropriate.
Installing the central instance is running.
Congratulations!! Installing the central instance successfully. We're already in half way.Please break before ... enjoy hot coffee and fried bananas you ...:)
3. Installing Dialog Instance
Set environment needed to run sapinst among others:
LD_LIBRARY_PATH = / sapmnt / [SID] / exe
SAPINST_JRE_HOME = / opt / [location of java runtime environment]
DISPLAY = [IP_Address of Windows Client]: 0.0
umask = 22
SAPINST_JRE_HOME = / opt / [location of java runtime environment]
DISPLAY = [IP_Address of Windows Client]: 0.0
umask = 22
To test, run the xclock command on the console. If an analog clock image, it means that environment is set correctly. If not appear, review the value of each environment variable you.
Make sure the machine Linux and AIX machines know each other. Perform the addition of the IP Address and hostname Linux on AIX machines and vice versa.
Make sure the machine Linux and AIX machines know each other. Perform the addition of the IP Address and hostname Linux on AIX machines and vice versa.
From the AIX machine via NFS, shared directory / sapmnt / [SID] / global and /sapmnt / [SID] / profile. From the Linux machine, mount the directory with the samemount point.
Screen installation election. Select Non-Unicode_Install Dialog Instance.
Information about the Central Instance. Remember! instance number and instanceinformation are hosted on the AIX machine.
Information Database ID (DBSID) and Database Host.
Information hosted instance of parameters. Leave the default.
Choose No if you do not use LDAP LDAP on the network.
Location SAP Mount Directory is on / sapmnt. Make sure this directory exists.
Note the type of information Database Schema and Database servers. Do not forgetthat the database server that we use is 64 bits.
Note the directory listing above. These directories must exist. If not exist, create itnow!. The directory must exist is / usr / sap, / usr / sap / trans, / sapmnt, / oracle, /oracle / [SID] / 920_64.
You must indicate the location of the SAP Kernel for Linux is available. You should be ready.
Now is the time for us to install Oracle Client. Tick the option extract oracle client.
Information used ports in the SAP. Should have been prepared at the time ofinstallation of the Central Instance.
Setting name of the listener and the listener port name.
Location IGS_SOFT.
Installation Summary Dialog Instance.
Installing Dialog Instance is running.
Error will be out due to lack of permissions on the directory NFS / sapmnt / [SID] /profile.
From the AIX machine, change the first permissions recursively to 777, the command# chmod-R / sapmnt / [SID] / profile. Continue the installation until it met the error again.
Errors occur because the permissions on the directory NFS / sapmnt / [SID] / profileon AIX machines.
Restore permissions to its original position. Use the following commands in succession: # chmod-R 644 profile, # chmod 755 profile.
This error is a bug from SAP. Please edit the file keybd.xml. Search keyword"ERROR" and change it to OK. Save, then run back to the old installation.
Congratulations! Dialog Instance installation has been completed.
4. Next run the dialog instance. Previous sure central instance and database server is running on the AIX machine.
Now we already have a Linux application servers are cheap, reliable and stable.There is more to be dituning, later we went on again.
Subscribe to:
Posts (Atom)