Wednesday, February 29, 2012

HPUX System Mirroring Script


This was taken off of itrc forums. It may need some adjustment.
#!/bin/ksh
PARTITION_FILE=/var/tmp/partition_file
# define primary and mirror disks
# the format is:
# PRI_DISK=cXtXdX
# PRI_DISK=cXtXdX
PRI_DISK=c2t1d0
MIR_DISK=c3t0d0
echo
echo “PRIMARY DISK = /dev/dsk/$PRI_DISK”
echo “MIRROR  DISK = /dev/dsk/$MIR_DISK”
echo
echo If the above is correct, hit enter to continue echo If not correct, hit control-C to quit echo
echo
echo “Creating partition file /tmp/$PARTITION_FILE”
echo
cat < $PARTITION_FILE
3
EFI 500MB
HPUX 100%
HPSP 400MB
EOF
# create system, OS and  service partitions
echo
echo idisk -wf $PARTITION_FILE /dev/rdsk/$MIR_DISK echo
idisk -wf $PARTITION_FILE /dev/rdsk/$MIR_DISK
# Create device files needed for the new partitions
insf -eC disk
# Verify the parition table
echo idisk /dev/rdsk/$MIR_DISK
idisk /dev/rdsk/$MIR_DISK
# Initialize the EFI partition for use
echo efi_fsinit -d /dev/rdsk/${MIR_DISK}s1 efi_fsinit -d /dev/rdsk/${MIR_DISK}s1
# Populate the /efi/hpux directory in the new EFI system partition
echo mkboot -e -l /dev/rdsk/$MIR_DISK
mkboot -e -l /dev/rdsk/$MIR_DISK
# Changing the auto file for the mirror to boot without quorum # Note: Using s1
echo “boot vmunix -lq”
echo “boot vmunix -lq”           > /tmp/AUTO.lq
efi_cp -d /dev/rdsk/${MIR_DISK}s1  /tmp/AUTO.lq   /EFI/HPUX/AUTO
# Verify the contents of the auto file on the primary and the mirror.
# Note: Using s1
echo  Verify the contents of the auto file on the primary and the mirror.
echo
efi_cp -d /dev/rdsk/${PRI_DISK}s1 -u  /EFI/HPUX/AUTO  /tmp/AUTO.pri efi_cp -d /dev/rdsk/${MIR_DISK}s1 -u  /EFI/HPUX/AUTO  /tmp/AUTO.alt
echo cat /tmp/AUTO.pri
echo
cat /tmp/AUTO.pri
echo cat /tmp/AUTO.alt
echo
cat /tmp/AUTO.alt
# add the new paritition to vg00
# Note: Using s2
echo  add the new paritition to vg00
echo  Note: Using s2
echo pvcreate  -B /dev/rdsk/${MIR_DISK}s2
pvcreate  -B /dev/rdsk/${MIR_DISK}s2
#pvcreate  -fB /dev/rdsk/${MIR_DISK}s2
vgextend vg00 /dev/dsk/${MIR_DISK}s2
# Add the new disk to /stand/bootconf
# Note: Using s2
echo  “Add the mirror disk $MIR_DISK to /stand/bootconf”
echo “l  /dev/dsk/${MIR_DISK}s2″ >> /stand/bootconf
echo  Mirroring all Logical Volumes in /dev/vg00, lvol1 – lvol8 echo echo
echo “Mirroring /stand”
echo lvextend -m 1 /dev/vg00/lvol1  /dev/dsk/${MIR_DISK}s2
lvextend -m 1 /dev/vg00/lvol1  /dev/dsk/${MIR_DISK}s2 echo
echo “Mirroring swap”
echo lvextend -m 1 /dev/vg00/lvol2  /dev/dsk/${MIR_DISK}s2
lvextend -m 1 /dev/vg00/lvol2  /dev/dsk/${MIR_DISK}s2 echo
echo “Mirroring root”
echo lvextend -m 1 /dev/vg00/lvol3  /dev/dsk/${MIR_DISK}s2
lvextend -m 1 /dev/vg00/lvol3  /dev/dsk/${MIR_DISK}s2 echo
echo “Mirroring /home”
echo lvextend -m 1 /dev/vg00/lvol4  /dev/dsk/${MIR_DISK}s2
lvextend -m 1 /dev/vg00/lvol4  /dev/dsk/${MIR_DISK}s2 echo
echo “Mirroring /opt”
echo lvextend -m 1 /dev/vg00/lvol5  /dev/dsk/${MIR_DISK}s2
lvextend -m 1 /dev/vg00/lvol5  /dev/dsk/${MIR_DISK}s2 echo
echo “Mirroring /tmp”
echo lvextend -m 1 /dev/vg00/lvol6  /dev/dsk/${MIR_DISK}s2
lvextend -m 1 /dev/vg00/lvol6  /dev/dsk/${MIR_DISK}s2 echo
echo “Mirroring /usr”
echo lvextend -m 1 /dev/vg00/lvol7  /dev/dsk/${MIR_DISK}s2
lvextend -m 1 /dev/vg00/lvol7  /dev/dsk/${MIR_DISK}s2 echo
echo “Mirroring /var”
echo lvextend -m 1 /dev/vg00/lvol8  /dev/dsk/${MIR_DISK}s2
lvextend -m 1 /dev/vg00/lvol8  /dev/dsk/${MIR_DISK}s2 echo

Tuesday, February 28, 2012

How to Patch SAP J2ee Stack

1. Read the release notes of packages and do the home work (very Important)
2. Download the Support Packs from the SAP Market Place
2.a. CTRLSAPDBnn_0-20000nnn.SAR
2.b. J2EERTnn_0-20000nnn.SAR
2.c. J2EERTOSnn_0-20000nnn.SAR
2.d. SAPINSTnn_0-20000nnn.SAR
2.e. SAPCAR (optional, but necessary because what you have might not be the latest)
3. Create a Temporary File System, and
4. Extract SAPINST* and CTRL* SAR Files
5. Extract OS Independent (J2EERTnn_0-20000nnn.SAR) and apply First and then extract the OS Dependent Files and apply. The Order is important.
6. J2ee Engine patching would either be required to be done by sapinst or by SDM or JSPM tools. The details will be mentioned in the release notes.
7. First patch the Central Instance, when you run the sapinst
a. The patching should be done first for the Central Instance
i. The Option “Import Support Package nn”, when you run the sapinst.


b. Only then patch the Dialog instance
1. Choose the option “Support Package nn – Dialog Instance Update”

6 Restart the j2ee engine.
7 Check the status from the URL http://hostname:javaport/ -> “System Information”

Monday, February 27, 2012

How to Patch SAP JAVA Applications

This is deployed using the tools SDM. (/usr/sap/SID/instance/program/RemoteGui.sh) The default password for the SDM tool is “sdm”. In Offline Deployment, the Java instance has to be stopped before SDM is started while in online deployment it can be deployed online.

Sometimes the files come with the extension filename.sca.zip just rename the file as filename.sca (or sda) and then deploy.

JAVA Application Server sometimes requires SAPINST tool to apply the patches, Then
1. Stop all instances of SAP except the CI
2. Deactivate all server process except one (server0 should alone be active)
3. Make the instance in SAFE mode from Config Tool.
4. Start Patching using the sapinst tool, possibly by keeping the instance in SAFE Mode.
5. Start Patching the Java application in CI.
6. Start Patching applications for other server nodes.

Friday, February 24, 2012

SAP Java requires 4 Systems Landscape Architecture while ABAP requires 3 Systems Landscape Architecture, Why ?

ABAP Stack require 3 System Landscape
ABAP requires 3 systems Landscape because ABAP modifies programs and moves them as a program to the consolidation for Testing. Since ABAP has both have Client Dependent and Client Independent data(s) and programs (cross client data consists of Programs and Data Dictionary), modification to such programs cannot be tested reliably in the same (development) system, which anyway would work correctly. So to simulate a production environment the changes need to be tested in Quality System. So an ABAP system would require 3 and not 2 systems landscape.

JAVA Stack require 4 System Landscape
In a Java stack the program are not moved alone, they are moved along with its other dependencies as a Software Component (jar, ear files). In the development system a user can copy the program and modify it and but would require a consolidation system for consolidating and building the application (Software Component). So a program is transported from Development System to Consolidation System. The Consolidation system will build the application. Once the software components are built they would be moved to Test System for Testing and finally to delivery System (Production System). Thus a Java Stack would require a 4 system landscape for a development Infrastructure.

In addition to these 4 Servers, there would be one more system which will host the Netweaver Development Infrastructure Application (NW + NWDI)

Development System -> Consolidation System -> Test System -> Productions System


Development : will have the modified Sources
Consolidation : Will consolidate the modified program from Development system and will be built as a Software component (jar File)
Testing : Software Component will tested here
Production : Productions System

Product -> Software Component -> Development Component -> Program


SAP NW 2004s Development Infrastructure
http://help.sap.com/saphelp_nw04s/helpdata/en/71/0369404c65587ee10000000a155106/frameset.htm

Thursday, February 23, 2012

How to register CCMS Agent (SAPCCMSR) on JAVA stack for it to be monitored in the ABAP STACK?


How to connect SAP Java to CEN system on the ABAP Stack
Where Java Stacks ends the data to ABAP Stack to be monitored in the CEN CCMS system, while in NWA data from ABAP Stack and goes to the Java Stack, it is there in the NW2004s (NW7.0). The SAPCCMSR are installed and registered in the JAVA Stack, this agents pushes the data to the CEN or into the Solution Manager. This program reads the data from shared memory of the JAVA Stack, where the data is populated by the J2EE engine. It is similar to the program SAPCCM4X in ABAP Stack.

Tx Code RZ21
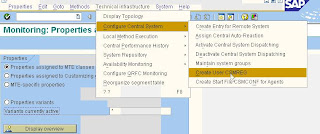
1. Creating CSMREG User

2. Creating start file for CSMCONF Agent

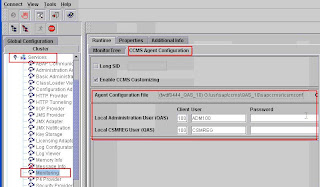
3. Register the Username and Password in Visual Administrator
For Dispatcher -> Services -> Monitoring

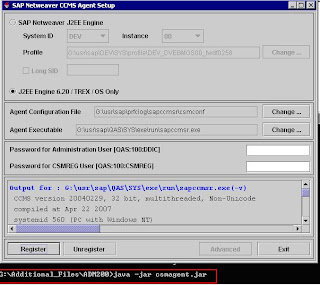
4. Then Click on the register button.

5. If Visual Administrator fails to register the gent, the manually do it by using command at the bottom of the below picture.

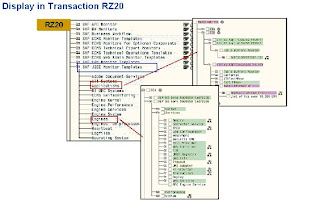
6. Then check in the ABAP Stack, Tx. Code RZ21 (J2ee -> Engines) the node will appear.

Wednesday, February 22, 2012

How to activate and evaluate SQL TRACE


SQL Trace can be activated from the url ahttp://hostname:javaport/sqltrace.
In this page activate the sql trace for any node then stop the trace and evaluate.

To show the statistical data from JAVA stack in ABAP Stack (Tx ST03G)

Distributed Statistical Records
Similar in the ABAP Stack it is called Work Load Analyzer (ST03 / ST03G)
To show the statistical data from JAVA stack in ABAP Stack (Tx ST03G)
The First Requirement is that
The Agent SAPCCMSR must be running
The Seconnd
The job SAP JOB FOR NONR3_STACK Job is running


(tips : All the jobs would be defined in the table TCOLL)

Tuesday, February 21, 2012

How to Activate Session Trace


To Activate the Session trace, click on the highlighted button.


The results appear in the activity tab

How To enable STATTRACE in Java Stack


Difference between STATTRACE and DSR
DSR will give time spent for the complete job, while STATTRACE will in a very detailed with detailed time spent in each of activity. So generally first a basic function is monitored using DSR. When something is noticed which has to be drilled down in detail, then STATTRACE is used to monitor in detail.

To enable STATTRACE in Java Stack, go to Visual Administrator and then go to the tab
Runtime -> Trace Config. Here activate the traces


Then go to the tab Application Tracing and restart the node to be traced in the “Maintenance Mode”.


The results can be viewed in the ABAP Stack in the tx Code ST03G


And the detailed result can be viewed in the Tx Code STATTRACE.

Friday, February 17, 2012

SAP Solution Manager

What Is The Use of Solution Manager
What is the use of solution manager, and what we can do with solution manager?

Now a days solution manager is mandatory.
1. it is used for generating keys and downloading support packages
2. it is used to document user requirments and preparing senarios what needs to to be adopted using solution manager, where the blue print is the part of solution manager
3. it is used for reporting, solution desk,to manage the change requests and use to monitor entire landcape Central message processing in the SAP Solution Manager:
- Display customer data, problem description, priority, attached documents, Service Level Agreements (SLA)
- Assign processor
- Send messages to the creator and other processors
- Forward message to other processors or support units
- Create documents and URLs
- Attach documents
- Status assignment and monitoring
- Create a worklist with selection conditions *-- Shankar

I have a requirement to install SAP Solution Manager Solution Support Enablement Package (SEP) in our solution manager 4.0. This SEP contains, RBE, TDMS, ...etc.,

I checked for the software download at market place but couldn't find the software package, can anyone help me to download this SEP for windows/oracle.

Look at following:

http://service.sap.com/swdc -> Download -> Installations and Upgrades -> Entry by Application Group -> Installations and Upgrades -> SAP Technology Components -> SAP Support Enablement Package - >SAP Support Enabl. Package 1.0

How to configure the service desk on Solution Manger 4.0. I want to cofigure Solution Manger only for service desk I have install Solution Manger 4.0. What is the Step please explain.

Check: http://service.sap.com/rkt-solman

There are tutors, PDFs and powerpoints to guide you through the configuration process. *-- Markus

If you have 3 or 4 client systems, must you install SAP solution manager for each one of these systems and manage them independently -or- 2. Can you install One Solution manager, that will manage all 3 these systems in one solution manager -or- 3. Do you install 3 Solution managers for each of the systems, then another one linked to the 3 individual solution managers, which then in turn manages the 3 systems in one.

In any System landscape only one solution manager is installated in one system and it will communicate with the other system using the RFC and collect the report from each and every system through (SDCCN).

Thursday, February 16, 2012

LVM Volume Group Create. High Capacity VGLVM


Volume group creation, done right need only be done once to last a long time. A few simple steps can make it a process you do once and then enjoy the long term benefits.
Step one is a little homework. Take a reasonable estimate at how many physical volumes the volume group is going to contain. Why is this important? Because by default lvm allocates resources as if there will be 255 physical volumes. Most volume groups don’t see that many disks, and the overall capacity is impacted by the default. For this example, we will pick a small volume group that is never anticipated to exceed 10 physical volumes. We will set the maximum volumes to 25 to have a fair amount of additional capacity but to more efficiently allocate scarce resources.
Now th fun begins. We will create a volume group called vg03
Discover the new disks, important if LUNS have been presented to the system.
insf -C disk (may not be needed on HP-UX 11.31)
ioscan -fnC disk
ioscan shows three disks for this example.
/dev/rdsk/c10t0d1 /dev/rdsk/c10t0d2 /dev/rdsk/c10t0d3
cd /dev
mkdir vg03
mknod /dev/vg03/group c 64 0×030000
# We have created a device file for the volume group.
We need to pvcreate the disks, which lablels the disk for use by LVM
pvcreate /dev/rdsk/c10t0d1
pvcreate /dev/rdsk/c10t0d2
pvcreate /dev/rdsk/c10t0d3
vgcreate -p25 /dev/vg03 /dev/dsk/c10t0d1 /dev/dsk/c12t0d1 /dev/dsk/c10t0d3
# alternative vgcreate -e 65535 -s 16 /dev/vg10 /dev/dsk/c10t0d1 /dev/dsk/c12t0d1 /dev/dsk/c16t0d1 /dev/dsk/c17t0d1
The option -s lets us set a larger PE size which can also increase capacity.
Now inevitably someone is going to decide to add another disk to this volume group. It may be immediately or it may be down the road. We are prepared.
The SAN admin and project manager want to create a scratch area within the volume group for oracle backups to disk.
They present a new lun disk /dev/rdsk/c16t0d5
We respond like lightning.
insf -C disk
ioscan -fnC disk
pvcreate /dev/rdsk/c16t0d5
vgextend vg03 /dev/dsk/c16t0d5
The disk is ready for use.
Different article for how we set up logical volumes and a file system.

Wednesday, February 15, 2012

How to create Logical Volumes and Filesystems


Quick and Dirty Example here.
In our last example, we created a volume group vg03. It had thee disk, we expanded it to 4 because we planned proper capacity.
Our volume group now consists of 4 disks.
We are asked to create an approximately 10 GB files system in this SAN based volume group.
vgdisplay /dev/vg03
vgdisplay -v /dev/vg03
< Insert vgdisplay example here>
HP vgdisplay documentation link (Note this tends to change. I can’t help it if HP breaks the links)
This will show an empty volume group as we have not created any logical volumes
pvdisplay /dev/dsk/c10d0t1
… repeat for other disks …
Make sure nothing is on them.
Turns out 10 GB will fit quite nicely on a single disk. Since this is a SAN based disk, we need not worry here about raid configuration. If you are hosting an oracle rdbms, you should make sure the SAN admin sets up data, index and rollback as raid 1 or raid 10 to insure good performance.
lvcreate /dev/vg03
# Creates an empty logical volume on vg03. Uses default naming.
You can also do it this way if you like names.
lvcreate /dev/vg03 -n mydata
lvextend -L 10240 /dev/vg03/mydata /dev/dsk/c10t0d1
# This command creates an approximately 1024 MB logical volume and defines the disk it goes on. Always define the disk. Don’t let LVM or SAM decide where your data is going to go. Plan in advance. Note that LVM for Linux which is a feature port and not a binary recompile does let you define size 10 GB or 10240 MB. Still waiting for that feature on LVM for HP-UX.
newfs -F vxfs -o largefiles /dev/vg03/rmydata
Why largefiles? Databases are big and the default limit on a file size in a file system is 2 GB. That is too small. I almost always set up my file systems these days for largefiles unless the file system itself is less than 2 GB
# Create a mount point.
mkdir /mydata
# mount it.
mount /dev/vg03/mydata /mydata
# This does not set an optimal JFS logging and recovery options, but that is a different article
bdf
# See if its there and the right capacity.
Next article: Edit /etc/fstab and set permanent mount options.
NOTE: This article needs to be checked and have vgdisplay and pvdisplay and other examples inserted into it.

Tuesday, February 14, 2012

HPUX Integrity Software mirror procedure


This was written by a former colleague. It is better than anything else I have seen. SEP
Mirroring a Boot Disk with LVM on HP-UX 11i for HP Integrity
Servers
The following diagram shows the disk layout of a boot disk. The disk
contains a Master Boot Record (MBR) and Extensible Firmware
Interface (EFI) partition tables that point to each of the partitions. The
idisk
command is used to create the partitions (see idisk (1M)).
Figure 6-5 Example LVM Disk Layout on HP Integrity Server
Before starting the procedure, make sure that add-on product HP
MirrorDisk/UX (B5403BA) is installed. This product is an extra-cost
product available on the HP-UX 11i application release media. For
example:
swlist -l fileset | grep -i mirror
LVM.LVM-MIRROR-RUN B.11.22 LVM Mirror
Step 1.
file.
Partition the disk using the idisk command and a partition description
a.
Create a partition description file. For example:
vi /tmp/idf
In this example the partition description file contains:
3
EFI 500MB
HPUX 100%
HPSP 400MB
NOTE
an EFI partition, an HP-UX partition, and an HP Service partition.
Boot disks of earlier HP Integrity Servers may have an EFI partition
of only 100MB and may not contain the HPSP partition.
The values in the example represent a boot disk with three partitions:
b.
Partition the disk using idisk and your partition description file:
idisk -f /tmp/idf -w /dev/rdsk/c3t1d0
c.
To verify you can run:
idisk /dev/rdsk/c3t1d0
Step 2.
the partitions. For example:
Use the insf command with the -e option to create the device files for all
insf -e -H 0/18/1/2/0.0.1.0
You should now have eight device files for this disk:
/dev/[r]dsk/c?t?d?
(This refers to the entire disk)
/dev/[r]dsk/c?t?d?s1
(This refers to the EFI partition)
/dev/[r]dsk/c?t?d?s2
(This will be the HP-UX partition)
/dev/[r]dsk/c?t?d?s3
(This refers to the Service partition)
Step 3.
disk:
Use pvcreate to make the HP-UX partition of the disk an LVMmanaged
pvcreate -B /dev/rdsk/c3t1d0s2
Step 4.
Add the disk to vg00:
vgextend vg00 /dev/dsk/c3t1d0s2
Step 5.
Place the boot files on the disk using mkboot:
mkboot -e -l /dev/rdsk/c3t1d0
Step 6.
Copy any autoboot file from the original boot disk to this one.
a.
partition to the current directory. Make sure to use the device file
with the
Use efi_cp to copy the AUTO file from the original boot disk’s EFIs1 suffix, as it refers to the EFI partition:
efi_cp -d /dev/rdsk/cntndns1 -u /efi/hpux/auto ./AUTO
b.
partition:
Copy the file from the current directory into the new disk’s EFI
efi_cp -d /dev/rdsk/c3t1d0s1 ./AUTO /efi/hpux/auto
Step 7.
volume group onto the desired physical volume. The logical volumes
must be extended in the same order that they are configured on the
original boot disk. Use the
determine the list of logical volumes and their order. For example:
Use the lvextend command to mirror each logical volume in the rootpvdisplay command with the -v option to
pvdisplay -v /dev/dsk/c0t0d0s2 | grep ’current.*0000$’
00000 current /dev/vg00/lvol1 00000
00038 current /dev/vg00/lvol2 00000
00550 current /dev/vg00/lvol3 00000
00583 current /dev/vg00/lvol4 00000
00608 current /dev/vg00/lvol5 00000
00611 current /dev/vg00/lvol6 00000
00923 current /dev/vg00/lvol7 00000
01252 current /dev/vg00/lvol8 00000
In this example, mirror the logical volumes as follows:
lvextend -m 1 /dev/vg00/lvol1 /dev/dsk/c3t1d0s2
lvextend -m 1 /dev/vg00/lvol2 /dev/dsk/c3t1d0s2
lvextend -m 1 /dev/vg00/lvol3 /dev/dsk/c3t1d0s2
lvextend -m 1 /dev/vg00/lv0l4 /dev/dsk/c3t1d0s2
lvextend -m 1 /dev/vg00/lvol5 /dev/dsk/c3t1d0s2
lvextend -m 1 /dev/vg00/lvol6 /dev/dsk/c3t1d0s2
lvextend -m 1 /dev/vg00/lvol7 /dev/dsk/c3t1d0s2
lvextend -m 1 /dev/vg00/lvol8 /dev/dsk/c3t1d0s2
If
lvextend fails with following message:
“m”: Illegal option
then HP MirrorDisk/UX is not installed.
Step 8.
Update the root volume group information:
lvlnboot -R /dev/vg00
Step 9.
disk and that the boot, root, and swap logical volumes appear to be on
both disks:
Display the BDRA. Verify that the mirrored disk is displayed as a boot
lvlnboot –v
Step 10.
Specify the mirror disk as the alternate boot path in nonvolatile memory:
setboot -a path_to_disk
Step 11.
text editor:
Add a line to /stand/bootconf for the new boot disk using vi or another
vi /stand/bootconf
l /dev/dsk/c3t1d0s2
where
denotes LVM.

Monday, February 13, 2012

Clean up Procedure after Ignite replication of hpvm host


This errror is created by Ignite replication of an hpvm system. The following checks device integrity and cleans up errors created by Ignite replication.
hpvmcreate: ERROR (jdeautp1): Incorrect backing device type.
First check for errors with this script (I may check this in at some point)
#!/usr/bin/sh
#
# Unofficial quick and dirty passthru DSF check script
#
# It walks all /dev/pt/* files and tries to find corresponding /dev/rdisk
# or /dev/rtape files. If they are foudn their minor numbers are compared.
#
# @(#) pt_check.sh v1.1 – stanm@wtec
#
for i in $(ls /dev/pt/*)
do
# ll $i
shortname=${i##*_}
printf “checking $shortname”
minor1=$(ll $i|awk ‘{print $6}’)
# echo minor1=$minor ($i)
if [ -c /dev/rdisk/$shortname ]; then
minor2=$(ll /dev/rdisk/$shortname|awk ‘{print $6}’)
# echo minor2=$minor2 ($/dev/rdisk/$shortname)
if [[ "x$minor1" = "x$minor2" ]]; then
printf ” – OK\n”
else
printf ” – Minor numbers are probably incorrect\n”
printf “minor1=$minor1 ($i) vs ”
printf “minor2=$minor2 (/dev/rdisk/$shortname)\n”
fi
else
# could be tape
if [ -c /dev/rtape/${shortname}_BEST ]; then
minor2=$(ll /dev/rtape/${shortname}_BEST|awk ‘{print $6}’)
if [[ "x$minor1" = "x$minor2" ]]; then
printf ” – OK\n”
else
printf ” – Minor numbers are probably incorrect\n”
printf “minor1=$minor1 ($i) vs ”
printf “minor2=$minor2 (/dev/rtape/${shortname}_BEST)\n”
fi
else
printf ” – /dev/rdisk/$shortname or /dev/rtape/${shortname}_BEST not found – check skipped\n”
fi
fi
done
Output indicating problems:
checking disk11 – Minor numbers are probably incorrect
minor1=0×000005 (/dev/pt/pt_disk11) vs minor2=0×000008 (/dev/rdisk/disk11)
checking disk12 – Minor numbers are probably incorrect
minor1=0×000006 (/dev/pt/pt_disk12) vs minor2=0×000009 (/dev/rdisk/disk12)
checking disk13 – Minor numbers are probably incorrect
minor1=0×000007 (/dev/pt/pt_disk13) vs minor2=0x00000a (/dev/rdisk/disk13)
checking disk14 – Minor numbers are probably incorrect
minor1=0×000008 (/dev/pt/pt_disk14) vs minor2=0x00000b (/dev/rdisk/disk14)
checking disk15 – Minor numbers are probably incorrect
minor1=0×000009 (/dev/pt/pt_disk15) vs minor2=0x00000c (/dev/rdisk/disk15)
checking disk17 – OK
checking disk18 – /dev/rdisk/disk18 or /dev/rtape/disk18_BEST not found – check skipped
checking disk19 – Minor numbers are probably incorrect
minor1=0×000017 (/dev/pt/pt_disk19) vs minor2=0×000013 (/dev/rdisk/disk19)
checking disk2 – OK
checking disk22 – Minor numbers are probably incorrect
minor1=0×000018 (/dev/pt/pt_disk22) vs minor2=0×000014 (/dev/rdisk/disk22)
checking disk23 – Minor numbers are probably incorrect
minor1=0×000019 (/dev/pt/pt_disk23) vs minor2=0×000015 (/dev/rdisk/disk23)
checking disk3 – OK
checking disk5 – OK
checking disk8 – /dev/rdisk/disk8 or /dev/rtape/disk8_BEST not found – check skipped
checking disk9 – /dev/rdisk/disk9 or /dev/rtape/disk9_BEST not found – check skipped
Correction procedure:
cd /var/opt/hpvm/common/

rm -f hpvm_devinit
cd /dev/pt
ls
rm -f *
hpvmdevmgmt -I

Consider this a necessary procedure to clean up after ignite replication

Friday, February 10, 2012

Setboot hardware path to legacy hardware path


HP-UX 11.23
setboot provides output only including the hardware path (ioscan -H).
When calculating DRD clone targets and such you need the regular legacy device path.
Here is a converter, built with a little help from JRF on the ITRC forums.
First get the setboot path. Might want to use the full path of the setboot command in practice.
pboot=$(setboot | grep ^Primary | awk ‘{ print $NF }’);
aboot=$(setboot | grep ^Alternate |awk ‘{ print $NF}’);
abootdisk=$(ioscan -kfnCdisk | awk -v aboot=${aboot} ‘/aboot/ $0~aboot {getline;print aboot,$2}’ | awk ‘{ print $2 }’);
pbootdisk=$(ioscan -kfnCdisk | awk -v aboot=${pboot} ‘/pboot/ $0~pboot {getline;print pboot,$2}’ | awk ‘{ print $2 }’);
The slick part is getting the variable in and out of awk.
Uses ioscan.

Thursday, February 9, 2012

VxVM replace boot disk


Create a partition description file
(Need to update the EFI and HPSP size below according to the other root disk partition’s size)
This examples is where the new disk is disk85. Applies only to HP-UX 11.31 with VxVM as boot drive manager.
# vi /tmp/efipart
3
EFI 500MB
HPUX 100%
HPSP 400MB
Use the idisk(1M) command to partition the disk according to this file
# idisk -wf /tmp/efipart /dev/rdisk/disk85
Write EFI info to the EFI partition on the disk
# mkboot -e -l /dev/rdisk/disk85
Confirm the AUTO file entry is intact It should be  “boot vmunix”
# efi_cp -d /dev/rdisk/disk85_p1 -u /EFI/HPUX/AUTO /tmp/efi; cat /tmp/efi
If found any difference, edit /tmp/efi file  as below to update the entry “boot vmunix”
#echo “boot vmunix ” > /tmp/efi
Update auto file
#efi_cp -d /dev/rdisk/disk85_p1 /tmp/efi /EFI/HPUX/AUTO
Confirm the AUTO file entry again, It should be  “boot vmunix”
# efi_cp -d /dev/rdisk/disk85_p1 -u /EFI/HPUX/AUTO /tmp/efi; cat /tmp/efi
Initialize the disk as VXVM  boot disk
#### vxdisksetup -iB disk85_p2  ((lives in etc vx bin slashes removed due to Word Press error))
Add the disk to the existing rootdg
# vxdg -g rootdg adddisk rootdisk02=disk85_p2
Write Volume Manager volume information to the LABEL file:
# /opt/VRTS/bin/vxbootsetup rootdisk02
Display the LIF and Volume Manager label information:
# vxvmboot -v /dev/rdisk/disk85
Check the Mirror status  ( Each volume should be with two plex )
$ vxprint –htg rootdg |egrep –i “^v|^pl”

Wednesday, February 8, 2012

HPUX Patch Designations


Ever wonder what those letters in HP-UX patches stand for.
PHCO – General Command and libraries patches
PHKL – Kernel patches.
PHNE – Networking Patches
PHSS – Sub System patches (Anything else)
Any of these patches can force you to do a reboot. Kernel patches almost always involve a reboot

Tuesday, February 7, 2012

SAP GUI for HTML – running SAP on a PC that does not have the SAP client installed


There are three versions of the SAP GUI the Standard version, which is for Win32, a version for none windows based PC’s which is SAP GUI for Java and SAP GUI for HTML. Both the Win32 and Java version require some form of installation on every workstation. SAP GUI for HTML (Web GUI) requires no installation on each workstation other than a standard web browser.
SAP GUI for HTML then allows you to access SAP via a Web browser using the same screens, transaction codes etc as you would when using the standard Win32 GUI. All you have to do install the ITS which is a free download from SAP onto a server machine.
Advantages
  • Still has same look and feel as standard SAP
  • Don’t have to do any work other than install the ITS
  • Don’t have to install SAP GUI onto PC
Disadvantages
  • Still has same look and feel as standard SAP
  • Requires a lot more network capacity (10x)
  • Cant run every transaction (i.e. can’t handle SAP graphics)

To activate the SAP WebGui service (SAPGUI for HTML) in SAP WAS 6.40:
1) Make sure the HTTP service is running and note the port number (I think the default is 8001). Txn SMICM, then pushbutton “services” (3rd from the left).
2) Activate the webgui service. Txn SICF, navigate to default_host -> sap -> bc -> gui -> sap -> its -> webgui. Right-click webgui and “activate service”.
3) You should then be able to test the service. Right-click webgui then “test service”. Enter username/pswd, and voila!
The URL for the webgui will be:
http://:/sap/bc/gui/sap/its/webgui/!

Monday, February 6, 2012

Important and Categorized SAP Tcodes


SPOOL
1. SP12                        –                       Tem Se Administration
2. SPAD                        -                       Spool Administration
3. SP01                                    -                       Output Controller
STMS
1. STMS                        –                       Transport Management System
2. SE09/10                   –                       Transport Organizer
3. SE03                                    -                       Transport Organizer Tools
4. SE01                                    -                       Transport Organizer (Extended)
ABAP
1. SE16                                    -                       Data Browser
2. SE38/SA38               -                       ABAP Editor/Reports.
3. SE80                                    -                       Object Navigator.
OTHERS
1. SPAM                        -                       Support Pack Manager
2. SAINT                       -                       Add on Installation Tool
3. SICK/SM28                -                       Installation Check
4. SPRO                        -                       Customizing – Edit Project.
5. SALE                         -                       Display ALE Customizing.
6. BD54                        -                       Maintain Logical Systems.
7. SGEN                        -                       SAP Load Generator.
PROFILES
1. RZ10                        -                       Maintenance of Profile Parameters.
2. RZ11                                    -                       Profile Parameter Maintenance.
3. TU02                        -                       Parameter Changes on this instance.
MONITORING
1. RZ01                                    -                       Job Scheduling Monitor.
2. RZ03                                    -                       Presentation, Control of SAP Instances.
3. RZ04                                    -                       Maintain SAP Instances.
4. RZ12                                    -                       Maintain RFC Server Group
5. RZ20                                    -                       CCMS Monitoring
6. AL11                        -                       List SAP Directories.
7. SM01                        -                       Lock Transactions.
8. SM02                        -                       System Messages.
9. SM04                        -                       Users List
10. SM12                          -                       Display and Delete Locks.
11. SM13                          -                       Update Statistics.
12. SM21                          -                       System Logs.
13. SM35                          -                       Batch Input Monitoring.
14. SM36                          -                       Background Job Scheduling.
15. SM37                          -                       Background Job Monitoring.
16. SM50                          -                      Work Process Overview.
17. SM51                          -                       Instances Overview.
18. SM58                          -                       Asynchronous RFC Error Log.
19. SM63                          -                       Display/Maintain Operation Modes.
20. SM65                          -                       Background Job Analysis Tool.
21. SM66                          -                       Global Work Process Overview.
22. AL08                          -                       System wide active users list.
23. AL11                          -                       List SAP Directories.
24. AL15                          -                       Customize SAPOSCOL Destination.
USER ADMINISTRATION
1. PFCG                        -                       Profile & Role Maintenance.
2. SU01                        -                       User Administration.
3. SU02                        -                       Maintain Authorization Profiles.
4. SU10                        -                       Mass User Maintenance.
5. SU53                        -                       Evaluate Authorization Check.
6. SUIM                                    -                       User Information.
ALERTS
1. AL02                        -                       Database Alert Monitor
2. AL03                        -                       OS Alert Monitor
3. AL04                        -                       Monitor Call Distribution.
4. AL05                        -                       Monitor Current Workload.
5. OS07                        -                       Remote OS Activity.
CLIENT
1. SCC1                        -                       Client Copy Logs – Special Selections.
2. SCC3                                    -                       Client Copy Logs.
3. SCC4                                    -                       Client Administration.
4. SCC5                                    -                       Delete Client
5. SCC7                                    -                       Post Client Import Methods.
6. SCC8                                    -                       Client Export.
7. SCC9                                    -                       Remote Client Export.
8. SCCL                                    -                       Local Client Copy.
DATABASE
1. DB01                        -                       Analyze Exclusive lock waits.
2. DB02                        -                       Database Performance – tables and Indexes.
3. DB03                        -                       Parameter Changes in the Database.
4. DB12                        -                       DBA Backup Logs.
5. DB13                        -                       DBA Planning Calendar.
6. DB14                        -                       Display DBA Operation Logs.
7. DB16                        -                       Display DB Check Results.
8. DB17                        -                       Configure DB Check.
9. DB20                        -                       Update DB Statistics.
10. DB21                          -                       Configure DB Statistics.
11. DB24                          -                       Log Information: All Operations.
12. DB26                          -                       Database Profile Parameters.
WORKLOAD ANALYSIS
1. ST01                                    -                       System Trace
2. ST02                                    -                       Setups/Tune up Buffers.
3. ST03                                    -                       Performance, SAP Statistics, Workload
4. ST03N                      -                       System Workload & Performance Statistics.
5. ST04                                    -                       DB Performance Monitor.
6. ST05                                    -                       Performance Trace.
7. ST07                                    -                       Application Monitor.
8. ST10                                    -                       Table Call Statistics.
9. ST11                                    -                       Developer Traces.
10. ST22                          -                       ABAP Dump Analysis.
11. STAD                          -                       Statistics Display for all systems.
12. STAT                          -                       Local Transaction Statistics.
13. ST06                          -                       Operating Systems monitor.