Showing posts with label Tcode. Show all posts

Monday, February 6, 2012

Important and Categorized SAP Tcodes


SPOOL
1. SP12                        –                       Tem Se Administration
2. SPAD                        -                       Spool Administration
3. SP01                                    -                       Output Controller
STMS
1. STMS                        –                       Transport Management System
2. SE09/10                   –                       Transport Organizer
3. SE03                                    -                       Transport Organizer Tools
4. SE01                                    -                       Transport Organizer (Extended)
ABAP
1. SE16                                    -                       Data Browser
2. SE38/SA38               -                       ABAP Editor/Reports.
3. SE80                                    -                       Object Navigator.
OTHERS
1. SPAM                        -                       Support Pack Manager
2. SAINT                       -                       Add on Installation Tool
3. SICK/SM28                -                       Installation Check
4. SPRO                        -                       Customizing – Edit Project.
5. SALE                         -                       Display ALE Customizing.
6. BD54                        -                       Maintain Logical Systems.
7. SGEN                        -                       SAP Load Generator.
PROFILES
1. RZ10                        -                       Maintenance of Profile Parameters.
2. RZ11                                    -                       Profile Parameter Maintenance.
3. TU02                        -                       Parameter Changes on this instance.
MONITORING
1. RZ01                                    -                       Job Scheduling Monitor.
2. RZ03                                    -                       Presentation, Control of SAP Instances.
3. RZ04                                    -                       Maintain SAP Instances.
4. RZ12                                    -                       Maintain RFC Server Group
5. RZ20                                    -                       CCMS Monitoring
6. AL11                        -                       List SAP Directories.
7. SM01                        -                       Lock Transactions.
8. SM02                        -                       System Messages.
9. SM04                        -                       Users List
10. SM12                          -                       Display and Delete Locks.
11. SM13                          -                       Update Statistics.
12. SM21                          -                       System Logs.
13. SM35                          -                       Batch Input Monitoring.
14. SM36                          -                       Background Job Scheduling.
15. SM37                          -                       Background Job Monitoring.
16. SM50                          -                      Work Process Overview.
17. SM51                          -                       Instances Overview.
18. SM58                          -                       Asynchronous RFC Error Log.
19. SM63                          -                       Display/Maintain Operation Modes.
20. SM65                          -                       Background Job Analysis Tool.
21. SM66                          -                       Global Work Process Overview.
22. AL08                          -                       System wide active users list.
23. AL11                          -                       List SAP Directories.
24. AL15                          -                       Customize SAPOSCOL Destination.
USER ADMINISTRATION
1. PFCG                        -                       Profile & Role Maintenance.
2. SU01                        -                       User Administration.
3. SU02                        -                       Maintain Authorization Profiles.
4. SU10                        -                       Mass User Maintenance.
5. SU53                        -                       Evaluate Authorization Check.
6. SUIM                                    -                       User Information.
ALERTS
1. AL02                        -                       Database Alert Monitor
2. AL03                        -                       OS Alert Monitor
3. AL04                        -                       Monitor Call Distribution.
4. AL05                        -                       Monitor Current Workload.
5. OS07                        -                       Remote OS Activity.
CLIENT
1. SCC1                        -                       Client Copy Logs – Special Selections.
2. SCC3                                    -                       Client Copy Logs.
3. SCC4                                    -                       Client Administration.
4. SCC5                                    -                       Delete Client
5. SCC7                                    -                       Post Client Import Methods.
6. SCC8                                    -                       Client Export.
7. SCC9                                    -                       Remote Client Export.
8. SCCL                                    -                       Local Client Copy.
DATABASE
1. DB01                        -                       Analyze Exclusive lock waits.
2. DB02                        -                       Database Performance – tables and Indexes.
3. DB03                        -                       Parameter Changes in the Database.
4. DB12                        -                       DBA Backup Logs.
5. DB13                        -                       DBA Planning Calendar.
6. DB14                        -                       Display DBA Operation Logs.
7. DB16                        -                       Display DB Check Results.
8. DB17                        -                       Configure DB Check.
9. DB20                        -                       Update DB Statistics.
10. DB21                          -                       Configure DB Statistics.
11. DB24                          -                       Log Information: All Operations.
12. DB26                          -                       Database Profile Parameters.
WORKLOAD ANALYSIS
1. ST01                                    -                       System Trace
2. ST02                                    -                       Setups/Tune up Buffers.
3. ST03                                    -                       Performance, SAP Statistics, Workload
4. ST03N                      -                       System Workload & Performance Statistics.
5. ST04                                    -                       DB Performance Monitor.
6. ST05                                    -                       Performance Trace.
7. ST07                                    -                       Application Monitor.
8. ST10                                    -                       Table Call Statistics.
9. ST11                                    -                       Developer Traces.
10. ST22                          -                       ABAP Dump Analysis.
11. STAD                          -                       Statistics Display for all systems.
12. STAT                          -                       Local Transaction Statistics.
13. ST06                          -                       Operating Systems monitor.

Thursday, July 7, 2011

How to reset buffer on SAP Server

Some-time its needed to reset some buffers in SAP For performance issues So here iam sharing the differnt buffer cleanup T-codes.
But Keep n mind Resetting of the buffers could change the performance of the entire system

/$DYNP - reset the screen buffer of the application server
/$SYNC - resets the buffers of the application server
/$CUA - resets the CUA buffer of the application server
/$TAB - resets the TABLE buffers of the application server
/$NAM - the nametab buffer of the application server

Wednesday, July 6, 2011

How to configure Central User Administration (CUA)

Hi All,

Here is the procedure for Central user administration configuration in a landscape:

1) Create Logical systems to all clients for the landscape using BD54 or SALE as
comfortable.

2) Attach Logical system to clients using Same.

3) Create RFC connection to relevant systems with the same name as logical system name .

If you Logical system name is SIDCLNT100 for dev then create RFC connection to
DEV with same name SIDCLNT100.

4) Let us suppose you Central system: DEVCLNT100
Child system: QUACLNT200

5) Create user CUA_DEV_100 in devclnt100 system

4. Create user CUA_QUA_200 in quaclnt200 system.

Create RFC’s to child systems from central and central to child.

5) Now logon to central system and execute tcode scua to configure cua.

Enter the name of the distribution model: CUA

Press create

Enter ALL Child system RFC’s

Save your entries now result screen will appear

If you expand the nodes for

the individual systems, you normally see the following messages for

each system: .ALE distribution model was saved,. .Central User

Administration activated,. and .Text comparison was started.. If

problem messages are displayed here, follow the procedure in SAP

Note 333441:


6) Setting the Parameters for Field Distribution
Enter Tcode SCUM in central system following screen will appear
Now maintain your filed distribution and save it.
You can use transaction SUCOMP to administer company address data.
You can use transaction SCUG in the central system to perform the
synchronization activities between the central system and the child
systems by selecting your child system on the initial screen of transaction
SCUG and then choosing Synchronize Company Addresses in the Central System

After you have synchronized the company addresses, you can transfer the
users from the newly connected child systems to central administration.

This is done, as with the synchronization of the company addresses, using

transaction SCUG in the central system. To do this, on the initial screen of

transaction SCUG, select your child system and choose the Copy Users to

the Central System button.


Use

You can use the report RSCCUSND from the central system of Central User Administration (CUA) to synchronize the master data of selected users with a child system of the CUA. The report sends the master data (including role and profile assignments) to a child system of the CUA.


If master data exists in the child system for the user sent, it is overwritten.

Procedure
...

1. Start report RSCCUSND (for example, using transaction SA38).

2. In the Receiving System field, specify the child system to which you want
to send the user data.

3. You can use the fields User and User Group to restrict the number of users.

4. Specify the data that you want to distribute under Distribution Options.

5. Choose Execute.

Tuesday, July 5, 2011

How to update using SPAM/SAINT

Importing a SPAM/SAINT Update
Use:
A SPAM/SAINT Update (SPAM update for short) contains updates and improvements to Support Package Manager and Add-On Installation Tool. There is always one SPAM update for each release.

The latest SPAM update is also available in SAP Support Portal, under service.sap.com/spManager.

Make sure you always have the most recent version of SPAM update before importing Support Packages or Installation Packages.

Prerequisites
You can only import a SPAM update if there are no terminated packages in the system.

A dialog box informs you if there are any terminated packages. You then have two options:

● Import the entire queue to begin with and then the SPAM update.

● Delete the queue, import the SPAM update, then import the queue.

You can only delete the queue if module Import 1 has not yet started (up to phase SCHEDULE_RDDIMPDP).

Procedure
1. Call Support Package Manager (transaction SPAM).

2. Check if the SPAM update offered is newer than the one in your system.

3. To import the most recent SPAM update, choose Support Package ® Import SPAM update.

SPAM updates are automatically confirmed once they have been imported.

Transaction on SAP System

A transaction in SAP terminology is the execution of a program. The normal way of executing ABAP code in the SAP system is by entering a transaction code (for instance, SE51 is the code for the ABAP workbench). Transactions can be accessed via system-defined or user-specific, role-based menus. They can also be started by entering their transaction code (a mnemonic name of up to 20 characters) in the special command field, which is present in every SAP screen. Transactions can also be invoked programmatically by means of the ABAP statements CALL TRANSACTION and LEAVE TO TRANSACTION. Transaction codes can also be linked to screen elements or menu entries. Selecting such an element will start the transaction. The term "transaction" must not be misunderstood here: in the context just described, a transaction simply means calling and executing an ABAP program. In application programming, "transaction" often refers to an indivisible operation on data, which is either committed as a whole or undone (rolled back) as a whole. This concept exists in SAP but is there called a LUW (Logical Unit of Work). In the course of one transaction (program execution), there can be different LUWs.

Let’s have a look at the different kind of transactions:


1) Dialog transaction
These are the most common kind of transactions. The transaction code of a dialog transaction is linked to a Dynpro of an ABAP program. When the transaction is called, the respective program is loaded and the Dynpro is called. Therefore, a dialog transaction calls a Dynpro sequence rather than a program. Only during the execution of the Dynpro flow logic are the dialog modules of the ABAP program itself are called. The program flow can differ from execution to execution. You can even assign different dialog transaction codes to one program.


2) Parameter transaction
In the definition of a parameter transaction code, a dialog transaction is linked with parameters. When you call a parameter transaction, the input fields of the initial Dynpro screen of the dialog transaction are filled with parameters. The display of the initial screen can be inhibited by specifying all mandatory input fields as parameters of the transaction.


3) Variant transaction
In the definition of a variant transaction code, a dialog transaction is linked with a transaction variant. When a variant transaction is accessed, the dialog transaction is called and executed with the transaction variant. In transaction variants, you can assign default values to the input fields on several Dynpro screens in a transaction, change the attributes of screen elements, and hide entire screens. Transaction variants are maintained in transaction SHD0.


4) Report transaction
A report transaction is the transaction code wrapping for starting the reporting process. The transaction code of a report transaction must be linked with the selection screen of an executable program. When you execute a report transaction, the runtime environment internally executes the ABAP statement SUBMIT—more to come on that.


5) OO transaction
A new kind of transaction as of release 6.10. The transaction code of an OO transaction is linked with a method of a local or global class. When the transaction is called, the corresponding program is loaded, for instance methods an object of the class is generated and the method is executed.

Friday, July 1, 2011

SAP Notes : Troubleshoot your SAP ERP problem

SAP Notes give you instructions on how to remove known errors from SAP Systems. They include a description of the symptoms, the cause of the error, and the SAP Release and Support Package level in which the error occurs.

Depending on the type of error, an SAP Note may also include:

· Workarounds

· Descriptions of how to correct repository objects in the ABAP workbench, known as correction instructions

· Links to Support Packages that solve the problem

You can access SAP Notes both from the SAP Service Marketplace and SAPNet - R/3 Frontend.

Caution: The Note Assistant can automatically implement only SAP Notes that have correction instructions.
Read the SAP Note carefully before you use the Note Assistant to implement it. The SAP Note can contain prerequisites, interactions, and references to postprocessing activities (making changes to a table, for example) that you must take into consideration when you implement it.
Technical Details on Correction Instructions Locate the document in its SAP Library structure

Validity

All correction instructions specify the releases and Support Package levels in which you can implement them. These release and Support Package levels are known as the validity range of the correction instructions.

For example, if Support Package 5 corrects and error in Release 4.6C, the validity range of the correction instructions is 4.6C Support Packages 1 -4.

An SAP Note can also determine that correction instructions are not allowed to be implemented if a certain software component (an add-on, for example) exists in the system. This is the case, for example, when a correction changes a program part that is required by another software component in an unaltered form.

If an exception such as this was defined, it is displayed in the header area of the correction instructions, under Invalid for .

The Note Assistant automatically checks the validity and only implements a correction instruction if the system status is within the validity range specified.

Prerequisites

In some cases, you can only implement correction instructions if certain other correction instructions have already been implemented. This is due to related changes made to the same part of the source code, or semantic dependencies.

These dependencies are described in the header area of the correction instructions. These dependencies (prerequisites) mean that you need to implement a sequence of SAP Notes, and not just one SAP Note.

Friday, June 17, 2011

SAP Basis Daily Check


SAP Logon Connection Test

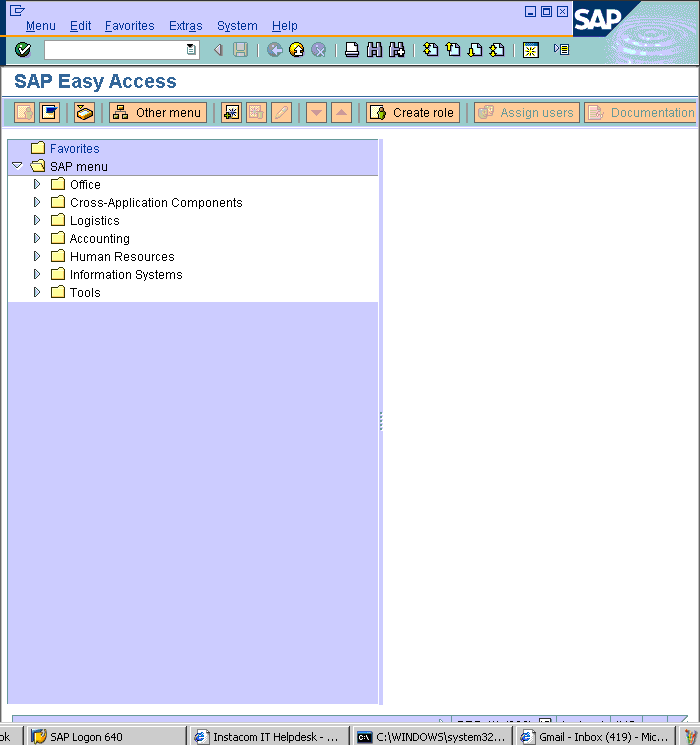
1. Double click on all above instance to check if you are able to login.
2. If login sucessful, this means server is alive and has no connectivity issue. A new screen will pop up. See below

3. You shall see the above screen. Now you are ready to start your daily check list.
DB12/DB13 Create and Check backup status
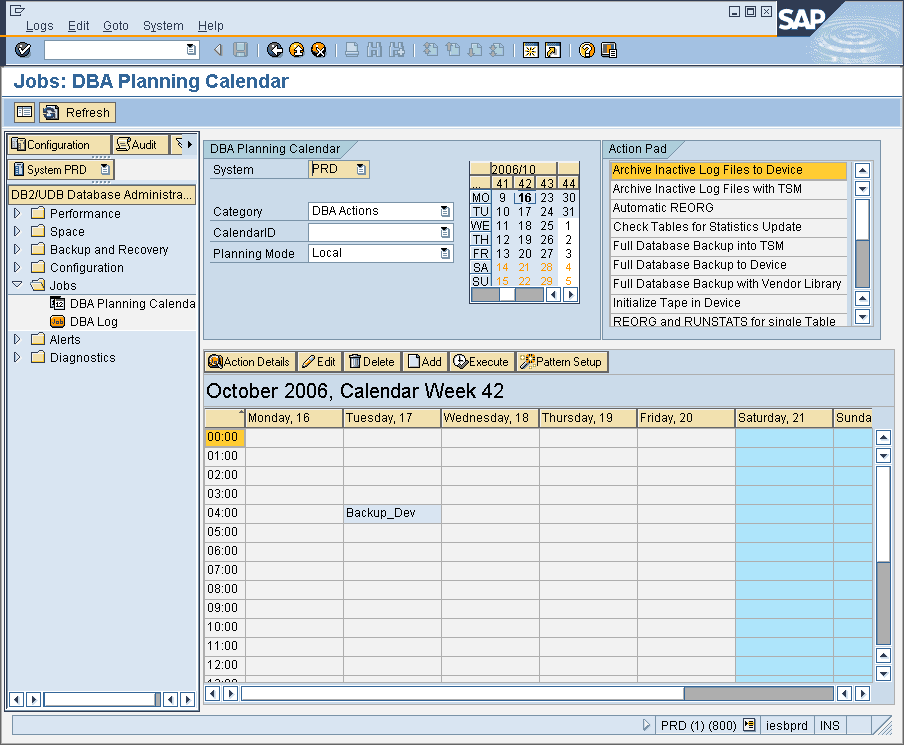
1. On the command field, key in DB12 and below screen will be displayed. It shows the summary of the backup status.

2. On command field, enter /nDB13. This T-code is used to perform backup. You can also check the backup status.


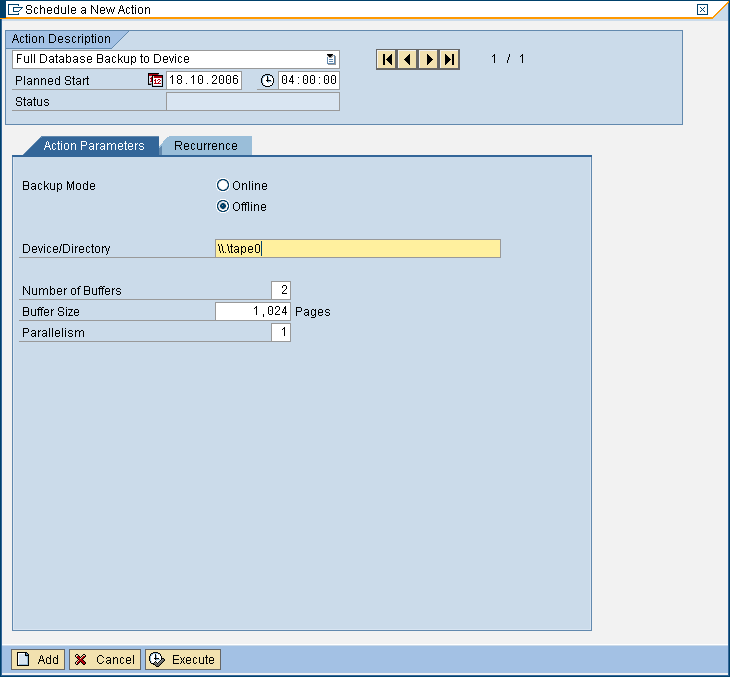
3. In DB13, select a desired cell which you plan to perform your backup. Double click on the cell
4. Choose Full database backup to device
5. Backup mode: Offline
6. Device directory: ‘ d:\backup\ (this is just a folder which your backup could be stored)
7. Below is a sample picture.

DB02 Check Database size
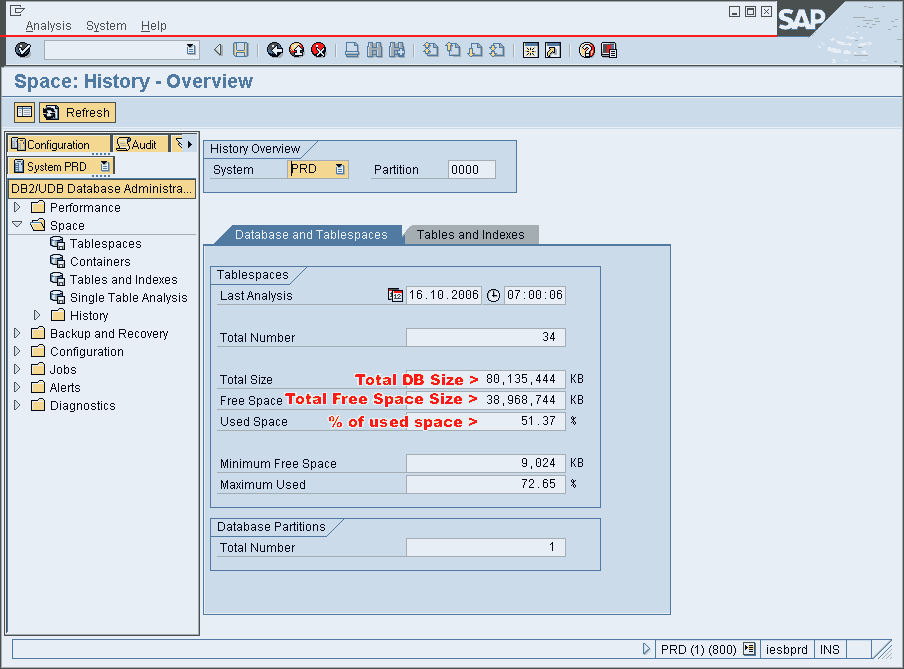
1. Use DB02 to check DB size
2. Database current size (GB) is Total DB size – Free space
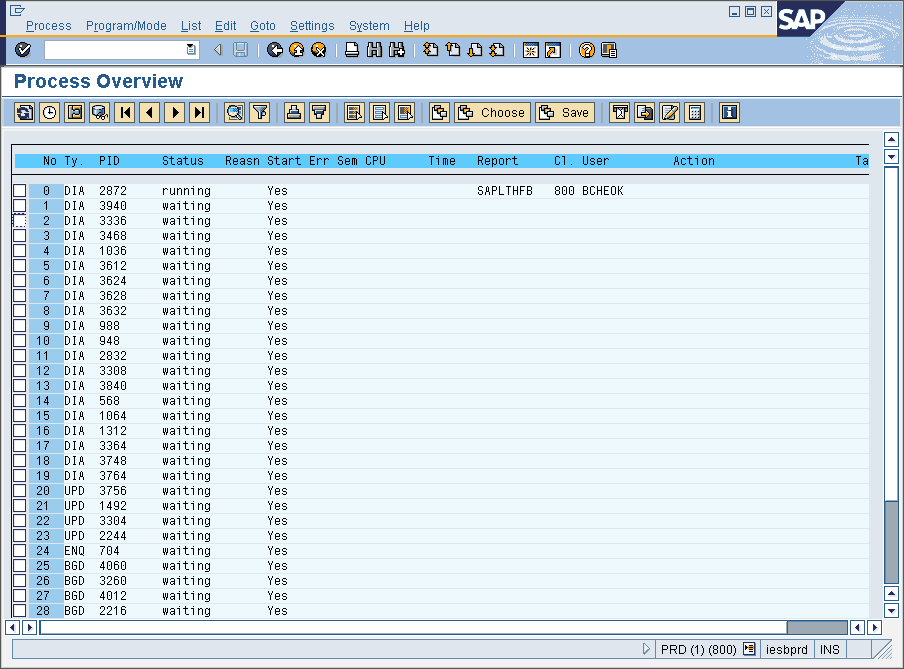
SM50 Check if instance is running on all servers1. All work process is either running or waiting and none are stopped except CPIC (interprocess communication)
2. Make sure not all dialog work process are used up, otherwise other user cannot make any transaction.
RZ20 Check filling degree of spool used numbers
1. Click on SAP CCMS Monitor Templates
2. Click on SPOOL System
3. System Wide > Spool > SpoolNumbers > UsedNumebrs
4. If value greater then 80% in spool numbers – will lead to system wait until spool reorganisation is done
SM13 Check if update is active
1. Enter SM13 and make sure UPDATE SYSTEM STATUS : Update is active.
2. Make sure client = *, User =* and status = All, Press F8 to execute
3. Click on any entry with error
4. You may have to dig deeper (SM21, ST22, DB02, etc) and work with functional expert to resolve the issue
SM12 Check lock entries with long duration
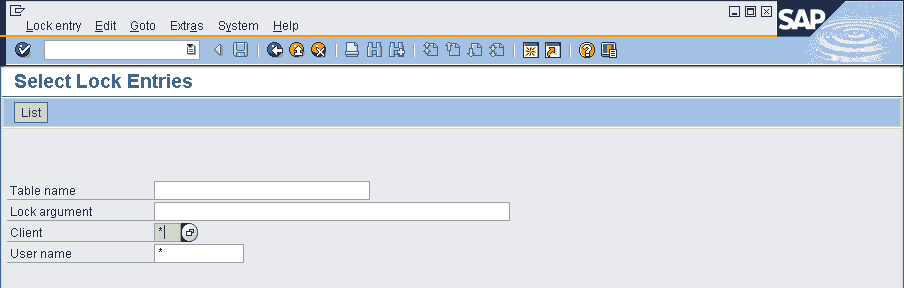
1. Type SM12 in command field
2. Client = *
3. User name = *
4. Click list.
Its important to notice all values under the time column show the current time. Jobs with earlier date should be immediately investigated. These locks are problematic because it prevents access or changes to the locked records.
ST22 Check and analyze SAP ABAP short Dumps
An ABAP dump (AKA short dump) is generated when a report or transaction terminates as the result of a serious error. The system records the error in the system log. SM21 and write a snapshot (dump) of the program terminiation to a special table (SNAP). This transaction can also be called from the system log (SM21). ABAP dump is used to analyze and determine why the error occured and take corrective action
(no print screen – currenly my SAP has no Runtime errors)
Once Runtime errors is displayed
1. Double click on the entries
2. A detail analysis on the error will be displayed
3. Dump contains the follow information
- Why program has been terminted
- What caused the program termination
- Where in the program code the termination occured
- What you can do to correct the error
- The values of the relevant system fields when the program terminated
- The calls or events that was active when the program terminated
- Any other programs that are affected


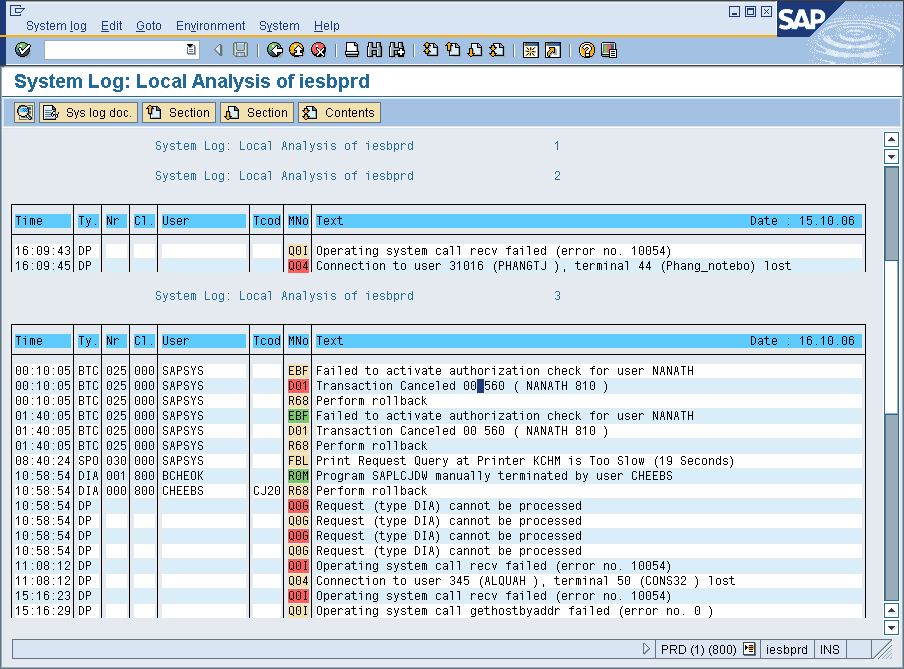
SM21 Check and analyze SAP system log for any critical log entries (hourly)
1. Type SM21 into command field
2. Enter the relevant details and execute
3. Look for unusual entries.
4. Double click on the entries for more information
Lastly, a few more userful transaction
1. SM37 – Check and analyze failed background jobs
2. SP01 – Check SPOOL for errors
3. ST06 – CPU & Memory Utilization
4. ST03 – Check for database performance and response time
5. ST11 – Check for core file entries