1. Before that download the installation guide from the http://service.sap.com/instguides and read it properly before the installation is started.
2. Prepare the OS as described in the installation Guide.
3. Install ABAP Central Instance (CI)
4. Install Database (chose the number of parallel process at an optimal level (which can be maximum up to 8, default is 3). It depends on the system resources (processors and memory in the Server).
5. Install additional Dialog Instances ABAP
6. Client Creation (using Tx Code SCC4) (UID/Password : sap* / pass)
7. Client Copy from 000 to a new client. (There will only be 2 clients initially after a fresh installation. 066 and 000).
8. Install an Add-on Java to Central Instance (CI) to the newly created client (java has no client concept in JAVA Stack), here it will install the Central Service (CS) instance (MS, ES) and also will install Dispatcher, Server process and SDM.
9. Install Add-on Java to other ABAP Dialog Instance (It will install only Dispatcher and Server process) also note that only one Server process (server0) will created when the instance is initially installed, for scaling up a new server process (server1) can be added separately after installation.
10. Decide on the Option of User Management, it could be either centrally or distributed.
Central – can be handled in the ABAP stack. (using Tx Code SU01 / PFCG) and distributed would use Java’s User Management Stack (UME) for user management.
11. Changes to JVM parameters to the Java Stack (dispatcher, server process(es)) are made after installation. The first step in the post installation steps is to run the template Configurator. It will set the SAP recommended JVM parameters setting for Java Stack.
Template Configurator is found in the path :
(/usr/sap/SID/SYS?global/TemplateConfig/cfgtemplategui.bat) or http://hostname:javaport/nwa ->Deploy and Change.
It is done individually for each of the instances immediately after the ABAP installation.
Is it possible to add a Java Stack alone, without ABAP in a ABAP+JAVA installation scenario. ?
In an ABAP+JAVA stack combined (java add-on to ABAP stack) installation, it is not possible to install java stack (individually, without ABAP stack) in any instance or in any host. So any additional instance of Java Stack can only be installed as an add-on to a fresh ABAP stack .i.e. both have to be installed together. For scaling up java stack a further server process can be added, BUT ABAP stack alone, without JAVA Add-on, can be installed.
A new Server process can be added by Logging into “ConfigTool” "Current Instance" -> Select the Option “Server” -> “Add”
Difference in 6.40 and 7.00 installation steps.
In 7.0 we have to choose a particular installable component during initial steps based on the Client requirement (installation scenario). ie. If the client’s requirement is of installing EP, the nEP alone will be selected for installation. Since EP requires only NW Java Stack, it will install only Java Stack with EP component. Further it will combine CI and DB installation in one step, while 6.40 had two separate steps for CI and DB installation. In ABAP+JAVA Stack installation, In NW 7.0 it will automatically create three clients 000, 066 and 001 and java stack will be automatically added to 001 client. While in 6.40 ABAP will be installed first then a fresh client has to be created and then JAVA stack is installed as an add-on to the fresh client.
Kindly note that In 7.0 after installation if the Client to which Java Stack is added as an add-on, has to be changed, then it is possible by making a few changes. The changes can be made by using Visual Administrator to change the Client Number.
Showing posts with label SAP Basis. Show all posts
Showing posts with label SAP Basis. Show all posts
Sunday, March 4, 2012

Thursday, January 5, 2012
Jobs, Roles and Responsibilities of a SAP Basis Consultant
SAP basis consultant should have primarily the knowledge of network administration. Then only he can install and configure operating system perfectly to install a SAP system. Because any SAP system mostly depend on the underlying database, he also should be able to install, configure and administer any type of relational database system. He should have through understanding about different computer programs or applications to use the sap system properly. He should be able to understand the complete structure and functionality of the entire SAP R/3 system. The following are the general day to day roles of a SAP basis consultant.
- Basis consultant should be able to handle the administration of sap including the installation,configuration and maintenance.
- Installation may include SAP R/3, ECC, Net weaver, Net Weaver components, Solution Manager etc..
- He should be able to do user administration like creating and deleting users, assigning and resetting passwords, locking and unlocking users.
- He should be able to do client administration like local client copy, remote client copy, create and deleting clients.
- He should be able to create and restore data backups
- He should be able to do printer or spool configuration and administration
- He should be able to create RFCs and should be able to configure TMS (Transport Management System)
- He should be able to monitor and manage the servers, background jobs, performacne of the system
- He should be able to create roles using different methods like transactions, direct objects, missing authorizations, restrictions…etc
- He should be able to analyze and fix missing authorizations
- He should be able to do the sap license management
- He should be able to troubleshoot security or authorization problems using SU53, ST01 and SUIM
- He should be able to monitor the status of work processes, application servers and system logs etc…
- He should be able to analyze the ABAP dumps
- He should be able to manage the database space allocation
- He should be able to do system copies
- He should be able to rectify any type of problem related to opearing systems
- He should be able to configure SAP GUI at client computers
- He should be able to rectify minor networking problems
- He should have through understanding of IP address configurations and pinging concept
- He must able to troubleshoot any client or server problems
In my openion an SAP administraor is all one in computer industy. He must have knowledge in all the subjects like operating ssstems, databases, applications, security systems…etc
Wednesday, August 3, 2011
PI Archiving Conceptual Overview
Applies To: SAP NetWeaver Process Integration 3.0/ 7.0/ 7.10
Summary: This document provides both an introduction to the key concepts of SAP NetWeaver Process Integration XML message archive and delete and overview of the tasks, reports that comes into play in concept of Archiving and Deleting of XML messages. This document targeted for beginners wanting to get involved in the topic.
This document covers Archive and Delete of XML messages of 'Integration Engine' only
Archiving & Deleting PI XML messages Process
By and large Archiving applies to asynchronous (EO and EOIO) messages only on the ABAP and JAVA side. It is a general decision by SAP to not archive synchronous (Best Effort) messages and this is by design unless error occurs during processing.
SXMSPMAST is the master table that holds the key information about each of the messages going through the Integration engine. The data is persisted in this table based on the retention period defined for asynchronous and synchronous messages.
If a message enters the Integration Server the field ITFACTION of SXMSPMAST table is set to INIT. Then the interface is checked for the action to take, if it is listed as an interface for archiving, the field ITFACTION is changed to ARCH. Otherwise it changes to DEL
*Note: ITFACTION filed value in SXMBPMAST table that describes what action applies to the messages but does not mean that that the action is already took place. So it's only action status info not that action already done.
Deleting: All messages with ITFACTION=DEL will be deleted by report RSXMB_DELETE_MESSAGES as soon as message processing is complete (message status is final) and adapter status allows deletion. The Delete job deletes only Payload.
Message are deleted from PI persistency layer if they
are no longer in retention period
are flagged for deletion
have appropriate messages state
have appropriate adapter state
Archiving: All messages with ITFACTION=ARCH have to be archived by report RSXMB_ARCHIVE_MESSAGES first and will then be deleted by report RSXMB_DELETE_ARCHIVED_MESSAGES (similar name as RSXMB_DELETE_MESSAGES, but totally different messages are handled!)
Message are Archived from PI persistency layer if they
are no longer in retention period
are flagged for Archiving
have appropriate messages state
have appropriate adapter state
Archiving XML messages process involves two steps before XML messages are deleted, during first step messages are read from PI persistence layer and stored to archive files and in the second step reads the previously written message from archiving files in order to verify the data integrity. Finally messages are deleted from PI persistence layer.
ERROR Messages: Error messages or messages that are not in complete/final status have to be cancelled first thus cancelling a message forces the field ITFACTION to be set to ARCH in a productive system i.e. this message MUST be archived and it cannot be deleted by report RSXMB_DELETE_MESSAGES anymore, even if ITFACTION initially was set to DEL. Which is as per thumb rule - Only messages in a final status can be deleted / archived. Messages with errors have to be cancelled first. After that these cancelled messages can only be archived and *will not be deleted*!
As mentioned above, error messages have to be cancelled first before they then can be removed (archive/delete) from the database. Canceling is required for asynchronous messages in error state only. By canceling a message its state changes from error to cancel/final and at this state message is allowed to be archived. In contrast synchronous messages are final right when processing fails.
If in case of bulk error messages, all these error messages can either be cancel them manually by selecting these set of messages in SXMB_MONI and then cancel them by pressing button "Cancel Processing of Messages With Error" (CTRL+F8). or report RSXMB_CANCEL_MESSAGES is the tool of choice for mass data handling, i.e. for canceling a large set of messages. This report handles message that already are in error state.
Report RSXMB_SHOW_STATUS helps in getting an overview of persistence layer situation. In general, messages status with 003 is consider final state in Integration Engine. You may refer to either SXMBPMAST table column ITFACTION to know the status overview of XI messages or refer to OSS note# 944727 to know in detail about different status of XI messages. If messages is not in status cancel or any other state (other than final) even after running RSXMB_CANCEL_MESSAGES report as an extreme step, you may use report RXWF_XI_UNUSED_MSGS to convert these messages status to final state (i.e. 003), consequently the subsequent run of Archive and Delete jobs will take care of next course of action. *Important Note - You are highly recommended to experiment running RXWF_XI_UNUSED_MSGS report in Testing Environment before running the same in Production environment.
If RSXMB_SHOW_STATUS shows messages with status no 001 and 008 (adapter status) and not either archiving or delete then schedule report SXMB_REFRESH_ADAPTER_STATUS. This report applicable only if system configured to use 'outbound IDoc Adapter or ccBPM'.
HISTORY Entries: Deleting history entries for processed messages, History entries are spots for observing message processing. They are generated by persisting at the end of a processing step for a message and contain the current status and the execution date.
History entries remain in the database for an unspecified length of time and must be deleted at some stage so that the database table does not overflow. The deletion process only deletes history entries for messages that have already been archived or deleted. The history entry is kept in the database for at least seven days after a message has been deleted. This is necessary since history entries are also required for the quality of service Exactly Once. Deleting these History entries are taken care by standard house-keeping job SAP_BC_XMB_HIST_DELETE_.
Different Archiving/Delete related Reports at glance:
RSXMB_ARCHIVE_MESSAGES Archive XML Messages
RSXMB_CANCEL_NOT_REST_MESSAGES Cancel XI Messages With Errors That Cannot Be Restarted
RSXMB_DELETE_ARCHIVED_MESSAGES Delete Archived XML Messages
RSXMB_DELETE_MESSAGES Delete XML Messages from the Persistency Layer marked for DEL
RSXMB_CANCEL_MESSAGES Mass cancellation of error messages - XI
RSXMB_SHOW_REORG_STATUS & RSXMB_SHOW_STATUS provide an overview for all XML messages in XI persistency layer.
RSXMB_MESSAGE_STATISTICS2 which provides the processing statistics. This report basically analyzed the history table.
RXWF_XI_UNSED_MSGS report helps in converting messages states other than 003 to final state i.e. 003.
SXMB_REFRESH_ADAPTER_STATUS report helps in converting message sates like 001/008 into final state.
For more detailed information please refer to below SAP notes and URLs
Note 872388 - Troubleshooting Archiving and Deletion
Note 960240 - Messages with adapter type 'PE' are not deleted
Note 1042379 - BPE-HT: Deleting messages that are no longer used
Note 944727 - Status overview of XI messages
URLs of help.sap.com
1) http://help.sap.com/saphelp_nw04s/helpdata/en/f5/d347ddec72274ca2abb0d7682c800b/frameset.htm
2) http://help.sap.com/saphelp_nw04s/helpdata/en/41/b715015ffc11d5b3ea0050da403d6a/frameset.htm
3) http://help.sap.com/saphelp_nw04s/helpdata/en/0e/80553b4d53273de10000000a114084/frameset.htm
Summary: This document provides both an introduction to the key concepts of SAP NetWeaver Process Integration XML message archive and delete and overview of the tasks, reports that comes into play in concept of Archiving and Deleting of XML messages. This document targeted for beginners wanting to get involved in the topic.
This document covers Archive and Delete of XML messages of 'Integration Engine' only
Archiving & Deleting PI XML messages Process
By and large Archiving applies to asynchronous (EO and EOIO) messages only on the ABAP and JAVA side. It is a general decision by SAP to not archive synchronous (Best Effort) messages and this is by design unless error occurs during processing.
SXMSPMAST is the master table that holds the key information about each of the messages going through the Integration engine. The data is persisted in this table based on the retention period defined for asynchronous and synchronous messages.
If a message enters the Integration Server the field ITFACTION of SXMSPMAST table is set to INIT. Then the interface is checked for the action to take, if it is listed as an interface for archiving, the field ITFACTION is changed to ARCH. Otherwise it changes to DEL
*Note: ITFACTION filed value in SXMBPMAST table that describes what action applies to the messages but does not mean that that the action is already took place. So it's only action status info not that action already done.
Deleting: All messages with ITFACTION=DEL will be deleted by report RSXMB_DELETE_MESSAGES as soon as message processing is complete (message status is final) and adapter status allows deletion. The Delete job deletes only Payload.
Message are deleted from PI persistency layer if they
are no longer in retention period
are flagged for deletion
have appropriate messages state
have appropriate adapter state
Archiving: All messages with ITFACTION=ARCH have to be archived by report RSXMB_ARCHIVE_MESSAGES first and will then be deleted by report RSXMB_DELETE_ARCHIVED_MESSAGES (similar name as RSXMB_DELETE_MESSAGES, but totally different messages are handled!)
Message are Archived from PI persistency layer if they
are no longer in retention period
are flagged for Archiving
have appropriate messages state
have appropriate adapter state
Archiving XML messages process involves two steps before XML messages are deleted, during first step messages are read from PI persistence layer and stored to archive files and in the second step reads the previously written message from archiving files in order to verify the data integrity. Finally messages are deleted from PI persistence layer.
ERROR Messages: Error messages or messages that are not in complete/final status have to be cancelled first thus cancelling a message forces the field ITFACTION to be set to ARCH in a productive system i.e. this message MUST be archived and it cannot be deleted by report RSXMB_DELETE_MESSAGES anymore, even if ITFACTION initially was set to DEL. Which is as per thumb rule - Only messages in a final status can be deleted / archived. Messages with errors have to be cancelled first. After that these cancelled messages can only be archived and *will not be deleted*!
As mentioned above, error messages have to be cancelled first before they then can be removed (archive/delete) from the database. Canceling is required for asynchronous messages in error state only. By canceling a message its state changes from error to cancel/final and at this state message is allowed to be archived. In contrast synchronous messages are final right when processing fails.
If in case of bulk error messages, all these error messages can either be cancel them manually by selecting these set of messages in SXMB_MONI and then cancel them by pressing button "Cancel Processing of Messages With Error" (CTRL+F8). or report RSXMB_CANCEL_MESSAGES is the tool of choice for mass data handling, i.e. for canceling a large set of messages. This report handles message that already are in error state.
Report RSXMB_SHOW_STATUS helps in getting an overview of persistence layer situation. In general, messages status with 003 is consider final state in Integration Engine. You may refer to either SXMBPMAST table column ITFACTION to know the status overview of XI messages or refer to OSS note# 944727 to know in detail about different status of XI messages. If messages is not in status cancel or any other state (other than final) even after running RSXMB_CANCEL_MESSAGES report as an extreme step, you may use report RXWF_XI_UNUSED_MSGS to convert these messages status to final state (i.e. 003), consequently the subsequent run of Archive and Delete jobs will take care of next course of action. *Important Note - You are highly recommended to experiment running RXWF_XI_UNUSED_MSGS report in Testing Environment before running the same in Production environment.
If RSXMB_SHOW_STATUS shows messages with status no 001 and 008 (adapter status) and not either archiving or delete then schedule report SXMB_REFRESH_ADAPTER_STATUS. This report applicable only if system configured to use 'outbound IDoc Adapter or ccBPM'.
HISTORY Entries: Deleting history entries for processed messages, History entries are spots for observing message processing. They are generated by persisting at the end of a processing step for a message and contain the current status and the execution date.
History entries remain in the database for an unspecified length of time and must be deleted at some stage so that the database table does not overflow. The deletion process only deletes history entries for messages that have already been archived or deleted. The history entry is kept in the database for at least seven days after a message has been deleted. This is necessary since history entries are also required for the quality of service Exactly Once. Deleting these History entries are taken care by standard house-keeping job SAP_BC_XMB_HIST_DELETE_
Different Archiving/Delete related Reports at glance:
RSXMB_ARCHIVE_MESSAGES Archive XML Messages
RSXMB_CANCEL_NOT_REST_MESSAGES Cancel XI Messages With Errors That Cannot Be Restarted
RSXMB_DELETE_ARCHIVED_MESSAGES Delete Archived XML Messages
RSXMB_DELETE_MESSAGES Delete XML Messages from the Persistency Layer marked for DEL
RSXMB_CANCEL_MESSAGES Mass cancellation of error messages - XI
RSXMB_SHOW_REORG_STATUS & RSXMB_SHOW_STATUS provide an overview for all XML messages in XI persistency layer.
RSXMB_MESSAGE_STATISTICS2 which provides the processing statistics. This report basically analyzed the history table.
RXWF_XI_UNSED_MSGS report helps in converting messages states other than 003 to final state i.e. 003.
SXMB_REFRESH_ADAPTER_STATUS report helps in converting message sates like 001/008 into final state.
For more detailed information please refer to below SAP notes and URLs
Note 872388 - Troubleshooting Archiving and Deletion
Note 960240 - Messages with adapter type 'PE' are not deleted
Note 1042379 - BPE-HT: Deleting messages that are no longer used
Note 944727 - Status overview of XI messages
URLs of help.sap.com
1) http://help.sap.com/saphelp_nw04s/helpdata/en/f5/d347ddec72274ca2abb0d7682c800b/frameset.htm
2) http://help.sap.com/saphelp_nw04s/helpdata/en/41/b715015ffc11d5b3ea0050da403d6a/frameset.htm
3) http://help.sap.com/saphelp_nw04s/helpdata/en/0e/80553b4d53273de10000000a114084/frameset.htm
Tuesday, August 2, 2011
How to transport variant
Guess what: You have a system landscape with total 16 clients and created a fancy report variant. Now, the business folks want this variant in all systems & clients. What now? Well, you can define the variant as global variant and transport it everywhere without having to recreate this darn variant.
Run the program you want to create a variant for in your GOLDEN CLIENT (the client where you do all your development):

Save the variant and name it, starting with the string CUS&…

When you now save the variant, SAP will prompt you to create a transport request. Follow the next prompts, release your transport and import into other systems – that’s it!

Saturday, July 16, 2011
How to delete old batch session on SM35
Users have created a ton of batch input sessions and processed them with SM35. The users did not care about deleting unwanted sessions and there are a lot of old sessions, with almost any status (in processing/in background/processed/errors). All of them are junk (in your terms), and have to be removed from the system.
You can delete unwanted sessions with abap program RSBDCTL6 at once and then setup a background job that deletes the sessions for a specific session, user who created the session, date range, older than x days etc. that runs on a regular basis.

As an alternative, you can run program RSBDC_REORG. However, our tests showed that this program may not be suitable for sessions that have a status other than processed.

Note: This has been validated on a ECC 5.0 system. Please consult SAP Marketplace if your system doesn’t have these programs and/or if these are suitable for your release.
Wednesday, July 6, 2011
How to configure Central User Administration (CUA)
Hi All,
Here is the procedure for Central user administration configuration in a landscape:
1) Create Logical systems to all clients for the landscape using BD54 or SALE as
comfortable.
2) Attach Logical system to clients using Same.
3) Create RFC connection to relevant systems with the same name as logical system name .
If you Logical system name is SIDCLNT100 for dev then create RFC connection to
DEV with same name SIDCLNT100.
4) Let us suppose you Central system: DEVCLNT100
Child system: QUACLNT200
5) Create user CUA_DEV_100 in devclnt100 system
4. Create user CUA_QUA_200 in quaclnt200 system.
Create RFC’s to child systems from central and central to child.
5) Now logon to central system and execute tcode scua to configure cua.
Enter the name of the distribution model: CUA
Press create
Enter ALL Child system RFC’s
Save your entries now result screen will appear
If you expand the nodes for
the individual systems, you normally see the following messages for
each system: .ALE distribution model was saved,. .Central User
Administration activated,. and .Text comparison was started.. If
problem messages are displayed here, follow the procedure in SAP
Note 333441:
6) Setting the Parameters for Field Distribution
Enter Tcode SCUM in central system following screen will appear
Now maintain your filed distribution and save it.
You can use transaction SUCOMP to administer company address data.
You can use transaction SCUG in the central system to perform the
synchronization activities between the central system and the child
systems by selecting your child system on the initial screen of transaction
SCUG and then choosing Synchronize Company Addresses in the Central System
After you have synchronized the company addresses, you can transfer the
users from the newly connected child systems to central administration.
This is done, as with the synchronization of the company addresses, using
transaction SCUG in the central system. To do this, on the initial screen of
transaction SCUG, select your child system and choose the Copy Users to
the Central System button.
Use
You can use the report RSCCUSND from the central system of Central User Administration (CUA) to synchronize the master data of selected users with a child system of the CUA. The report sends the master data (including role and profile assignments) to a child system of the CUA.
If master data exists in the child system for the user sent, it is overwritten.
Procedure
...
1. Start report RSCCUSND (for example, using transaction SA38).
2. In the Receiving System field, specify the child system to which you want
to send the user data.
3. You can use the fields User and User Group to restrict the number of users.
4. Specify the data that you want to distribute under Distribution Options.
5. Choose Execute.
Here is the procedure for Central user administration configuration in a landscape:
1) Create Logical systems to all clients for the landscape using BD54 or SALE as
comfortable.
2) Attach Logical system to clients using Same.
3) Create RFC connection to relevant systems with the same name as logical system name .
If you Logical system name is SIDCLNT100 for dev then create RFC connection to
DEV with same name SIDCLNT100.
4) Let us suppose you Central system: DEVCLNT100
Child system: QUACLNT200
5) Create user CUA_DEV_100 in devclnt100 system
4. Create user CUA_QUA_200 in quaclnt200 system.
Create RFC’s to child systems from central and central to child.
5) Now logon to central system and execute tcode scua to configure cua.
Enter the name of the distribution model: CUA
Press create
Enter ALL Child system RFC’s
Save your entries now result screen will appear
If you expand the nodes for
the individual systems, you normally see the following messages for
each system: .ALE distribution model was saved,. .Central User
Administration activated,. and .Text comparison was started.. If
problem messages are displayed here, follow the procedure in SAP
Note 333441:
6) Setting the Parameters for Field Distribution
Enter Tcode SCUM in central system following screen will appear
Now maintain your filed distribution and save it.
You can use transaction SUCOMP to administer company address data.
You can use transaction SCUG in the central system to perform the
synchronization activities between the central system and the child
systems by selecting your child system on the initial screen of transaction
SCUG and then choosing Synchronize Company Addresses in the Central System
After you have synchronized the company addresses, you can transfer the
users from the newly connected child systems to central administration.
This is done, as with the synchronization of the company addresses, using
transaction SCUG in the central system. To do this, on the initial screen of
transaction SCUG, select your child system and choose the Copy Users to
the Central System button.
Use
You can use the report RSCCUSND from the central system of Central User Administration (CUA) to synchronize the master data of selected users with a child system of the CUA. The report sends the master data (including role and profile assignments) to a child system of the CUA.
If master data exists in the child system for the user sent, it is overwritten.
Procedure
...
1. Start report RSCCUSND (for example, using transaction SA38).
2. In the Receiving System field, specify the child system to which you want
to send the user data.
3. You can use the fields User and User Group to restrict the number of users.
4. Specify the data that you want to distribute under Distribution Options.
5. Choose Execute.
How to install two installing Oracle database on a host
Hi Team,
Here i am sharing the experience of installing two oracle database on same host.
After installing new database my first database won't come up.there are some problems with listener.ora and tnsnames.ora so you have to follow this approach...
dbsid1 existing Database
dbsid2 New Database
Changes in listener.ora
################
# Filename......: listener.ora for more than one database
# Created.......: created by SAP AG, R/3 Rel. >= 4.0A
# Name..........:
# Date..........:
################
LISTENER =
(ADDRESS_LIST =
(ADDRESS=
(PROTOCOL=IPC)
(KEY= dbsid1.WORLD)
)
(ADDRESS=
(PROTOCOL=IPC)
(KEY= dbsid1)
)
(ADDRESS=
(PROTOCOL=IPC)
(KEY= dbsid2.WORLD)
)
(ADDRESS=
(PROTOCOL=IPC)
(KEY= dbsid2)
)
(ADDRESS =
(COMMUNITY = SAP.WORLD)
(PROTOCOL = TCP)
(HOST = DBHOSTNAME)
(PORT = 1527)
)
)
STARTUP_WAIT_TIME_LISTENER = 0
CONNECT_TIMEOUT_LISTENER = 10
TRACE_LEVEL_LISTENER = OFF
SID_LIST_LISTENER =
(SID_LIST =
(SID_DESC =
(SDU = 32768)
(SID_NAME = dbsid1)
(ORACLE_HOME = ORACLE_HOME_dbsid1)
(PRESPAWN_MAX = 10)
)
(SID_DESC =
(SDU = 32768)
(SID_NAME = dbsid2)
(ORACLE_HOME = ORACLE_HOME_dbsid2)
(PRESPAWN_MAX = 10)
)
)
and tnsnames.ora should be like this:
################
# Filename......: tnsnames.ora
# Name..........: LOCAL_REGION.world
# Date..........:
################
dbsid1.world =
(DESCRIPTION =
(SDU = 4096)
(ADDRESS_LIST =
(ADDRESS =
(COMMUNITY = sap.world)
(PROTOCOL = TCP)
(HOST = DBHOSTNAME)
(PORT = 1527)
)
)
(CONNECT_DATA =
(SID = dbsid1)
(GLOBAL_NAME = dbsid1.world)
)
)
dbsid2.world =
(DESCRIPTION =
(SDU = 4096)
(ADDRESS_LIST =
(ADDRESS =
(COMMUNITY = sap.world)
(PROTOCOL = TCP)
(HOST = DBHOSTNAME)
(PORT = 1527)
)
)
(CONNECT_DATA =
(SID = dbsid2)
(GLOBAL_NAME = dbsid2.world)
)
)
I think it will help you.
For more clarity follow SAP Note 98252
Here i am sharing the experience of installing two oracle database on same host.
After installing new database my first database won't come up.there are some problems with listener.ora and tnsnames.ora so you have to follow this approach...
dbsid1 existing Database
dbsid2 New Database
Changes in listener.ora
################
# Filename......: listener.ora for more than one database
# Created.......: created by SAP AG, R/3 Rel. >= 4.0A
# Name..........:
# Date..........:
################
LISTENER =
(ADDRESS_LIST =
(ADDRESS=
(PROTOCOL=IPC)
(KEY= dbsid1.WORLD)
)
(ADDRESS=
(PROTOCOL=IPC)
(KEY= dbsid1)
)
(ADDRESS=
(PROTOCOL=IPC)
(KEY= dbsid2.WORLD)
)
(ADDRESS=
(PROTOCOL=IPC)
(KEY= dbsid2)
)
(ADDRESS =
(COMMUNITY = SAP.WORLD)
(PROTOCOL = TCP)
(HOST = DBHOSTNAME)
(PORT = 1527)
)
)
STARTUP_WAIT_TIME_LISTENER = 0
CONNECT_TIMEOUT_LISTENER = 10
TRACE_LEVEL_LISTENER = OFF
SID_LIST_LISTENER =
(SID_LIST =
(SID_DESC =
(SDU = 32768)
(SID_NAME = dbsid1)
(ORACLE_HOME = ORACLE_HOME_dbsid1)
(PRESPAWN_MAX = 10)
)
(SID_DESC =
(SDU = 32768)
(SID_NAME = dbsid2)
(ORACLE_HOME = ORACLE_HOME_dbsid2)
(PRESPAWN_MAX = 10)
)
)
and tnsnames.ora should be like this:
################
# Filename......: tnsnames.ora
# Name..........: LOCAL_REGION.world
# Date..........:
################
dbsid1.world =
(DESCRIPTION =
(SDU = 4096)
(ADDRESS_LIST =
(ADDRESS =
(COMMUNITY = sap.world)
(PROTOCOL = TCP)
(HOST = DBHOSTNAME)
(PORT = 1527)
)
)
(CONNECT_DATA =
(SID = dbsid1)
(GLOBAL_NAME = dbsid1.world)
)
)
dbsid2.world =
(DESCRIPTION =
(SDU = 4096)
(ADDRESS_LIST =
(ADDRESS =
(COMMUNITY = sap.world)
(PROTOCOL = TCP)
(HOST = DBHOSTNAME)
(PORT = 1527)
)
)
(CONNECT_DATA =
(SID = dbsid2)
(GLOBAL_NAME = dbsid2.world)
)
)
I think it will help you.
For more clarity follow SAP Note 98252
How to configure Service Desk on Solution Manager
HI All,
Here I am sharing Configuration of Service Desk On Solution Manager 7.0 First Step
Follow This Link Service Desk Configuration .
Some Tips That can Help you :
1)In case you fail at step where you need to fetch component using transaction DSWP go to note no. 926419.
2) In case you face internal error while executing DSWP follow this note:1059271.
3)While Configuring Service Desk If you face error like "report CRM_MKTBP_ZCACL_UPDATE_30" follow note :450640
4)Other than these notes can also Help 864195 Problems when you create support message in Solution Mngr,949292 Solution Manager: Service Desk Related SAP Notes.
Here I am sharing Configuration of Service Desk On Solution Manager 7.0 First Step
Follow This Link Service Desk Configuration .
Some Tips That can Help you :
1)In case you fail at step where you need to fetch component using transaction DSWP go to note no. 926419.
2) In case you face internal error while executing DSWP follow this note:1059271.
3)While Configuring Service Desk If you face error like "report CRM_MKTBP_ZCACL_UPDATE_30" follow note :450640
4)Other than these notes can also Help 864195 Problems when you create support message in Solution Mngr,949292 Solution Manager: Service Desk Related SAP Notes.
How to activate Add On for SAP ECC 6
Step by step on how to activate Add On on SAP ECC 6 :
1) Go to T-code SPRO.
2) Click On SAP Reference IMG button.
3) Check for Activate SAP ECC Extension
4) Select Business Function Set as SAP oil and Gas.
5) Change Status Of All the business function to ON.
6) Accept Prompt For License
SO Add-on Has been Activated...(Running in background)
1) Go to T-code SPRO.
2) Click On SAP Reference IMG button.
3) Check for Activate SAP ECC Extension
4) Select Business Function Set as SAP oil and Gas.
5) Change Status Of All the business function to ON.
6) Accept Prompt For License
SO Add-on Has been Activated...(Running in background)
How to activate WebGUI on SAP Server
HI Please follow Steps to Activate Web GUI for SAP:
1)verify if the ICM is working correctly. Transaction SMICM (ICM Monitor)
displays the central entry point to the ICM configuration and monitoring. After starting this
transaction, you will see the ICM status. Make sure it is running. Check the following ICM
parameters via Menu-> Goto -> Parameters ->Display:
icm/server_port_0 PROT=HTTP,PORT=8000
icm/host_name_full server.full.domain
2)With transaction SICF and locate the
services by path
/sap/public/bc/its/mimes
/sap/bc/gui/sap/its/webgui
3)Activate the full path to these services
4)Browse to
http://server_name:icmport/sap/bc/gui/
sap/its/webgui/ and login to the
webgui.
If you still have any problem to run WEBGUI run this transaction SIAC_PUBLISH_ALL_INTERNAL
it will do ........Enjoy
1)verify if the ICM is working correctly. Transaction SMICM (ICM Monitor)
displays the central entry point to the ICM configuration and monitoring. After starting this
transaction, you will see the ICM status. Make sure it is running. Check the following ICM
parameters via Menu-> Goto -> Parameters ->Display:
icm/server_port_0 PROT=HTTP,PORT=8000
icm/host_name_full server.full.domain
2)With transaction SICF and locate the
services by path
/sap/public/bc/its/mimes
/sap/bc/gui/sap/its/webgui
3)Activate the full path to these services
4)Browse to
http://server_name:icmport/sap/bc/gui/
sap/its/webgui/ and login to the
webgui.
If you still have any problem to run WEBGUI run this transaction SIAC_PUBLISH_ALL_INTERNAL
it will do ........Enjoy
Tuesday, July 5, 2011
How to update using SPAM/SAINT
Importing a SPAM/SAINT Update
Use:
A SPAM/SAINT Update (SPAM update for short) contains updates and improvements to Support Package Manager and Add-On Installation Tool. There is always one SPAM update for each release.
The latest SPAM update is also available in SAP Support Portal, under service.sap.com/spManager.
Make sure you always have the most recent version of SPAM update before importing Support Packages or Installation Packages.
Prerequisites
You can only import a SPAM update if there are no terminated packages in the system.
A dialog box informs you if there are any terminated packages. You then have two options:
● Import the entire queue to begin with and then the SPAM update.
● Delete the queue, import the SPAM update, then import the queue.
You can only delete the queue if module Import 1 has not yet started (up to phase SCHEDULE_RDDIMPDP).
Procedure
1. Call Support Package Manager (transaction SPAM).
2. Check if the SPAM update offered is newer than the one in your system.
3. To import the most recent SPAM update, choose Support Package ® Import SPAM update.
SPAM updates are automatically confirmed once they have been imported.
Use:
A SPAM/SAINT Update (SPAM update for short) contains updates and improvements to Support Package Manager and Add-On Installation Tool. There is always one SPAM update for each release.
The latest SPAM update is also available in SAP Support Portal, under service.sap.com/spManager.
Make sure you always have the most recent version of SPAM update before importing Support Packages or Installation Packages.
Prerequisites
You can only import a SPAM update if there are no terminated packages in the system.
A dialog box informs you if there are any terminated packages. You then have two options:
● Import the entire queue to begin with and then the SPAM update.
● Delete the queue, import the SPAM update, then import the queue.
You can only delete the queue if module Import 1 has not yet started (up to phase SCHEDULE_RDDIMPDP).
Procedure
1. Call Support Package Manager (transaction SPAM).
2. Check if the SPAM update offered is newer than the one in your system.
3. To import the most recent SPAM update, choose Support Package ® Import SPAM update.
SPAM updates are automatically confirmed once they have been imported.
How to generate SAP Solution Manager Key
Hi All,
To Generate Solution Manager Key Execute T-code SMSY in Solution Manager system, you need to do the following steps:
1)Create a system by right clicking on System entry and select Create new system.
2)Enter the System Name i.e., SID (3 chars)
3)Product = SAP ECC (select from the list)
4)Product Version= ECC 5.0 (select from the list)
5)Save the entries.
6)Select Menu Item "System--->Other Configuration" and enter the SID which you have created earlier.
7)Enter the Server Name(hostname)
8)Finally click on Generate "Installation/Upgrade Key Button "
The system generates a Key ,copy that Key and paste it in the SAPINST screen when it prompts for Sol man Key.
To Generate Solution Manager Key Execute T-code SMSY in Solution Manager system, you need to do the following steps:
1)Create a system by right clicking on System entry and select Create new system.
2)Enter the System Name i.e., SID (3 chars)
3)Product = SAP ECC (select from the list)
4)Product Version= ECC 5.0 (select from the list)
5)Save the entries.
6)Select Menu Item "System--->Other Configuration" and enter the SID which you have created earlier.
7)Enter the Server Name(hostname)
8)Finally click on Generate "Installation/Upgrade Key Button "
The system generates a Key ,copy that Key and paste it in the SAPINST screen when it prompts for Sol man Key.
How to install SAP Library
1) Copy the SAP Library DVD on SAP system.
2) Share the ..\htmlhelp\helpdata directory with the name of SAPHelp
3) Execute the Transaction SR13
4) Click on HtmlHelpFile Tab
5) Click on New Entries
6) Enter the Data in Corresponding column
variant....Sap library
platform...WinNT
area .....IWBhelp
path........\\Servername\SAPHelp
language...en
7) Create your own requests with any Description.
8) Save & exit
9) Go to Help Menu. Setting?application help
10) Chose IWBehlp and click on Choose Area then select setting variant and from the menu select the SAP Library.
Now its over To use it you can go to Help and then Application help/SAP Library
Enjoy But In Case it ddid'nt work Follow Me:
Go to Regedit in windowNT
Navigate to HKLM/Software/Microsft/HTMLHelp/1.x/ItssRestrictions
1) Create New Dword Value with name "MaxAllowedZone" and value "4"
2) Create New Key value with name "UrlAllowList" and value "\\Server IP\saphelp"
Now Restart The system and check .If still have Probelm, Follow SAP as in Note:857216
2) Share the ..\htmlhelp\helpdata directory with the name of SAPHelp
3) Execute the Transaction SR13
4) Click on HtmlHelpFile Tab
5) Click on New Entries
6) Enter the Data in Corresponding column
variant....Sap library
platform...WinNT
area .....IWBhelp
path........\\Servername\SAPHelp
language...en
7) Create your own requests with any Description.
8) Save & exit
9) Go to Help Menu. Setting?application help
10) Chose IWBehlp and click on Choose Area then select setting variant and from the menu select the SAP Library.
Now its over To use it you can go to Help and then Application help/SAP Library
Enjoy But In Case it ddid'nt work Follow Me:
Go to Regedit in windowNT
Navigate to HKLM/Software/Microsft/HTMLHelp/1.x/ItssRestrictions
1) Create New Dword Value with name "MaxAllowedZone" and value "4"
2) Create New Key value with name "UrlAllowList" and value "\\Server IP\saphelp"
Now Restart The system and check .If still have Probelm, Follow SAP as in Note:857216
How to configure printer on SAP Server
The configuration of the spool system is a system administration task. The central tool for this is transaction SPAD.
· To create an output device, choose Output Devices on the Devices / Servers tab page. If there is already a large number of devices in your system, you can restrict the output list in the field next to the button.
Important information for a device:
1)Output device
Name, maximum of 30 characters long (case-sensitive).
2) Short name
For internal system purposes (can be automatically generated).
3) Device type
Printer model/family (more information about this below). The device type SWIN transfers the SAP system format to the Microsoft Windows printer driver. This is useful, for example, if various printers are used for front end printing in a Microsoft Windows environment.
4) Spool server
SAP application server with spool work processes or logical server.
5) Location
For example, building and room number (so that users can find their output).
6) Message
Used to temporarily override the location (such as .Is currently in maintenance.)
7) Lock printer in SAP system
Output requests for printers for which this indicator is selected are created but not transferred to the printer. The user receives the message ...no immediate printing.
8) Host spool access method
How does a spool work process contact the operating system spooler?
9) Host printer
Name of the printer at operating system level. Note that this name is case-sensitive. Under Microsoft Windows, there must not be a space in the printer name, and network printers are addressed using their UNC names (in the format \\\). The specification __DEFAULT calls the defaultMicrosoftWindows printer (for example, for front end printing in a Microsoft Windows environment).
10)Host
Only for local printing, is calculated automatically from the spool server.
11) Destination hosts
Only for remote printing. Name of the host on which the operating system spooler (such as lpd or saplpd) is running.
· To create an output device, choose Output Devices on the Devices / Servers tab page. If there is already a large number of devices in your system, you can restrict the output list in the field next to the button.
Important information for a device:
1)Output device
Name, maximum of 30 characters long (case-sensitive).
2) Short name
For internal system purposes (can be automatically generated).
3) Device type
Printer model/family (more information about this below). The device type SWIN transfers the SAP system format to the Microsoft Windows printer driver. This is useful, for example, if various printers are used for front end printing in a Microsoft Windows environment.
4) Spool server
SAP application server with spool work processes or logical server.
5) Location
For example, building and room number (so that users can find their output).
6) Message
Used to temporarily override the location (such as .Is currently in maintenance.)
7) Lock printer in SAP system
Output requests for printers for which this indicator is selected are created but not transferred to the printer. The user receives the message ...no immediate printing.
8) Host spool access method
How does a spool work process contact the operating system spooler?
9) Host printer
Name of the printer at operating system level. Note that this name is case-sensitive. Under Microsoft Windows, there must not be a space in the printer name, and network printers are addressed using their UNC names (in the format \\
10)Host
Only for local printing, is calculated automatically from the spool server.
11) Destination hosts
Only for remote printing. Name of the host on which the operating system spooler (such as lpd or saplpd) is running.
Monday, July 4, 2011
Configure solution database in SAP CRM 2007/Solution Manager
Hi,
I am describing the steps to configure the solution database in CRM 2007 scenario,although configuration part is almost same in case of Solution manager also.
So here i am trying to cover solution database for CRM and solution manager.
Configuration is valid for SAP CRM 2007 and solution manager 4.0/7.0
Prerequisites: Trex is need to be installed and connected with CRM/Solution Manager
1) Log-in to SAP CRM 2007 ,Go to TA SPRO
2) Navigate To Customer Relationship ManagementEnterprise IntelligenceSoftware
Agent Framework
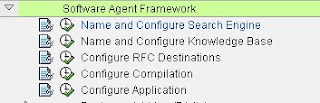
3) Execute Name and configure Search Engine Press Continue
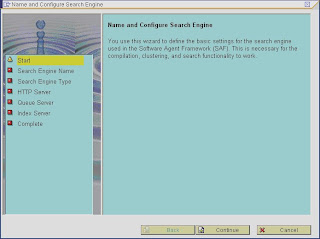
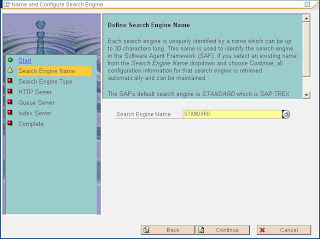
4) Select Search Engine Name STANDARD
5) Here change the communication type to TCP/IP
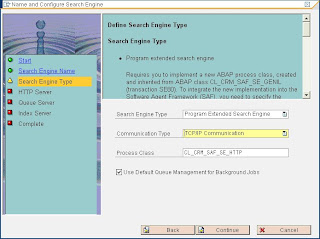
6) Press continue, in case of TCP/IP connectivity all fields remain in display mode only
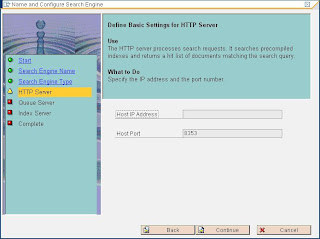
Here i am skipping all other screens as you need to press continue only,dont give any input.
7) Now Move to next SPRO activity known as Name and configure Knowledge Base

8) Press F4 on first screen you may get some of existing knowledge base,If its blank then you need to create e.g. I have existing SDB if its not there then we can create same by following steps

9) Give description SDB and Linked Search Engine Name STANDARD, Press continue

10) Press Continue in following screen

11) You can leave this field blank as well either you can give same knowledge base name

12 ) press continue on next screen and complete teh same.
13) To use the solution database we need to create some more knowledge bases , So again execute name and configure knowledge bases and give description SDB_SOLUTIONS, and Linked search engine STANDARD

14) Create 1 more Knowledge base SDB_PROBLEMS with same options as fro SDB

15 ) Now If you Press F4 in front screen you can view 3 knowledge bases

16) Next SPRO activity Configure RFC destination
For this to work we need to have TREX installed in your landscape and also connection established between TREX and CRM system. Contact your basis for this activity .

17) Select Search engine STANDARD

18) Here select the RFC connection which link to your TREX server ,give the RFC name and then press test connection it should show OK,incase test failed contact BASIS team to resolve the same.

19) In next screen as well give same RFC and test connection
20 ) Next SPRO activity

21) Select one Knowledge Base name SDB and continue

22) Note: search engine name should be standard or what you have specified while definig the knowledge base

23)Here you can enter tuning parameter for Index (better to start with standard)

24) In next of teh screens press next only and complete the same.
25) In the same manner configure compilation for rest of knowledge bases too
26) Finally SPRO activity Configure application

27) Select application name ICWEBCLIENT

28) Provide Knowledge base name related to this

29) Finish the activity with default options.
30) Check and verify setting
Go to TA crmc_saf_tool

31)Output should be green

32) In the same window navigate to GOTO knowledge base compilation

Here you can compile and administrate the knowledge base.
After this you can use Solution database in CRM.
I am describing the steps to configure the solution database in CRM 2007 scenario,although configuration part is almost same in case of Solution manager also.
So here i am trying to cover solution database for CRM and solution manager.
Configuration is valid for SAP CRM 2007 and solution manager 4.0/7.0
Prerequisites: Trex is need to be installed and connected with CRM/Solution Manager
1) Log-in to SAP CRM 2007 ,Go to TA SPRO
2) Navigate To Customer Relationship ManagementEnterprise IntelligenceSoftware
Agent Framework

3) Execute Name and configure Search Engine Press Continue

4) Select Search Engine Name STANDARD

5) Here change the communication type to TCP/IP

6) Press continue, in case of TCP/IP connectivity all fields remain in display mode only

Here i am skipping all other screens as you need to press continue only,dont give any input.
7) Now Move to next SPRO activity known as Name and configure Knowledge Base

8) Press F4 on first screen you may get some of existing knowledge base,If its blank then you need to create e.g. I have existing SDB if its not there then we can create same by following steps

9) Give description SDB and Linked Search Engine Name STANDARD, Press continue

10) Press Continue in following screen

11) You can leave this field blank as well either you can give same knowledge base name

12 ) press continue on next screen and complete teh same.
13) To use the solution database we need to create some more knowledge bases , So again execute name and configure knowledge bases and give description SDB_SOLUTIONS, and Linked search engine STANDARD

14) Create 1 more Knowledge base SDB_PROBLEMS with same options as fro SDB

15 ) Now If you Press F4 in front screen you can view 3 knowledge bases

16) Next SPRO activity Configure RFC destination
For this to work we need to have TREX installed in your landscape and also connection established between TREX and CRM system. Contact your basis for this activity .

17) Select Search engine STANDARD

18) Here select the RFC connection which link to your TREX server ,give the RFC name and then press test connection it should show OK,incase test failed contact BASIS team to resolve the same.

19) In next screen as well give same RFC and test connection
20 ) Next SPRO activity

21) Select one Knowledge Base name SDB and continue

22) Note: search engine name should be standard or what you have specified while definig the knowledge base

23)Here you can enter tuning parameter for Index (better to start with standard)

24) In next of teh screens press next only and complete the same.
25) In the same manner configure compilation for rest of knowledge bases too
26) Finally SPRO activity Configure application

27) Select application name ICWEBCLIENT

28) Provide Knowledge base name related to this

29) Finish the activity with default options.
30) Check and verify setting
Go to TA crmc_saf_tool

31)Output should be green

32) In the same window navigate to GOTO knowledge base compilation

Here you can compile and administrate the knowledge base.
After this you can use Solution database in CRM.
SAP User (Must known)
SAP Systems create the standard users SAP*, DDIC and EARLYWATCH during the installation process in the clients as shown in the table below.
During the installation process, SAP Systems creates standard users such as SAP*, DDIC and EARLYWATCH. The table below shows these ID’s with their standard passwords.

SAP*
SAP* will be available right after the installation in all client and contains composite profile SAP_ALL assigned and with all authorizations, including the ones needed for system set up.
SAP® has implemented this standard, hard-coded (backdoor) ID to allow a login, if the basis administrator’s user-ID is disable or for emergency access. However, to enable this standard ID, SAP* created as regular user-ID needs to be deleted.
To prevent a login with SAP* after a deletion, the parameter login/no_automatic_user_sapstar should be set. Value 0 (zero) allows users to log in with SAP*. Value 1 will prevent users from logging on after SAP* is deleted.
- The standard password for this user directly after the installation of clients 000,001 and 066 is 06071992.
- The standard password for all new clients is PASS.
The preferable method to protect this user is the deactivation of SAP* :
- Remove all authorizations from this user.
- Create a new superuser and deactivate SAP*.
- Change all of the default passwords for these users.
- Lock the user account.
- Set the parameter login/no_automatic_user_sapstar to 1.
- Activate the audit log for this user.
- Assign them to the group SUPER so that they only be modified by administrators who are authorized to change users in the group SUPER.
Report RSDELSAP deletes the user SAP*in the client 066. The corresponding source code is not active but available.
DDIC
The user DDIC is established in the client 000 and 001 with the installation and copies of these clients. This standard user -id is uitilized to cover installation and release updates including changes to the data dictionary. The use of the transport management system is restricted to display only.
This is the protection against any direct development. As the technical steps related to this process are initiated in the client 000, the DDIC only needs to be a dialog user in 000. In all other clients he can be set to the user type “system”. The standard password for this user directly after the installation is 19920706.
The report RDDPWCHK allows to check the password that is assigned to the user DDIC. In case the password matches, the dialog window will be closed. For mismatches the message False is displayed. The counter for false login does not count these password detection attempts.
Remote Support Users
When using the SAP support services, you often need to allow remote access to your system using a user defined at your site. Because you are allowing system access to someone outside of your system, you should take extra precautions to protect this user. We recommend the following:
- Define a special user for remote access. Do not use any of the standard users.
- Define a procedure for activating and deactivating the user. Activate it only when necessary and deactivate it once the remote session is completed.
- Do not disclose this user’s password over the remote session. Send it over a separate channel such as an e-mail or a return telephone call. Change the password once the session is completed.
EARLYWATCH
EARLYWATCH is created in the client 066 during installtion and is used for remote control by SAP® and is only set up with some standard authorizations S_TOOLS_EX_A for performance monitoring. The user is to be locked in general, and can be unlocked upon request. Initial password for EARLYWATCH is support.
Summary
To summarize, we recommend that you regularly review the following criteria for protecting the standard users:
- Maintain an overview of the clients that you have and make sure that no unknown clients exist.
- Make sure that SAP* exists and has been deactivated in all clients.
- Make sure that the default passwords for SAP*, DDIC, and EARLYWATCH have been changed.
- Make sure that these users belong to the group SUPER in all clients.
- Lock the users SAP*, DDIC, EARLYWATCH and your remote support user. Unlock them only when necessary. (Note that it should never be necessary to use SAP*!)
- Lock DDIC and EARLYWATCH and unlock them only when necessary.
But wait, don’t walk away,there is more….
TMSADM
This ID is automatically created at the set up the change and transport management system in the client 000. The user type is “Communication”, and is utilized for transports by the CTS. TMSADM is assigned to profile S_A.TMSADM assigned that authorizes the use of RFC with display of the development environment as well as access to write to the file system. The standard password for this user directly after the installation is PASSWORD.
SAPCPIC
SAPCPIC is created as a “communication” user at the installation and is mostly used for EDI. The standard profile S_A.CPIC restricts the access to the use of RFC. This user is hard-coded into the function module INIT_START_OF_EXTERNAL_PROGRAM together with a standard password. This needs to be considered in case of password changes for this user.
The standard password for this user directly after the installation is ADMIN.
SAP* in J2EE
The user is established with full authorizations for the administration. With regard to security, the user has no standard password assigned. To utilize this user as emergency user the properties in the UME need to be maintained. Setting the ume.superadmin.activated property to true will activate the use of this user for emergency cases. Setting a password in ume.superadmin.password will then activate the user finally after the restart of the engine. While the user SAP* is in use, all other users will be inactivated during this time.
When the system is fixed, the deactivation can be achieved by setting the ume.superadmin.activated property to false.
J2EE_ADMIN_
This user is the Java standard user with full administration authorization in this environment. The password is to be assigned during the set up.
High complexity is recommended for this password.
J2EE_GUEST
This user is a Java standard user who can be utilized for anonymous access. The user is locked per default. The password is assigned during the installation.
SAPJSF_
This user is a standard communication user for LDAP Lightweight Directory Access Protocol data sources.
ADSuser
This standard user is utilized for the communication between Java and ADS Adobe Document Service.
caf_mp_scvuser
This standard user is utilized in the context of the Composite Application Framework (CAF) core transport system and communication with other Java services.
Friday, July 1, 2011
SAP Notes : Troubleshoot your SAP ERP problem
SAP Notes give you instructions on how to remove known errors from SAP Systems. They include a description of the symptoms, the cause of the error, and the SAP Release and Support Package level in which the error occurs.
Depending on the type of error, an SAP Note may also include:
· Workarounds
· Descriptions of how to correct repository objects in the ABAP workbench, known as correction instructions
· Links to Support Packages that solve the problem
You can access SAP Notes both from the SAP Service Marketplace and SAPNet - R/3 Frontend.
Caution: The Note Assistant can automatically implement only SAP Notes that have correction instructions.
Read the SAP Note carefully before you use the Note Assistant to implement it. The SAP Note can contain prerequisites, interactions, and references to postprocessing activities (making changes to a table, for example) that you must take into consideration when you implement it.
Technical Details on Correction Instructions Locate the document in its SAP Library structure
Validity
All correction instructions specify the releases and Support Package levels in which you can implement them. These release and Support Package levels are known as the validity range of the correction instructions.
For example, if Support Package 5 corrects and error in Release 4.6C, the validity range of the correction instructions is 4.6C Support Packages 1 -4.
An SAP Note can also determine that correction instructions are not allowed to be implemented if a certain software component (an add-on, for example) exists in the system. This is the case, for example, when a correction changes a program part that is required by another software component in an unaltered form.
If an exception such as this was defined, it is displayed in the header area of the correction instructions, under Invalid for .
The Note Assistant automatically checks the validity and only implements a correction instruction if the system status is within the validity range specified.
Prerequisites
In some cases, you can only implement correction instructions if certain other correction instructions have already been implemented. This is due to related changes made to the same part of the source code, or semantic dependencies.
These dependencies are described in the header area of the correction instructions. These dependencies (prerequisites) mean that you need to implement a sequence of SAP Notes, and not just one SAP Note.
Depending on the type of error, an SAP Note may also include:
· Workarounds
· Descriptions of how to correct repository objects in the ABAP workbench, known as correction instructions
· Links to Support Packages that solve the problem
You can access SAP Notes both from the SAP Service Marketplace and SAPNet - R/3 Frontend.
Caution: The Note Assistant can automatically implement only SAP Notes that have correction instructions.
Read the SAP Note carefully before you use the Note Assistant to implement it. The SAP Note can contain prerequisites, interactions, and references to postprocessing activities (making changes to a table, for example) that you must take into consideration when you implement it.
Technical Details on Correction Instructions Locate the document in its SAP Library structure
Validity
All correction instructions specify the releases and Support Package levels in which you can implement them. These release and Support Package levels are known as the validity range of the correction instructions.
For example, if Support Package 5 corrects and error in Release 4.6C, the validity range of the correction instructions is 4.6C Support Packages 1 -4.
An SAP Note can also determine that correction instructions are not allowed to be implemented if a certain software component (an add-on, for example) exists in the system. This is the case, for example, when a correction changes a program part that is required by another software component in an unaltered form.
If an exception such as this was defined, it is displayed in the header area of the correction instructions, under Invalid for .
The Note Assistant automatically checks the validity and only implements a correction instruction if the system status is within the validity range specified.
Prerequisites
In some cases, you can only implement correction instructions if certain other correction instructions have already been implemented. This is due to related changes made to the same part of the source code, or semantic dependencies.
These dependencies are described in the header area of the correction instructions. These dependencies (prerequisites) mean that you need to implement a sequence of SAP Notes, and not just one SAP Note.
Subscribe to:
Posts (Atom)